Table of Contents
Advertisement
Available languages
Available languages
Advertisement
Table of Contents

Summary of Contents for salling 10100956
- Page 1 INSTRUCTION MANUAL ICE MAKER 10100956...
-
Page 2: Generelle Sikkerhedsforanstaltninger
INTRODUKTION Mange tak fordi du har valgt et produkt fra Salling. Dermed har du erhvervet et kvalitetsprodukt som opfylder alle gældende krav til præstation og sikkerhedsstandarder i EU. For at sikre en korrekt behandling og en lang levetid anbefaler vi, at du overholder nedenstående anvisninger. - Page 3 den altid holdes under opsyn. • Børn må ikke lege med produktet. • Produktet kan indeholde skarpe dele og bør derfor opbevares utilgængeligt for børn. • Brug kun tilbehør, der følger med produktet eller er anbefalet af producenten. • Produktet må ikke bruges af personer med nedsat følsomhed, fysiske eller mentale handicap, eller personer, som ikke er i stand til at betjene produktet, medmindre de overvåges eller instrueres i brugen af en person, som er ansvarlig for deres sikkerhed.
-
Page 4: Bortskaffelse Af Produktet
BORTSKAFFELSE AF PRODUKTET Brugte produkter må ikke smides i husholdningsaffaldet. Iht. lovforskrifterne skal det udtjente produkt bortskaffes på ordentlig vis. Derved genanvendes de brugbare materialer, og miljøet skånes. Nærmere informationer fås hos den ansvarlige kommunale myndighed eller det lokale bortskaffelsesfirma. Produktet er forsynet med følgende logo:... - Page 5 VIGTIGE MEDDELELSER Følg altid grundlæggende sikkerhedsforholdsregler for at reducere faren for brand, elektrisk stød og/eller personskade, når du bruger elektriske apparater, herunder: 1. Læs alle anvisninger, før du bruger ismaskinen. 2. Fjern al emballagen, og tjek omhyggeligt din ismaskine for at sikre, at den er i god stand, og at den samt ledningen og stikket ikke er beskadiget.
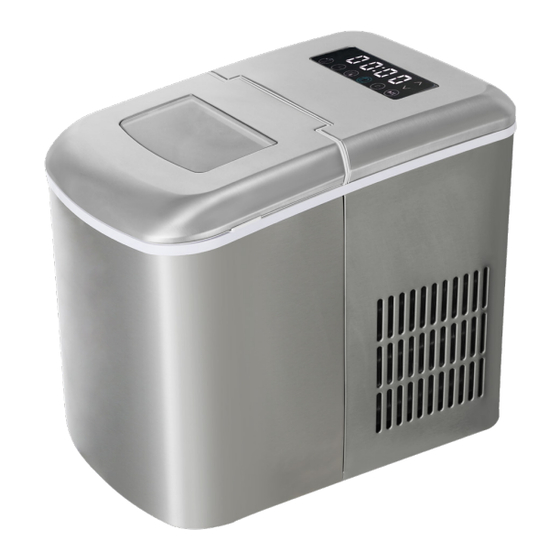
- Page 6 BESKRIVELSE 1. Bagkabinet 9. Vandbeholder 2. Bagerste metaldæksel 10. Filterskærm 3. Vandbakke 11. Afløbsprop 4. Fordamper 12. Kompressor 5. Isskovl 13. Ledning 6. Sensor til fuld beholder til isterninger 14. Touchpanel 7. Forreste metaldæksel 15. Gennemsigtigt låg 8. Opsamlingsbakke til isterninger FUNKTION •...
- Page 7 væggen skal være mindst 150 mm for at sikre tilstrækkelig ventilation. Hold apparatet væk fra ovne, radiatorer og andre varmekilder. 4. Lad apparatet stå med åbent topdæksel i mindst to timer, før du bruger apparatet første gang. 5. Kontrollér, at spændingen i elnettet svarer til spændingen på apparatets typeplade. 6.
- Page 8 Strøm. Lyser hvidt Forudindstilling. Lyser blåt under brug, hvidt i standbytilstand og blinker blåt i standbytilstand Timer. Lyser blåt under brug, hvidt i standbytilstand og blinker blåt i standbytilstand Ekstra tid. Lyser hvidt under brug. Er slukket i standbytilstand Termisk reduktion af tid. Lyser hvidt under brug.
- Page 9 blåt. Ikonet for strøm lyser hvidt, og ikonet for tid lyser hvidt. Ikonet for tid viser tiden, der nedtælles fra 05:00 til 00:00. Rengøringsprogrammet afsluttet. Apparatet bipper fem gange og kan betjenes. 3.4 Forudindstilling: Tryk på ikonet for forudindstilling , når apparatet går i standbytilstand, for at aktivere tilstanden for forudindstilling.
- Page 10 5. Timer for rengøringsprogram: Tryk på ikonet for timer for at aktivere timertilstanden, når apparatet går i standbytilstand. Ikonet for timer blinker blåt. Store isterninger er standardtilstanden for frysning af isterninger. Tryk på ikonet for rengøringsprogrammet for at aktivere timertilstanden for rengøringsprogrammet. Standardvisningen for ikonet er 03:00 (3 minutter).
-
Page 11: Rengøring Og Pleje
Bemærk: Der er et maksimumsmærke, MAX, i beholderen. Vandet må ikke overstige MAX- mærket. Hvis vandet overstiger MAX-mærket, skal du åbne afløbsproppen i bunden, lukke det overskydende vand ud og lægge det gennemsigtige dæksel på igen. Trin 2 Slut til strømforsyningen. Tryk på touchscreenen. Tænd/sluk-knappen lyser. Tryk på tænd/ sluk-knappen for at aktivere standbytilstanden for apparatet. - Page 12 kabinettet. Genstart derefter apparatet. Kontrollér, om vandbeholderen er tom, når is- skovlen ikke kan tømme kurven med is. Er dette ikke tilfældet skal du forsigtigt skubbe til isskovlen med en finger og trykke på knappen Power for at genstarte. PROBLEM MULIG ÅRSAG FORESLÅET LØSNING Kompressoren kører...
- Page 13 6. Børn skal være under opsyn for at sikre, at de ikke leger med apparatet. 7. Sænk ikke apparatet ned i vand. SPECIFIKATIONER Artikelnr.: 10100956 Spænding: 220-240V / 50-60Hz Effektforbrug: 120 Watt Daglig kapacitet: 15 kg/24 timer Rumindhold: 600 g Rumindhold af vandbeholder: 2,1 l Nettovægt: 9,3 kg...
-
Page 14: General Safety Instructions
INTRODUCTION Thank you for choosing a product from Epiq. You have acquired a quality product which meets all applicable performance and safety standards in the EU. In order to ensure proper treatment and a long product life, we recommend that you comply with the instructions below. -
Page 15: Product Disposal
out of reach of children. • Only use the accessories that come with the product or that are recommended by the manufacturer. • The product must not be used by people with reduced sensitivity, physical or mental disability, or people who are not able to operate the product unless they are supervised or instructed by a person responsible for their safety. - Page 16 properly so that the materials can be recycled in an environmentally friendly manner. Further information is available from the responsible local authority or local disposal company. The product is equipped with the following logo:...
-
Page 17: Important Notices
IMPORTANT NOTICES When using an electrical appliance, basic safety precautions should always be followed to reduce the risk of fire, electric shock, and/or injury, including the following: 1. Read all instructions before using. 2. Remove all packing material and carefully check your ice maker to ensure it is in good condition and that there is no damage to the ice maker or power cord and plug. - Page 18 DESCRIPTION 1. Rear Housing 9. Water Tank 2. Rear Metal Cover 10. Filter Screen 3. Water Pan 11. Drain Plug 4. Evaporator 12. Compressor 5. Ice Shovel 13. Power Cord 6. Ice-Bin-Full Sensor 14. Touch Panel 7. Front Metal Cover 15.
-
Page 19: Control Panel Operation
the oven, radiator or other heat source. 4. Before using the machine for the first time, place the machine and leave the transparent cover open for at least two hours. 5. Make sure that the home voltage is consistent with the voltage indicated by the machine. - Page 20 Power icon, only white light on Preset function icon, blue light in working mode, white light in standby mode, blue light flashes in standby mode Timing function icon, blue light in working mode, white light in standby mode, blue light flashes in standby mode Extra time icon, white light in working state and no display in standby state Thermal reduction time icon, white...
- Page 21 the cleaning function icon once, and the blue light of the function icon flashes. Touch the power icon once, and the machine enters the cleaning mode. At this time, the blue light of the cleaning function icon is on, the white light of the power icon is on, and the white light of the time icon is on.
- Page 22 blue. The default ice mode is large ice. Touch the small ice function icon once to enter the small ice timing mode. The operation is the same as the large ice timing mode. 5. Timing cleaning function: when the machine enters the standby mode, touch the timing function icon to enter the timing function mode.
-
Page 23: Troubleshooting
OPERATING INSTRUCTIONS Step 1 Open the lid and take out the basket and add water to the reservoir. Note: There is a maximum scale MAX in the reservoir. The water should not exceed the MAX position. If the water exceeds the maximum scale MAX, you need to open the bottom drain plug, release the excess water, and cover with a transparent cover. - Page 24 may be removed by disconnecting the power cord and gently pushing the shovel to the rear of the cabinet and removing the ice chips, then restarting. 2. Please check if the water reservoir is flat when the ice shovel cannot remove the ice to ice basket.
- Page 25 6. Children should be supervised to ensure that they do not play with the appliance. 7. Do not immerse in water. SPECIFICATIONS Article No.: 10100956 Voltage: 220-240V / 50-60Hz Power Consumption: 120 Watt Daily Ice Output:15kg/24 hours Ice Storage Capacity:600g...
Need help?
Do you have a question about the 10100956 and is the answer not in the manual?
Questions and answers