
Summary of Contents for ERR Cruise Commander Lite
- Page 1 Cruise Commander Lite Instruction Manual The Electric Railroad Co. 939 Wood Duck Avenue Santa Clara, Ca. 95051 Revised: November 2006...
- Page 2 With the Cruise Commander product installed, the performance of the locomotive will be greatly enhanced. The Cruise Commander Lite has a lash-up feature, referred to as “nudge mode”. The mode allows a person to match the locomotives in a lash-up. Once the speeds are matched, they dynamically adjust with throttle position.
-
Page 3: Installation Overview
The switch is in the RUN position when it is open (with the slide lever over the unused terminals) and in Program when in the closed position. Locate a suitable mounting location for the Cruise Commander Lite. Be certain the shell will fit without obstruction. If you plan to add RailSounds, the Sound Commander, or keep the horn present in the low cost engines, be sure there is room for everything before mounting. - Page 4 It is wise to make a drawing of the original connections for later reference. The Cruise Commander Lite is slightly wider than the original circuit board; therefore it is necessary to remove the top mounting clips on the plastic mount.
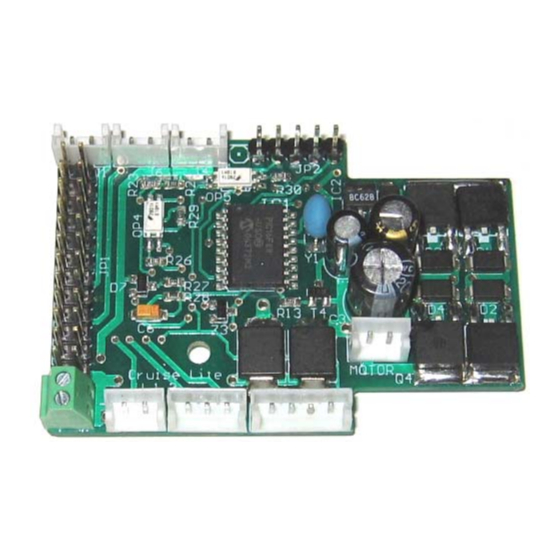
- Page 5 Installation, Mounting the Cruise Commander Lite • Using the double stick tape provided in the kit place a square piece on the back of the Cruise Commander Lite board as shown below. Attach the double stick tape as shown • Test fit, remove tape backing, and secure the Commander Lite as shown below.
- Page 6 Installation, Wiring Phase • Connections to the power are made first. Be sure to get the AC HOT and AC COMMON identified correctly. In this locomotive, the Brown and Gray were the power pickup wires, with the gray being the HOT, or 3 rail.
- Page 7 Installation, Optional Sound Control Disclaimer: This phase of the installation involves modification of the Sound Board. Done incorrectly, the board may be irreparably damaged. Proceed at your own risk! The Electric Railroad Company does not warranty this modification, and any damage done by making this modification is the sole responsibility of the user.
- Page 8 Installation, Finishing touches • The picture below shows the finished installation. A wire nut (not supplied) was used to connect a shortened “Antenna” connection to a wire hot melt glued in the shell roof. This allows the Shell to be removed easily, since the lighting can be removed by unplugging the 3-pin lamp connector.
-
Page 9: Operation
Note: The speed step selection is stored until changed, and survives power cycling. Motor Type Selection The Cruise Commander Lite requires you to set the motor type. Motors are classified as small or large. Selecting the wrong motor size won’t hurt anything, but operation is best when matched. - Page 10 “Nudge Mode” Operation The Cruise Commander Lite has a bit of “play” to allow locos to operate in a lash-up. At times the “play” is not optimal, so it is possible to match locos a bit closer with the “Nudge”...
- Page 11 Why is it necessary to set the Feature Code? The Cruise Commander Lite uses the serial data from the R2LC receiver to detect the throttle settings. This serial data signal is dependent on the feature code. If this is not...
- Page 12 Disclaimer Improper installation or configuration of the Cruise Commander Lite Board can cause overheating and fires! Since it is not possible to understand every installation, it is the consumer’s responsibility to verify proper operation of the upgrade to prevent malfunction.
Need help?
Do you have a question about the Cruise Commander Lite and is the answer not in the manual?
Questions and answers