
Related Manuals for Airthereal FL-100H

Summary of Contents for Airthereal FL-100H
- Page 1 FL-100H & FL-101S FLOWLESS WATER LEAK DETECTOR WITH WI-FI GATEWAY READ AND SAVE THESE INSTRUCTIONS...
-
Page 2: Table Of Contents
CONTENTS PRODUCT STRUCTURE DIAGRAM ················································02 SPECIFICATIONS ············································································04 SET UP AND OPERATION ······························································05 SET UP THE WATER LEAK DETECTOR ········································13 MODE CONTROL WITH AIRIA ························································19 SETTING MENU FOR THE GATEWAY ···········································22 SETTING FOR WATER LEAK DETECTOR ·····································23 BASIC SETTING AND INFORMATION SHARING ···························30 LOW BATTERY REMINDERS ··························································31... -
Page 3: Product Structure Diagram
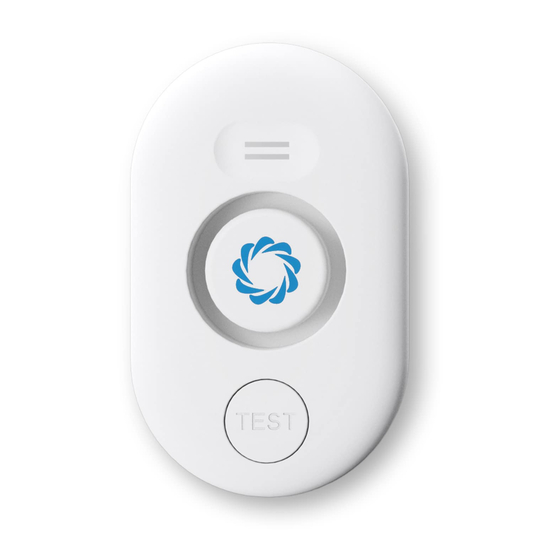
PRODUCT STRUCTURE DIAGRAM Wi-Fi Gateway Warning Light Power Indicator Tone Volume Setting... - Page 4 Test Key AAA Battery Airthereal Water Leak Detector sounds an alarm after detecting water drips or leaks. After connecting to Wi-Fi, it instantly sends alert notifications to the app wherever you are. 433 is a communication protocol with a frequency of 433MHz.
-
Page 5: Specifications
SPECIFICATIONS Wi-Fi Gateway Water Leak Detector Model: FL-101S Model: FL-100H Sensor Contact: Detect water drip Power Supply: AC 100-240V, 50-60Hz Sensor Contact: Detect water leak(0.5mm) Battery: 450mAh 3.7V Li-ion Test Button: Pause alarm / Adjust volume Alarm Volume: 120dB Batteries: 2 x AAA Battery... -
Page 6: Set Up And Operation
SET UP AND OPERATION Wi-Fi Gateway 1. Power: Power on / off (Battery powered). For AC power: The gateway will automatically turn on when connected to the power supply. (When powered on, the Gateway will beep and the warning light will flash once). - Page 7 4. Setting: Short press to adjust mode. Please refer to page 10 for the specific introduction of each mode. Mode Reaction Armed One beep sound Disarmed Two beeps sound Home Three beeps sound SOS/Alert Can’t set...
- Page 8 Checking the Water Leak Detector Step 1 Install the battery...
- Page 9 Step 2 Press the button [Test], and the detector will beep. Press again to pause the alarm. Note: If there is no beep, open the back cover to check whether the positive and negative directions of the battery are installed correctly. Press the button once.
- Page 10 Step 3 Adjust alarm volume by pressing and holding the test button for 3 seconds. Press and hold for 3s each time to adjust one level of volume. Long press the button 3s. 4 (DiDiDiDi-maximum sound) 3 (DiDiDi) 2 (DiDi) 1 (Di-mute)
- Page 11 Step 4 Test that the device can detect water. The detector will alarm if you drip some water on the sensor contacts or put it on a wet surface. Note: There are four detection sensors on the bottom of the device. Two detection sensors in parallel lines will immediately alarm when they detect water.
- Page 12 Step 5 Press the test button to stop the alarm. Remove the device from the water and dry the sensors to stop the alarm completely. The first alarm will last for 15 seconds. If the sensor alarm ends and there is still water, the sensor will continue to alarm every 15 seconds until dry or you press the test button to end.
- Page 13 Installing Your Device 1. Plug the gateway into a power outlet or use the battery supply. 2. Lay the water leak detector flat where you want to detect water leaks. Note: Keep the distance between the gateway and the detector less than 100m/328ft.
-
Page 14: Set Up The Water Leak Detector
SET UP THE WATER LEAK DETECTOR Preparation Before Connecting 1. Make sure your Wi-Fi router supports 2.4GHz (NOT 5GHz) and 802.11b/g/n bands. Note: Most 5GHz routers can also be set to 2.4GHz band or dual band. 2. Make sure the Wi-Fi name and password are correct. 3. - Page 15 Step 1 1. Connect your phone to the 2.4 GHz network your gateway will use. 2. Open AIRIA and tap the “+” icon in the top right corner. 3. Click Auto Scan, enter the finding page.
- Page 16 Step 2 Entering the Wi-Fi connection mode: Press and hold the “Volume” and “Alarm” buttons to enter the connection mode. The Warning Light will blink quickly. Make sure the gateway is powered on.
- Page 17 Step 3 1. Finding the gateway in the finding page, go to the next step. 2. Enter the password of your Wi-Fi network when prompted (same Wi-Fi network on which your smartphone is connected) and then click confirm. Important note: The alarm unit must be connected to a 2.4 GHz Wi-Fi network.
- Page 19 Step 4 Your device is now connected successfully. You can find the gateway in the device list.
-
Page 20: Mode Control With Airia
MODE CONTROL WITH AIRIA The above buttons are used to manage the system: Armed This Mode should be used when you go out and there is no one at home. (Detector will trigger the alarm regardless of any Zone Attribute.) - Page 21 Disarmed This Mode should be used when someone wants to cancel an alarm. (No Detector will trigger the alarm unless it is set to "SOS" Zone Attribute.) Home This Mode should be used when someone wants to stay home and feel safe. (Detectors set to active in “HOME ”...
- Page 22 Model Zone Attribute Gateway Detector Armed Normal/Home/SOS Trigger Send Alarm Notification Disarmed Normal/Home Not Trigger Alarm Trigger Send Alarm Notification Home Normal/SOS Trigger Send Alarm Notification Home Not Trigger Normal/Home/SOS Trigger Send Alarm (No leak Notification immediately trigger required) (No leak trigger required) Note: when the detectors are set to “SOS '' in the zone attribute, any mode will trigger the gateway and the App will send a notification to alert you.
-
Page 23: Setting Menu For The Gateway
SETTING MENU FOR THE GATEWAY Arm delay: Set the delay time of arming (delay reaction time when arming). Alarm volume: Adjust the siren volume. Alarm light: Turn on/off the warning light. Alarm time: Set the duration of the siren. Alarm tone type: Adjust the siren sound. Arm or disarm message push: Whether to receive the notifications from the App or not. -
Page 24: Setting For Water Leak Detector
SETTING FOR WATER LEAK DETECTOR Add or Re-add Water Leak Detector Step 1 1. To add accessories to your system, enter the AIRIA system and click on “Accessories”. 2. Then click on the symbol “+” at the top right of the screen. - Page 25 Step 2 To add additional detectors, simply trigger them by pressing the Test button. The detector connects the gateway When you perform one of the operations, the control panel will beep (after connection, press [Test] to cancel the alarm) and the accessories on the App will display “detector01 detector02 detector03”.
- Page 26 Disconnect The Water Detector 1. In the accessories system, select the detector you want to disconnect and slide left to cancel. 2. A factory reset can disconnect all the devices and restore the factory default settings.
- Page 27 Gateway Long press [ ],then it will beep 4 times, which means all the devices are disconnected. Zone Type Settings For Detectors In the accessories, click on the detector you wish to set up...
- Page 28 You can modify the name in the leaky area from the device name After closing, the detector can't trigger the gateway...
- Page 29 Setting zone attribute Normal: The detector is activated when the system is armed or home. SOS: The detector is activated regardless of any mode(armed, disarmed, or home). Home: The detector is activated when the system is armed, it will be inactive when the system is home.
- Page 30 Detector Turn On/Off Note: The detector will automatically turn on when the batteries are installed properly. Turn on: Press and hold the [Test] button for 10 seconds, it will make a short "beep" sound, indicating that the detector is turned on. (Suitable for restart after shutdown). Turn off: Press and hold the [Test] button for 10 seconds, it will make a long "beep"...
-
Page 31: Basic Setting And Information Sharing
BASIC SETTING AND INFORMATION SHARING Share Device: share information with other users. Create Group: create a discussion group to view the real-time situation. -
Page 32: Low Battery Reminders
LOW BATTERY REMINDERS Gateway When the gateway battery voltage is lower than 3.6V, the warning light will flash 3 times every 40 seconds and buzz three times. The App will also send a low battery reminder. Detector The detector will beep three times and send a low power signal to the gateway, gateway alarm. -
Page 33: Limited Warranty
LIMITED WARRANTY Airthereal warrants all Gateway and Detector for 1 year. For more information please visit www.airthereal.com/warranty. What’s covered? Defects due to faulty materials and/or workmanship of the product. What’s NOT covered? 1. Damage caused by the owner when attempting to fix or altering the product by himself or herself. - Page 34 This limited warranty is only effective for the original purchaser. It is non-transferable. How to request warranty services? To obtain the benefit of this warranty, please email support@airthereal.com. Our customer service team will address your issue as soon as possible!
- Page 35 Always here to help you www.airthereal.com Produced for: West Ryder Technology LLC 2330 Paseo Del Prado STE C304 Las Vegas, NV 89102 V 20220526...
Need help?
Do you have a question about the FL-100H and is the answer not in the manual?
Questions and answers