Advertisement
Quick Links
Instruction
Manual
Part # 3470 ver 2.0
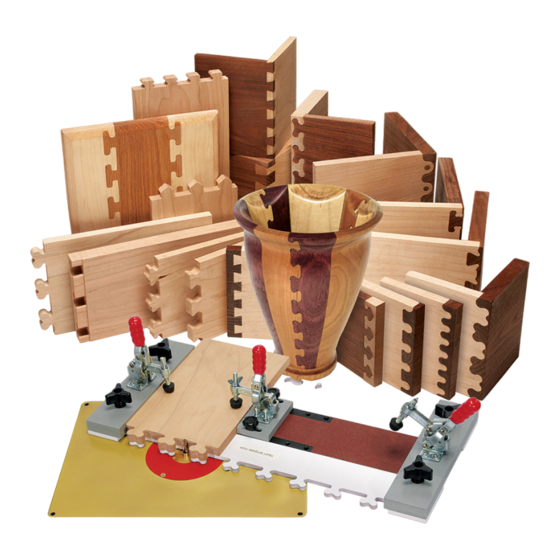
PRECISION JOINERY SYSTEM
Create joints like these with the
PRECISION JOINERY SYSTEM
Lolli-pop
Wave
Through
Heart Wave
Heart
Half Blind
Arrowhead
Large Key
© Copyright Fast Joint Precision Joinery System 8/2011. All images, copy, and graphics are copyrighted by law
and may not be copied, or reproduced without our express written consent.
P.O. Box 921487
P.O. Box 921487
1
Norcross GA, 30010
Norcross GA, 30010
B
PRECISION JOINERY SYSTEM
PRECISION JOINERY SYSTEM
Advertisement

Related Manuals for MLCS Fast-Joint

Summary of Contents for MLCS Fast-Joint
- Page 1 Instruction Manual Part # 3470 ver 2.0 PRECISION JOINERY SYSTEM Create joints like these with the PRECISION JOINERY SYSTEM Lolli-pop Wave Through Heart Wave Heart Half Blind Arrowhead Large Key © Copyright Fast Joint Precision Joinery System 8/2011. All images, copy, and graphics are copyrighted by law and may not be copied, or reproduced without our express written consent.
-
Page 2: Read And Follow All Safety Instructions
The hardest part about using the Fast-joint™ system is choosing which style template to use. With our Fast-joint™ precision joinery system you can choose and install templates in a matter of seconds, and once you have made your cut for one side, simply rotate the jig 180°... - Page 3 ™ precision joinery system Part # Part Description Quantity Part # Part Description Quantity Base Plate T-bolts Heart Templates 1 set Position Set-up Block Star Hole Through Knobs Template Alignment Blocks Nuts Toggle Clamps Panhead woodscrews Machine Head Screws Non-slip Sandpaper Strip 1”...
- Page 4 Step 4 - Squaring of Fast Joint Jig: Fig.2 In order for the Fast-Joint system to work properly, it is imperative that the left and right template alignment blocks are parallel to one another and square to the base plate.
- Page 5 Next, we will be using the MDF sub-plate (part #19) to align - parallel and square the right hand template align- Fig.4 ment block on the Fast-joint jig. Place the sub-plate ™ on top of the base plate between the template alignment blocks.
- Page 6 With both the left and right template alignment blocks fastened to the base plate, unlock the left toggle and re- Fig.10 move the MDF base plate. Your Fast-joint jig should ™ look like the photo below (See Fig. 8). Fig.8...
- Page 7 Temporarily clamp the MDF sub-plate and the right angle fence together with c-clamps (See Fig. 13). Fig.13 Your completed Fast-joint jig system and right angle ™ fence should look like the photograph shown below in Fig.
-
Page 8: Router Setup
Router Set-up Fig.18 Included with your Fast-joint system are three dif- ™ ferent size brass bushings that will fit into most router plates with a 1-1/4” opening with a rabbeted off-set of 1-3/8”. One bushing is marked “standard” (A), which is used with the 3/16”... - Page 9 When cutting your joints with the Fast-joint system, ™ to set the height of the bit. Using your Fast-joint system ™ make sure your stock is flat, and that the edge you will be with the Heart templates installed along with your stan- milling is straight.
- Page 10 Set-up For The Sides of the Box: Making The Cut: Part of what makes the Fast-joint so easy to use is the The first time you use each style of template, it is per- machined set-up block. This block allows you to easily fectly normal to cut into the template alignment blocks.
- Page 11 After the first cut is made, you should make multiple Your completed side pieces should resemble the photo- graph shown in fig. 27. passes to make sure all the material has been removed, working from the outer edge of the jig to the inside edge of your stock.
- Page 12 We start our cut approximately 1/4” in from the inside edge of the template alignment block. Make sure the router bit is not contacting the surface of the stock or any part of the Fast-joint jig before turning ™...
- Page 13 After the first cut is made, you should make multiple passes to make sure all the material has been removed, Fig.33a working from the outer edge of the jig to the inside edge of your stock. Your finished cut should resemble the pho- tograph shown below in Fig.
- Page 14 To loose of a fit may produce wobbling and a week joint. If satisfied with the fit of your joints, glue, clamp and finish your project. If your joint needs adjusting see page #32 "Fast-Joint Tips". Fig.34 Fig.36 Your completed front and back pieces should resemble the photograph shown below in fig.
- Page 15 Now that the right angle fence is secure, slide the ref- erence side of the stock against the template alignment block. Clamp the stock to the right angle fence using the two spring clamps that came with the Fast-joint system (See Fig. 39). Shop Notes: Set-up For The Front &...
- Page 16 To loose of a fit may produce wobbling and a week joint. If satisfied with the fit of your joints, glue, clamp Fig.42 and finish your project. If your joint needs adjusting see page #32 "Fast-Joint Tips". Fig.41 Set-up For The Front & The Back of Box recessed 1/4"...
- Page 17 To loose of a fit may produce wobbling and a week joint. If satisfied with the fit of your joints, glue, clamp and finish your project. If your joint needs adjusting see page #32 "Fast-Joint Tips". Fig.44 Set-up For The Female Side of The Joint: Now that the male side of our joint is complete we need to cut the female side of the joint.
- Page 18 #11 “Making The Cut”. The the female side of your stock Decorative Dental Moulding should resemble shown below in Fig. 47. Fig.47 The Fast-joint is capable of producing all types of dec- ™ orative types of molding. You can use either the male template or the female template for this type of molding.
- Page 19 Now that the right angle fence is secure, slide the ref- erence side of the stock against the template alignment block. Clamp the stock to the right angle fence using the two spring clamps that came with the Fast-joint system (See Fig. 52). Shop Notes: Shop Notes: An easy rule for adjusting the fit of a dovetail joint is;...
- Page 20 Fig. 55. Make sure the router bit is not contacting the surface of the stock or any part of the Fast-joint jig before turning on your router. Turn the router on. Firmly grasp the jig Fig.55 at both ends and slide the jig forward until the template contacts the bushing (See Fig.
- Page 21 Now that one end of the drawer is cut, you will now cut Shop Notes: the opposite end of the stock using the same reference Always remember to keep the reference mark you made mark. In order to do this, you will place the opposite end against the same template alignment block you started of the stock vertically on the other side of the jig, in front of the right angle fence, with the reference side against...
- Page 22 Make sure the router bit is not contacting the surface of the stock or any part of the Fast-joint jig before turning on your router. Turn the router on. Firmly grasp the jig at both ends and slide the jig forward until the template...
- Page 23 If your joint keeping your reference mark against the template align- needs adjusting see page #32 "Fast-Joint Tips". ment block, and following the same instructions outlined in "Cutting the tails" on page #22 for set-up. Once the stock is properly set-up and secure in the jig, make the cut (See Fig.
-
Page 24: Through Dovetails
Now that the right angle fence is secure, slide the ref- erence side of the stock against the template alignment block. Clamp the stock to the right angle fence using the two spring clamps that came with the Fast-joint system ™... - Page 25 Make sure the router bit is not contacting the surface of the stock or any part of the Fast-joint jig before turning on your router. Turn the router on. Firmly grasp the jig at both ends and slide the jig forward until the template contacts the bushing (See Fig.
- Page 26 Clamp the stock to the right angle fence using the Now that the front and back of our box are complete we two spring clamps that came with the Fast-joint system need to cut the sides. Start by removing the dovetail bit (See Fig.
- Page 27 Make sure the router bit is not contacting the surface of Your completed tail cut should resemble the photograph the stock or any part of the Fast-joint jig before turning shown below in fig. 78. on your router. Turn the router on. Firmly grasp the jig at both ends and slide the jig forward until the template contacts the bushing (See Fig.
- Page 28 To loose of a fit may produce wobbling and a week joint. If satisfied with the fit of your joints, glue, clamp and finish your project. If your joint needs adjusting see page #32 "Fast-Joint Tips". P.O. Box 921487 Norcross GA, 30010...
- Page 29 Equal Distance Distance Short off-set Place your stock to be cut flat on the Fast-joint jig up ™ against a template alignment block. Slide your stock away from the template alignment block until the Keys are centered underneath your stock and clamp the stock Shop Notes: in place with toggle(s).
- Page 30 Shop Notes: P.O. Box 921487 Norcross GA, 30010 PRECISION JOINERY SYSTEM...
-
Page 31: Project Notes
Project Notes: P.O. Box 921487 Norcross GA, 30010 PRECISION JOINERY SYSTEM... - Page 32 To fix this, loosen the rubber feet on the toggle Tools & Accessories clamps just enough to produce a light snap when en- For technical issues or questions please call toll free at: gaged on to your stock. The Fast-joint platform should ™ 1-888-512-9069 sit flat on your table top surface at all times.
Need help?
Do you have a question about the Fast-Joint and is the answer not in the manual?
Questions and answers
purchased Fast-Joint Precision System, and attempted to assemble it. As per the instruction manual, it was to include a MDF sub-plate. It was not included in the box. Can you send me one, or at least give me dimensions so I can make one? Your system will not accept jpg image