Table of Contents
Advertisement
Advertisement
Table of Contents

Related Manuals for Frontier Labs BAR-LT

Summary of Contents for Frontier Labs BAR-LT
- Page 1 BAR-LT Bioacoustic Audio Recorder - Long Term User Guide Version 1.2...
- Page 2 © 2017 Frontier Labs All Rights Reserved...
-
Page 3: Table Of Contents
1 TABLE OF CONTENTS Features ..........................1 A message from Frontier Labs ....................1 Overview..........................2 Getting to know your recorder (outside) ................2 Getting to know your recorder (inside) ................3 Recommended operating procedure ..................4 Menus ............................ 6 Microphones ........................ - Page 4 Tips and Troubleshooting ....................18 Diagnostic Log files ......................18 Recording time vs Sample Rate ................... 18 SD CARD Size vs Recording Duration ................... 18 Disabling Windows cache settings ..................19 No GPS lock ......................... 20 Showing The incorrect time ....................21 Incorrect Dawn/Dusk times ....................
-
Page 5: Features
Thank you for using our Bioacoustic Audio Recorder – Long Term (BAR-LT). We designed the BAR-LT with the goal of creating the best possible bioacoustic recorder for scientific field research. To that end we created a recorder that is simple to use and easy to deploy with best in class sound quality so you can hear quiet and distant calls, and we made it strong and reliable with the smallest size and weight possible so it's easier to carry in a backpack. -
Page 6: Overview
OVERVIEW GETTING TO KNOW YOUR RECORDER (OUTSIDE) FRONT Microphone B input: Microphone A input: Connect your microphone or Connect your microphone or extension cable here. Make extension cable here. Make sure you see the mic-detect sure you see the mic-detect icon appear on the home icon appear on the home screen. -
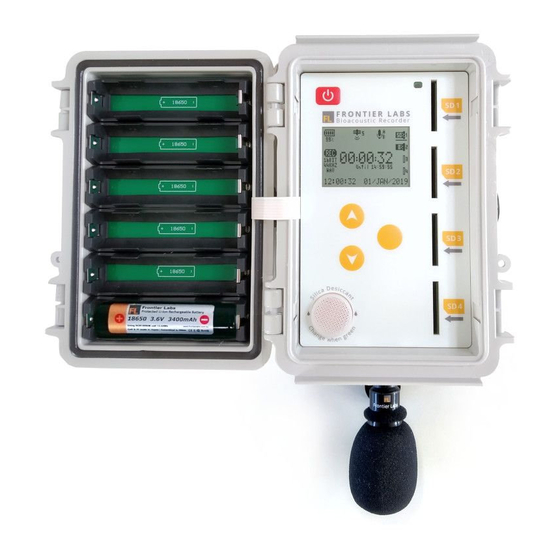
Page 7: Getting To Know Your Recorder (Inside)
GETTING TO KNOW YOUR RECORDER (INSIDE) Power button: Light sensor: Press this to turn the recorder ON or OFF. This is used to detect if the lid is open or closed. If you Powering off the recorder stops all future use the recorder in a very dark environment, it might recordings until it is powered on again. -
Page 8: Recommended Operating Procedure
We recommend using San Disk ultra, class 10 or higher. We have found them to have the best power consumption and reliability in the field. Check your recording schedule on the BAR-LT or using the Scheduler program on your PC. ( See 6.0 Recording Schedule. ) •... - Page 9 Operating procedure: 1. Insert the SD cards into the SD card slots of the BAR-LT. 2. Insert up to 6 batteries in the battery holders. 3. Turn the recorder on with the Power button. • As the recorder turns on, it shows the serial number and firmware version on the screen.
-
Page 10: Menus
MENUS Press the ENTER button from the home screen to access the Main Menu and use the UP/DOWN buttons to select different menu items. - MENU - Recording Schedule > Manual Recording > Settings > Utilities > < Back Menu Item Description Recording Schedule >... -
Page 11: Microphones
The recorder can detect which type of Frontier Labs microphone is attached and adjust its internal gain so that the total system gain stays the same even when you change to a microphone with a different pre-amp. -
Page 12: Microphone Calibration
2. Remove the foam windshield from the microphone by cutting the zip tie around the base. 3. Plug your microphone into the BAR-LT and insert the end into the microphone adapter. 4. Turn the BAR-LT on and navigate to Menu Utilities Mic Calibration. -
Page 13: Recording Schedule
Recording times and settings are controlled by the recording schedule which is stored in memory on the BAR-LT. The schedule allows you to program recordings to start at a particular time and date with repeating periods throughout the day and over multiple days. In this way you can maximise your deployment time by only recording the times you are interested in or sub-sampling throughout the day and/or alternating days. -
Page 14: Sample Rates
PROGRAMMING THE SCHEDULE ON A COMPUTER To create a schedule on your computer you must first install the Scheduler GUI program which can be downloaded from the Frontier Labs website: https://frontierlabs.com.au/software The Scheduler GUI program allows you to create and edit recording schedules and view the... -
Page 15: Copying A New Recording Schedule Onto The Recorder
For more information on creating schedules please see the Scheduler User Manual which is included with the Scheduler software. 6.2.1 COPYING A NEW RECORDING SCHEDULE ONTO THE RECORDER To use a new schedule file created in the Scheduler software you must first copy it onto the internal memory of the recorder. -
Page 16: Programming The Schedule On The Recorder
PROGRAMMING THE SCHEDULE ON THE RECORDER 6.3.1 MAKING A NEW SCHEDULED RECORDING To create a new scheduled recording on the BAR-LT recorder: 1. Navigate to Main Menu Recording Schedule. 2. Use the UP/DOWN buttons to select + New entry then press ENTER. -
Page 17: Deleting A Scheduled Recording
6.3.3 DELETING A SCHEDULED RECORDING To delete a scheduled recording: 1. Navigate to Main Menu Recording Schedule. 2. Use the UP/DOWN buttons to select the schedule entry you wish to delete then press ENTER. 3. Use the UP/DOWN buttons to select Delete then press ENTER. EDIT ENTRY - Start 06:00 Start 01/01/19... -
Page 18: Configuring The Recorder
You can set the total signal gain of the recorder between 10 and 60dB. This figure takes into account the gain of the microphone. The BAR can detect what model of Frontier Labs microphone is attached and adjust its gain so that the total signal gain will stay the same even if you change to a microphone with a different pre-amp, see 5.0 Microphones. -
Page 19: Utilities
UTILITIES VIEWING THE STATUS OF THE SD MEMORY CARDS To view the status of the SD memory cards including the amount of used and free space: 1. Navigate to Main Menu Utilities SD Card. 2. Use the UP/DOWN buttons to select a specific card (1-4) for more information. FORMATTING SD MEMORY CARDS We strongly recommend formatting your SD memory cards each time you deploy your recorder and not just delete the files off them. -
Page 20: Gps Transect Mode
The GPS works best with a clear unobstructed view of a large area of the sky, if you are unable to get a fix and the number of visible satellites is low and/or the signal strength of each satellite is low then consider moving the recorder into a clearing until it gets a fix. This should only take a few minutes. -
Page 21: Viewing The Battery Voltage
VIEWING THE BATTERY VOLTAGE To view the voltage and percentage full of the internal or external batteries navigate to Main Menu Utilities Battery Status. The internal and external battery voltage will be displayed as Volts and % full. For external batteries, the recorder detects if it’s connected to a 6V or a 12V battery and adjusts its full/empty thresholds accordingly. -
Page 22: Tips And Troubleshooting
TIPS AND TROUBLESHOOTING DIAGNOSTIC LOG FILES The BAR generates a detailed diagnostic log file every time it is used. Each action that is performed is logged with a time and date stamp. Even if there is no SD memory card present the BAR will log a small amount to internal memory until an SD card is inserted and then dump the internal buffer to the log file. -
Page 23: Disabling Windows Cache Settings
The BAR-LT can hold up to 4 SD Cards for a total of 2TB of storage. When a card becomes full, or has an error, it automatically moves down to the next card and starts recording to it, until all the cards are full. -
Page 24: No Gps Lock
5. In the Device Properties window, click Change Settings 6. Click the Policies tab at the top of the window 7. Select the Quick Removal policy then click OK NO GPS LOCK If you are unable to get a GPS lock, then consider moving the recorder into a clearing and turning it OFF and then ON to restart the searching process. -
Page 25: Showing The Incorrect Time
If you are having trouble getting a fix, navigate to the Main Menu → Utilities GPS Info to view the GPS status, the number of visible satellites and a graph of their signal strength as a percentage out of 100%. A minimum of 3 GPS satellites are required to get a fix. -
Page 26: Silent Recordings
This can occur for the following reasons: • Past the End Date: Double check the start and end dates of the recordings are what you were expecting as well as the time and date on the home screen of the recorder as you may be past the end time and date of the last recording. - Page 27 © 2021 Frontier Labs All Rights Reserved...
Need help?
Do you have a question about the BAR-LT and is the answer not in the manual?
Questions and answers