
Summary of Contents for REALINN RL0023
- Page 1 REALINN RL0023 Module User Manual Service Mailbox server@realinn.cn realinn@126.com...
- Page 3 The information contained here is subject to change without notice If you have any question or concern about the operation of the scanner, please contact us at following Email: server@realinn.cn realinn@126.com It is recommended that you send us the product model and specific questions.
-
Page 4: Table Of Contents
Contents ........Technical Parameter ........Scanner Appearance ........Installation Method ........Scanning Tip ........Maintenance ........Optional Function Settings ........1.Restore Factory Setting ........2. Illuminator Setting ........3. Aiming Light Setting ........4. Scanning Mode ........5.Barcode Upload Speed Adjustment ........ -
Page 5: Technical Parameter
Technical Parameter Mfr P/N EP2300 Image sensor 640*48 CMOS Illumination White LED Interface Printing Contract ≥20% Minimum Reflectance Difference EAN-13 (13mil) 45mm~200mm(Size:31mm*7mm) PDF417 (6mil) 30mm~135mm(Size:14mm*7mm) Typical Decode Range Code39 (5mil) 40mm~120mm(Size:27mm*8mm) Data Matrix (10mil) 30mm~140mm(Size:5mm*5mm) QR Code (15mil) 30mm~200mm(Size:10mm*10mm Dimension(mm) 55.5(W)×50.5(D)×24(H) Working Voltage 5 VDC±5%... -
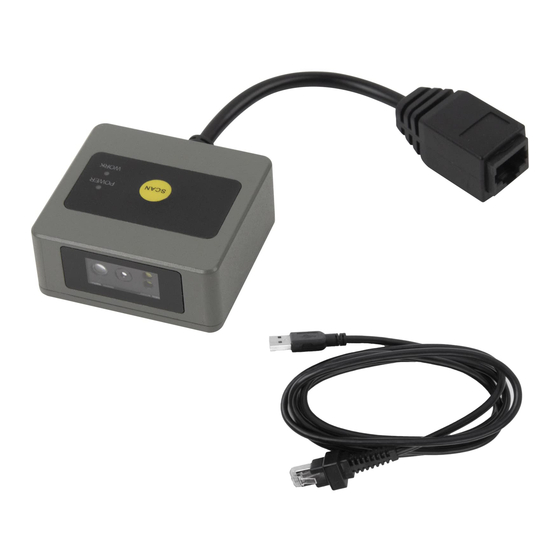
Page 6: Scanner Appearance
Packing list •Module*1 •USB Cable*1 •Quick Start Guide*1 Scanner Appearance Installation Method The scanner connect the computer via USB cable.Pressing the yellow button to turn on the scanner. Scanning Tip... -
Page 7: Maintenance
If the size of the barcode is small, please move the barcode close to the scanning window. If the size of the barcode is big, please move the barcode slightly away from the scanning window for correct reading.If the barcode is highly reflective (for example, the coated surface), you may need to tilt the barcode at an angle to successfully scan it. -
Page 8: Optional Function Settings
Optional Function settings The scan engine is able to read 1D and 2D barcodes from papers/labels or screens. Settings of the barcode scanner can be changed by scanning the setup barcodes in this user manual. 1. Restore Factory Setting All barcode readers have a factory default setting. Reading the setting barcode will restore all barcode reader property settings to the factory state. -
Page 9: Illuminator Setting
2. Illuminator Setting Normal Mode(default): the white LED illuminator will light up when scanning barcodes. Always On: the white LED illuminator will stay on after the scanner is turned on. Always Off: the white LED illuminator will never light up after the scanner is turned on. Normal Mode(default) Always On Always Off... -
Page 10: Scanning Mode
4. Scanning Mode 4.1 Manual Trigger Mode In this scanning mode, users need to manually press the yellow “scan”button to read barcodes. Manual Trigger Mode 4.2 Auto-sensing Mode Auto-sensing Mode 4.3 Continuous Scanning Mode Continuous Scanning Mode 5. Barcode Upload Speed Adjustment Users can change the barcode upload speed of the scanner through the following setting codes. -
Page 11: Reread Timeout
6. Reread Timeout Reread timeout can avoid rereading of same barcode in a given period of time. This feature is only applicable to Auto-sensing Mode and Continuous Scanning Mode . 500ms (default) 700ms 7. Scanner Version Open a notepad,put the cursor in the blank and scan the following barcode to check the version of barcode. -
Page 12: Voice Setting
8. Voice Setting 8.1 Decoding Beep Setting The scanner will beep for successful and unsuccessful decoding. Decoding Beep-On(default) Decoding Beep-Off High Volume(default) Low Volume 8.2 Beep Tone Setting Low Tone(default) Medium Tone High Tone... -
Page 13: Auto Power Off Setting
9. Auto Power Off Setting **The auto power off setting can be set up only when the scanner is under Manual Trigger Mode . Auto power off setting allows the scanner to automatically enter the sleep mode if no operation or communication is performed for a time period (user programmable). - Page 14 Save setting Auto power off setting - On Auto power off setting - Off...
-
Page 15: Communication Interface Setting
10. Communication Interface Setting 10.1 USB Interface When the scanner is connected to the USB port on the host device, you can enable the USB HID keyboard function by scanning the barcode below. Then the transmission of the scanner will be simulated as USB keyboard input. It works on a plug-and-play basis and no drivers required. - Page 16 ] ^] ** To replace the GS with character “ Ç “ should turn on the virtual keyboard function first. “Function key - On”>“ Enable virtual keyboard”>”Ç” Enable virtual keyboard Ç Disable virtual keyboard...
-
Page 17: Case Setting
12. Case Setting No converse All uppercase All lowercase Uppercase & Lowercase Swap 13. End Character Setting The end character is used to mark the end of a complete data message. The suffix of end character must be the last content of a data transmit, then there will be no additional data. -
Page 18: Identify Barcode Type(Code Id)
14. Identify Barcode Type ( Code ID ) This is to identify what type of the barcode is, follow the below steps to confirm: Scan code "Add Code ID " below, then scan your goal barcode, there will be a character BEFORE the barcode you scanned, and this character states your Barcode Type. -
Page 19: Aim Id Setting
15. AIM ID Setting AIM (Automatic Identification Manufacturers) ID defines symbology identifier. If AIM ID prefix/suffix is enabled, the scanner will add the corresponding AIM ID before or after the scanned data after decoding. Add AIM ID-Prefix Add AIM ID-Suffix Disable AIM ID Barcode Type Barcode Type... -
Page 20: Keyboard Language Setting
Keyboard Language Setting Different national languages correspond to the keyboard keys arrangement, symbols, etc. are different, the barcode scanner can be virtual according to the actual needs of different countries keyboard. English Italian Spanish French Portuguese(Portugal) Portuguese(Portugal) Japanese... -
Page 21: Bar Code Parameter Setting
17. Bar Code Parameter Setting Each type of barcode has its own unique properties,Through the setting code of this chapter, you can adjust the barcode reader to adapt to these property changes.The fewer types of barcodes that are enabled to enable reading, the faster the barcode reads. - Page 22 Start & Stop digits - On Start & Stop digits - Off* Code 39 Code 39 - On* Code 39 - Off Code 39 Full ASCII Code 39 Full ASCII - On Code 39 Full ASCII - Off* Note: If the decoding data of the Code 39 barcode is longer than the printed data, please scan the setting code “Code 32 - Off “...
- Page 23 Matrix 2 Of 5 Matrix 2 Of 5 - On* Matrix 2 Of 5 - Off Code 93 Code 93 - On* Code 93 - Off Code 11 Code 11 - On Code 11 - Off* Code 128 Code 128 - On* Code 128 - Off GS1 128 GS1 128 - On*...
- Page 24 UPCA Check Digit/Last Digit - On* UPCA Check Digit/Last Digit - Off UPCA to EAN 13 UPCA to EAN 13 - On UPCA to EAN 13 - Off* UPC-E UPC E - On* UPC E - Off UPCE Check Digit UPCE Check Digit/Last Digit - Off* UPCE Check Digit/Last Digit - On UPCE To UPCA...
- Page 25 EAN/JAN 13 - On* EAN/JAN 13 - Off EAN13 To ISBN EAN13 To ISBN - On EAN13 To ISBN - Off* UPC/EAN/JAN Additional Digits UPC/EAN/JAN Additional Digits - On UPC/EAN/JAN Additional Digits - Off* GS1 DataBar GS1 DataBar - On* GS1 DataBar - Off GS1 DataBar Limited GS1 DataBar Limited - Off...
- Page 26 PDF417 PDF417 - On* PDF417 - Off Micro PDF417 Micro PDF417 - On* Micro PDF417 - Off QR - On* QR - Off Micro QR Micro QR - On* Micro QR - Off Data Matrix Data Matrix - On* Data Matrix - Off Aztec Aztec - On* Aztec - Off...
-
Page 27: Insert Prfix & Suffix
18. Insert Prefix & Suffix Users can add characters before or after a specific type of barcode, for example, add the character "~" before or after the Code 39 barcodes. It also supports adding characters before or after all types of barcodes. For barcode type codes, please refer to "Barcode Type Table". - Page 28 18.2 Insert Suffix Show Customize Suffix Hide Customize Suffix Cancel Customize Suffix Setting Customize Suffix For example, add the character "~" as a suffix to all types of barcodes, Step 1: Scan setting code “ Customize Suffix “ Step 2: Scan setting code “9” “9” , refer to the “Barcode Type Table” and “Parameter Code Table”.
- Page 30 Save setting Barcode Type Table Type Type All barcode type GS1 DataBar Expanded Codabar Interleaved 2 of 5 Code 128,GS1 128 Matrix 2 of 5 Code32 Industrial 2 of 5 Code93 UPC-A Code39 UPC-E Code11 Data Matrix EAN-13, ISBN PDF417,Micro PDF417 EAN-8 QR Code,Micro QR Code GS1 DataBar...
-
Page 31: Delete Character
19. Delete Character 19.1 Delete Characters In Front Of Barcodes For example, delete 1 character in front of barcode “123456”, reserve 5 digits . After setting, the decoded data should be “23456”. Step 1: Scan the setting code”Number of reserved digits setting-1 ” Number of reserved digits setting-1 Step 2: To reserve 5 digits(delete 1 digit infront of barcodes),scan the setting code “5”, refer to the “Parameter Code Table”. - Page 32 Step 2: To reserve 5 digits(delete 1 digit after barcodes),scan the setting code “5”, refer to the “Parameter Code Table”. Step 3: Scan the setting code “Save Setting”. Save Setting Step 4: Scan the setting code “Show Decoding Date-1” Show Decoding Date-1 19.3 Delete Characters Before &...
- Page 33 Step 5: Scan parameter code “ 1”. Refer to the “Parameter Code Table”. Step 6: Scan setting code “Save Setting”. Save Setting Step 7: Scan setting code “Show the characters in the middle”. Show the characters in the middle ** Scan setting code“Original decoded barcode output”to cancel settings. Original decoded barcode output Parameter Code Table...
- Page 34 Save Setting...
-
Page 35: Ascii Table
ASCII Table Character NUL (NULL) SOH (Start Of Headling) STX (Start Of Text) ETX (End Of Text) EOT (End Of Transmission) ENQ (Enquiry) ACK (Acknowledge) BEL (Bell) BS (Backspace) HT (Horizontal Tab) LF/NL(Line Feed/New Line) VT (Vertical Tab) FF/NP (Form Feed/New Page) CR (Carriage Return) SO (Shift Out) SI (Shift In) - Page 36 DC4 (Device Control 4) NAK (Negative Acknowledge) SYN (Synchronous Idle) ETB (End of Transmission Block) CAN (Cancel) EM (End of Medium) SUB (Substitute) ESC (Escape) FS (File Separator) GS (Group Separator) RS (Record Separator) US (Unit Separator) (Space) " &...
- Page 37 < >...
- Page 40 DEL (Delete)
Need help?
Do you have a question about the RL0023 and is the answer not in the manual?
Questions and answers