
Summary of Contents for anko HLT-700
- Page 1 HLT-700 MULTIPURPOSE FILLING & FORMING MACHINE OPERATION MANUAL REF:080722 ANKO-OME-0005(A/0)
-
Page 2: Table Of Contents
A. S ....................56 TUFFING NJECTION YSTEM B. F : ....................58 ORMING YSTEM C. G & D : ................60 EARBOX OUGH XTRUSION YSTEM 16.BASIC RECIPE..............錯誤! 尚未定義書籤。 ................... 錯誤! 尚未定義書籤。 OUGH ..................錯誤! 尚未定義書籤。 TUFFING Stuffing Precautions ................. 錯誤 尚未定義書籤。 ANKO-OME-0005(A1) - Page 3 Sample recipe ................... 錯誤 尚未定義書籤。 17. HLT SERIES FORMING MOLD CHART ........錯誤! 尚未定義書籤。 18. HLT-700 INVERTER (VFD-B) SETTING STEP ...... 錯誤! 尚未定義書籤。 Table of Figures ..................7 IGURE TUFFING NJECTION YSTEM ......................8 IGURE LECTRIC ..................9 IGURE OUGH...
-
Page 4: Precaution
Our company will have no responsibility on any damage or accident caused by modify, change, add extra equipment or adjustor our machine without ANKO-OME-0005(A1) -
Page 5: B Check
D Preliminary cleaning The machine requires preliminary cleaning. This particular applies to the parts which come into contact with the products. ANKO FOOD MACHINE CO., LTD. carries out reliminary cleanings for these materials after making a test dough. The worm screw and the inside of the dough sheathing are then greased with protective oil. -
Page 6: Introduction
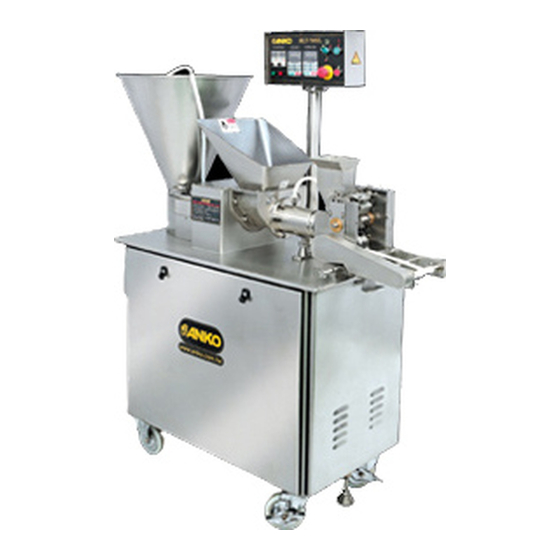
The HLT-700 allows independent control of the stuffing, pastry wrapper, and conveyor belt, which can produce a greater variety of products. Food products the HLT-700 can make include dumplings, egg rolls, noodles, samosa, curry puff pastries, and etc. Various stuffing can be used such as beef, pork, seafood, and vegetable. - Page 7 2. Dimensions ANKO-OME-0005(A1)
-
Page 8: Machine Overview
11. WHEELS 5. GEAR BOX 12. REFLECTION MIRROR 6. FINISHED PRODUCT SLIDE 13. STUFFING STOPPER 7. CONTROL PANEL (IN TOOLING BOX) 14. FAN COVER 15. MAIN POWER LIGHT 16. WATER INDICATOR LIGHT 17. WATER COOLING SYSTEM 4. SPECIFICATION & FUNCTION ANKO-OME-0005(A1) -
Page 9: Specification & Function
Machine parts in contact with dough material are coated with Teflon, making it easy to clean. The HLT-700 allows continuous variable speed adjustment of several systems. The maximum speed is limited to 60 Hz. For example, if the speed is adjusted to 50 Hz, production capacity will decrease by one-sixth (1/6). -
Page 10: Figures And Diagrams
3. COUPLING FOR STUFFING 11. FIXTURE FOR STUFFING PROPELLER SCRAPER 4. STUFFING PROPELLER 12. STUFFING STOPPER 5. STUFFING HOPPER 13. AXIS OF STUFFING PUMP 6. ROTOR COVER PLATE 14. COPPER BUSHING 7. ROTOR 15. BASE PLATE OF STUFFING PUMP 8. BLADE (3) ANKO-OME-0005(A1) -
Page 11: Figure 2 Electric Box
Figure 2 Electric Box 1. Non-Fuse Breaker (NFB) 2. Inverter 3. Relay 250V/3A 4. Electric magnetic switch 5. Temperature setter 6. Transformer 1.5A 7. Overload relay 8. Extending cable of inverter ※If machine uses 220V, use 250MA Transformer ANKO-OME-0005(A1) -
Page 12: Figure 3 Dough Extrusion System
Figure 3 Dough Extrusion System 1. DOUGH FEED CHAMBER 2. DOUGH HOPPER 3. DOUGH PROPELLER 4. AUXILIARY PROPELLER 5. LID FOR AUXILIARY PROPELLER 6. DOUGH SHEATH 7. PROPELLER SUPPORT 8. PROPELLER SUPPORT NUT 9. DOUGH EXTRUSION NOZZLE 10. ADJUSTMENT NUT FOR DOUGH THICKNESS ANKO-OME-0005(A1) -
Page 13: Figure 4 Forming Mold System
FLOUR DUSTING PIVOT FOR FORMING AP-HT3FHC7003 4-7 AP-HT3FMP7001 HOPPER MOLD SET HEIGHT ADJUSTMENT NUT AP-HT3FSS7001 4-8 ROLLER AP-HT3FRL7008 FOR FORMING MOLD 4-4 SIDE COVER AP-HT3FSC7002 4-9 FORMING MOLD AP-HT3FFHD4-1 FORMING MOLD SUPPORTING SHAFT AP-HT3FUC7005 4-10 AP-HT3FMS7001 SCRAPER OF FORMING MOLD ANKO-OME-0005(A1) - Page 14 ANKO-OME-0005(A1)
-
Page 15: Figure 5 Mini Conveyer Of Forming Mold
5-1 FRONT AXIS AP-HT6CVF7005 AP-HT6CVM7001 SHAFT 5-2 LEFT PLATE AP-HT6CVL7001 5-8 BEARING BASE AP-HT6CVB7001 5-3 RIGHT PLATE AP-HT6CVR7001 5-9 BEARING 6002 DDU P-BR6002D FRONT SUPPORTING AP-HT6CVG7001 5-10 CHAIN WHEEL AP-HT6CVT7001 SHAFT SUPPORTING AP-HT6CVH7001 5-11 TENSION ADJUSTOR P-SNHM6 SHAFT 5-6 BELT P-PUE55X465 ANKO-OME-0005(A1) -
Page 16: Figure 6 Adjustment For Unsuficient Tension On Belt
D or back the front axis at C to enlarge the gap. 3.If 1 and 2 are in good condition, it may be dough dreg stuck at C, please clean with air compressor to blow it away. ANKO-OME-0005(A1) -
Page 17: Assembly
If it does not, set it again. 4 Set the axis of stuffing pump evenly on the copper bushing and be sure its protrusion is facing down. The axis should be able to turn and slide inside. ANKO-OME-0005(A1) - Page 18 Turn the rotor to insure the blades turn and slide properly. 8 Place the setted rotor on the axis of stuffing pump. The rotor should be turn and slide properly inside. 8-a. Correct installation. 8-b. Incorrect installation. ANKO-OME-0005(A1)
- Page 19 Install the stuffing stopper and tighten it.. Stuffing stopper 12 Insert auxiliary propeller (Fig. 3-4) into dough hopper (Fig. 3-2) and cover with the lid (Fig. 3-5). ANKO-OME-0005(A1)
- Page 20 15 Sleeve with dough sheath (Fig. 3-6) and be sure water outlet is facing up and inlet is facing left.. Then turn the dough sheath to the left slightly and use “T” wrench to fix 3 acorn nuts. 16 Insert silicon pipes on water outlet and inlet. ANKO-OME-0005(A1)
- Page 21 18 Screw on and tighten propeller support nut clockwisely. 19 Insert dough extrusion nozzle (Fig. 3-9). 20 Screw on adjusting nut (Fig. 3-10) (Do not need to tighten). Screw on loosely will result thicker pastry wrapper screw on tightly will result thinner pastry wrapper. ANKO-OME-0005(A1)
- Page 22 Flour basket 24 Remove machine front cover, remove the lid of water tank, use a water sucker to pump water into the cooler tank until the water indicator light is off. (Power on to check). (About 3000ml water) Water sucker ANKO-OME-0005(A1)
-
Page 23: Disassembly
(1-a), and set the key on the transmitting shaft to the opening (1-b). 2. Pull the coupling backward to separate with the transmitting shaft of forming mold. 3. Pull out the set fixture bolt and remove the forming mold. 4. Remove out the forming mold with both hands. ANKO-OME-0005(A1) - Page 24 Then remove it. 7. Use #90-95 hook wrench to loosen the propeller support nut counter clockwisely then remove it. 8. Start the dough extrusion system again and use the remaining dough to push out the propeller support. Then remove ANKO-OME-0005(A1)
- Page 25 9. Pull out the cooling water connecting pipe. 10. Use “ T ” wrench to loosen the three acorn nuts. 11. Rotate the dough sheath clockwise, then remove it. 12. Remove the dough propeller. ANKO-OME-0005(A1)
- Page 26 15. Remove the stuffing stopping (if any), then pull up the coupling rotate the stuffing propeller counter clockwise, then remove it. Stuffing stopping 16. Use a 115-130 wrench to rotate the stuffing hopper clockwisely, then remove it. ANKO-OME-0005(A1)
- Page 27 * 18. Separate rotor and cover plate, remove blades. 19. Turn down the handles at the both sides of stuffing pump, then remove the pump. 20. Loosen the 4 wing nuts at the base plate of stuffing pump. ANKO-OME-0005(A1)
- Page 28 22. Use a M8 knurled knob bolt to remove the axis of stuffing pump. M8 knurled knob bolt 23. Use 2 pcs of M6 knurled knob bolt to remove the copper bushing. M6 knurled knob bolt * Do not scrub the parts with black coating. ANKO-OME-0005(A1)
-
Page 29: Operation Precautions
3. Don’t place hand into stuffing hopper during operation. 4. Don’t place hand into dough hopper during operation. 5. Don’t place hand or finger into forming mold during operation. × ANKO-OME-0005(A1) - Page 30 12. If machine stops operation for over 20 mins., please turn off the cooling system to avoid hardening of dough and damage machine parts. 13. If machine parts need to be lubricated, please use food grade grease or edible raseline, do not use vegetable oil. . ANKO-OME-0005(A1)
-
Page 31: Operation
Turn off it when stuffing comes out from the stuffing pipe stably. 5. Decrease the speed of stuffing system to F.20.0 (for mini dumpling lower to F.10.0), then accelerate the speed slowly when producing till desire stuffing quantity is met. Flour dusting hopper Flour box Set fixture bolt ANKO-OME-0005(A1) - Page 32 3. Turn the forming mold set back to its position. Main power light Water indicator light E. Turn on the water cooling system. (Turn off when stop producing) Check fluid level indicating light. If the indicator is light, add water referring to steps 24. ANKO-OME-0005(A1)
- Page 33 3. Turn on the stuffing system and regulate the speed until get proper volume of stuffing. ※ LED press △, the digit will be up and accelerate the speed. press ▽, the digit will be down and slow down the speed. ANKO-OME-0005(A1)
-
Page 34: Maintenance
2. Lubricate chains and gears in gear box with grease per 1-2 months. 3. Lubricate chains in stuffing motor with grease per 1~2 months. Too much grease will permeate through the torque limiter resulting lost of torsion. ANKO-OME-0005(A1) -
Page 35: Dusting Hopper Disassembly
1. Use #10 wrench to loosen the forming mold screw at the front of protection cover. 2. Remove the nut at the side. 3. Use #14 wrench to loosen the fixing nut of dusting hopper. 4. Remove dusting hopper. ANKO-OME-0005(A1) -
Page 36: Troubleshooting
Not enough stuffing in b. Add stuffing into hopper. hopper. Always keep at least 70% of hopper full. c. Stuffing was frozen and c. Use all of well-mixed stuffing at then thawed to re-use. one time. ANKO-OME-0005(A1) - Page 37 Forming mold not in proper nozzle position, dough extrusion b. Align forming mold with the nozzle does not aim aligned dough extrusion nozzle. with center of forming mold. c. Stuffing injection is not smooth. c. Refer to Problem #2. ANKO-OME-0005(A1)
- Page 38 . b. Dough residue on forming b. Adjust the top and bottom mold or roller. scrapers closer forming mold and roller and remove residue. ANKO-OME-0005(A1)
- Page 39 PROBLEM CASE RECOVERY a. Hex screws inside the base a.Remove forming mold set and Loose forming fixture of forming mold are use wrench to tighten mold set. loose. hexagon screw inside the base fixture. ANKO-OME-0005(A1)
- Page 40 " " on control panel. b.Space between roller and b.Rotate roller nuts clockwise to roller side plate is too big. move roller side plates closer to roller and remove any dough residue. PROBLEM CASE RECOVERY ANKO-OME-0005(A1)
- Page 41 Replace copper or plastic part. Pastry wrapper is bushing inside propeller Or before forming, cut the shrinks. support worn out. dough pipe open a little. Dough forced between propeller support stuffing pipe clogs stuffing exit made dough pipe vacuum. ANKO-OME-0005(A1)
- Page 42 Some meat tendon stuck on b. Use tools to clean away meat bottom scraper. tendon. a. Please refer to the inverter a. Please refer to the inverter Inverter control instruction manual. instruction manual. panel does not work or appears abnormal. ANKO-OME-0005(A1)
- Page 43 Dough extrusion speed is b. Slow down dough extrusion damaged. too fast. speed. c. Dough too hard. c. Water should be 38-45% of flour weight. d. Too much stuffing d.Do exceed maximum recommended amount stuffing. ANKO-OME-0005(A1)
- Page 44 Reconnect the power source. dough. power source. a. Fixing pin is not fixed a. Reinstall the forming mold. The forming mold properly in hole. vibrates. b. Excess flour obstructs the b. Clean the excess flour, then fixing hole. reinstall the forming mold. ANKO-OME-0005(A1)
-
Page 45: Circuit Diagrams
13. CIRCUIT DIAGRAMS 1 . 2 2 0 V ANKO-OME-0005(A1) - Page 46 ANKO-OME-0005(A1)
- Page 47 ANKO-OME-0005(A1)
- Page 48 ANKO-OME-0005(A1)
- Page 49 ANKO-OME-0005(A1)
- Page 50 ANKO-OME-0005(A1)
- Page 51 3 8 0 V / 4 1 5 V / 4 4 0 V ANKO-OME-0005(A1)
- Page 52 ANKO-OME-0005(A1)
- Page 53 ANKO-OME-0005(A1)
- Page 54 ANKO-OME-0005(A1)
- Page 55 ANKO-OME-0005(A1)
- Page 56 ANKO-OME-0005(A1)
-
Page 57: Toolbox Contents
1 pc AP-HT1FMR7001 Stuffing stopper `1 pc AP-HT1SSC7003 Stuffing stirring Hanging plank 1 pc AP-HT3RST7001 For products sliding Planking 1 pc AP-HT3FPP7001 For products sliding HLT-700 Instruction manual 1 volume Inverter Instruction manual 1 volume Water sucker 1 pc ANKO-OME-0005(A1) - Page 58 16 Dusting brush 26 Stuffing stopper Hook wrench (90-95 mm) 17 Cleaning brush 27 Hanging plank “T” type wrench (14 mm) 18 Two heads bolt 28 Planking Wrench hex wrench (no.14) 19 Acorn nut (M8) 10 Silicon pipe 20 Philips screwdriver ANKO-OME-0005(A1)
-
Page 59: Stuffing Injection System
15.PARTS LIST A. Stuffing Injection System ANKO-OME-0005(A1) - Page 60 AP-HT4SDC7001 Washer AP-HT5SBA7001 Cover for motor P-ELMTSTL2502-0 Nut P-SWHM5 Washer P-ELMTSTL2502-0 Plate P-SBS0808C Inner Hex. Bolt P-ELMTSTL2505 Washer AP-HT1FMR7001 Stuffing mirror Fixture for stuffing P-ELMTSTL2502-0 Spring AP-HT1FMR7001-1A mirror P-ELMTSTL2504 Friction P-SNBM8 Wing nut M8 Transmission chain AP-HT4SDT7001 gear (2) ANKO-OME-0005(A1)
-
Page 61: Forming Mold System
B. Forming Mold System: ANKO-OME-0005(A1) - Page 62 Holder of forming hold shaft P-SNCM8 Acorn nut P-SBR0510X Bolt P-SBD0824 Two heads bolt P-SWHM6 Washer AP-HT3FMQ7001 Washer for fixing base AP-HT3FBS7002 Supporting shaft AP-HT3FSE7001 Rotary base AP-HT3FBX7001 Dry flour collecting case AP-HT3FMP7001 Fixing base Base plate of dry flour AP-HT3FBI7008 collecting case ANKO-OME-0005(A1)
-
Page 63: Gearbox & Dough Extrusion System
C. Gearbox & Dough Extrusion System: ANKO-OME-0005(A1) - Page 64 Rear cover AP-HT2DPN7001 nozzle P-BR51209 Bearing 51209 AP-HT2DXT7006 Dough extrusion nozzle Fix ring cover of dough AP-HT4DPW7001 washer AP-HT2DXN7001 extrusion nozzle AP-HT4DPG7001 Gear of 1 shaft P-BR6209D BEARING 6209 AP-HT4DPT7001 Chain gear of 1 shaft P-BOG-45 O Ring G45 ANKO-OME-0005(A1)
Need help?
Do you have a question about the HLT-700 and is the answer not in the manual?
Questions and answers