
Summary of Contents for KAT Walk Coord 2
- Page 1 KAT Walk Coord 2 OWNER'S MANUAL This product is for personal use ONLY. Any form of commercial application is prohibited.
- Page 2 Acknowledgement Thank you for purchasing our product! Please, read this instruction manual carefully and keep it safely stored for future use.
- Page 3 Declaration Safety Instructions Health Warnings PRODUCT INTRODUCTION Product Description KAT Walk Coord 2 Description Product Appearance KAT Walk Coord 2 Dedicated Shoes Introduction KAT Shoes 2 KAT Walk Coord 2 Sensor Introduction Product Parameters PRODUCT INSTALLATION Precautions Tools Preparation Finding a suitable place...
-
Page 4: Table Of Contents
Locomotion Modes Game Configuration Recommended Games Step Counter System Device Manager Direction Calibration FIRST USE OF KAT WALK COORD 2 The Friction Level Introduction Anti-Slip Strap Introduction Entering the platform First Steps ‒ How to walk? DISASSEMBLY & MAINTENANCE Disassembly Procedure... - Page 5 First & Foremost This owner’s manual contains all the information you need to install your KAT Walk Coord 2. The following symbols are used to indicate important information and instructions for the device set-up process: This symbol is a precaution, it usually provides additional information to help you with a task, as well as information that applies only to certain situations.
- Page 6 2m/6'7" of height (recommended 1.60m/ 5'3" to 1.95m/6'5” ) and weight below 130kg (286 lbs). Do not use the KAT Walk Coord 2 if you do not meet the age, height or weight requirements, or if your physical condition does not allow for moderate to intense physical activity.
- Page 7 (3) Exhibition booths made of glass or those that are incapable of meeting the weight support requirements; (4) Near firefighting equipment or safety exits, etc. If you need to change the location after completing the assembly and installation, be sure to disassemble the device in strict accordance with the components order, use the same materi- al as the original packaging to wrap the device, and choose a high-quality logistics or han- dling company for the device transportation.
- Page 8 This device complies with Part 15 of the FCC Rules. Operation is subject to the following two conditions: (1) This device may not cause harmful interference, and (2) This device must accept any interference received, including interference that may cause undesired operation. CAN ICES-3 (B)/NMB-3(B).
- Page 9 flammable liquid or gas. Dispose of used batteries according to the instructions. Violation of the above safety instructions or any other misconduct may cause personal injury or damage to the product, for which KAT VR will not be held responsible. Health Warnings...
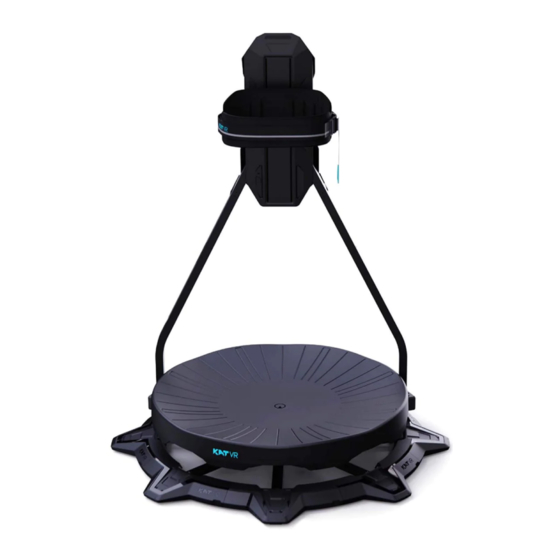
- Page 10 Product Description KAT Walk Coord 2 Description KAT Walk Coord 2 is an all-action VR treadmill designed for gamers, especially these with motion sickness and limited physical space to overcome the immersion-breaking compromis- es rooted in traditional methods of VR locomotion. At the same time, it enables the missing...
- Page 11 In order to avoid injuries, always use the dedicated shoes and waist harness according to the instructions. Dedicated shoes are only suitable for use with KAT Walk Coord 2 and it is strictly prohibited to use them in any other situation or for any other purpose.
- Page 12 KAT Walk Coord 2 Foot Sensor Introduction The KAT Walk Coord 2 Foot sensors are mounted on the bottom of the special shoes and serve the purpose of physical movement translation into movement in VR to ensure a highly accurate simulation of walking in any direction.
- Page 13 940mm (37” ) Base diameter 1.2㎡ (12.91 Square Feet) Footprint About 1 hour Charging time 7hrs Battery life KAT Walk Coord 2 5V DC KAT Walk Coord 2 Plus 110~240V Voltage 0℃~40 ℃ Operating temperature 20%Rh~85%Rh Working humidity <2000m Working altitude...
- Page 14 It is not advised to place the device on smooth surfaces that are easily scratched by metal, e.g wooden or tiled floor. Place KAT Walk Coord 2 on a carpet or take other measures to protect the floor. Ensure there is no furniture or other household items that can be easily knocked within the device vicinity.
- Page 15 No. 19 screws) and insert the pages/support). Pair the sensors screws) . supporting rods into the rod (follow the instructions in KAT Gate- openings on the base. way) and fully charge. (page 20) (ONLY FOR C2+: Lift the rubber cover...
- Page 16 Locate the height indicator on the Pull out the safety pin, step on Tighten the screws with back support corresponding with the platform facingthe rods. screwdriver, then tighten the your body height. When mounting Mount the support plate on the nuts with wrench.
- Page 17 Packing List Before assembly, check carefully whether the quantity and type of tools and accessories is con- sistent with the below list. If anything is missing, contact our customer service at service@kat- vr.com before you proceed.
- Page 18 Maintenance Oil...
- Page 19 KAT Gateway is an independent software platform designed by KAT VR for the management of the KAT Walk Coord 2. With KAT Gateway, you can quickly connect the KAT Walk Coord 2 with your computer system to manage the device, view the current connection status, adjust the settings, and run the available VR content.
- Page 20 Through KAT Gateway, you can achieve real-time control over your KAT Walk Coord 2 with all of its settings as well as quickly adapt the device to all supported content. With SteamVR you can operate the device without taking off the VR headset or leaving the platform.
- Page 21 KAT Gateway functions introduction Device Detection: KAT Gateway will detect all the currently connected KAT Devices but can only run one at a time. If no device or multiple devices are detected, KAT Gateway will inform the user about it and ask to connect only the intended device.
- Page 22 Second case - Multiple devices of the same model detected...
- Page 23 Third case - Multiple devices of the different model detected. Please select the "KAT Walk Coord 2". Sensor Pairing Connect the USB data cable of the KAT Walk Coord 2 to the PC USB port. Once the below window appears, the treadmill pairing is complete.
- Page 24 Having connected the KAT Walk Coord 2 to the computer, follow the Gateway instructions. Using the Micro USB cable, connect the sensors one by one to pair them.
- Page 25 Having connected the KAT Walk Coord 2 to the computer, follow the Gateway instructions. Using the Micro USB cable, connect the sensors one by one to pair them.
-
Page 26: Controller Options
Device Status KAT Gateway dashboard once KAT Walk Coord 2 is connected: Home page of KAT Gateway displays the current device connection status: -Headset direction; -Connection status and direction of the waist sensors; -Connection status and direction of the left foot sensor;... - Page 27 -Adjustment of the mapping speed; -Adjustment of the walking accuracy; -Enabling the continuous movement mode. -Enabling the haptics module vibration; -Adjustment of vibration intensity and test.
- Page 28 -View the current game; -Switch between 4 different vehicles; -Turn the Sit-walking on and off;Adjustment of speed. The LED is the brightest by default, you can use the gateway to adjust the brightness or turn it off. -Adjustment of the LED and LED brightness.
-
Page 29: Game Configuration
Game Configuration In the Game Configuration page, you can view the list of supported games including the recom- mended and manually added ones, as well as check and modify their configuration settings. Adding a game: Fill in the Steam ID of the game or choose the game EXE file. -
Page 30: Recommended Games
Adding a new configuration (through manual input or by file import): Deleting the game: View, select or delete the configuration files. Viewing the game configuration tips of the recommended games: Recommended Games... -
Page 31: System
The system settings page shows the currently selected language and the current inSteam driver and KAT Gateway versions. From this page you can exit the software, change the language and reinstall the drivers, as well as set the software auto-start rules:... -
Page 32: Direction Calibration
Direction calibration: a. First press the System Button on your hand controller to enter KAT Gateway. Select the loco- motion mode in KAT Gateway and start the game (More about the modes in the KAT Gateway soft- ware introduction below). - Page 33 Sensor parameter adjustment When in the game, you can adjust a number of KAT Walk Coord 2 parameters such as the move- ment sensitivity or the special actions(Strafing, Backward, Cruise). Note: If you experience problems with the walking direction, check if the waist harness is fastened correctly and carry out the direction calibration.
-
Page 34: First Use Of Kat Walk Coord 2
Before calibration, ensure that the room settings of your headset have been successfully set and the sensor initial pairing has been completed. First Use of KAT Walk Coord 2 Sensor Installation The sensors should be mounted on top of the dedicated shoes. -
Page 35: Anti-Slip Strap Introduction
Note 2: It is expected that due to the friction force, walking and running may cause scratches on the platform surface. It will not influence the normal operation and performance of the device. Note 3: Before entering the platform , please start SteamVR and select the mode in KAT Gateway. -
Page 36: Entering The Platform
Entering the Platform: Before getting on or when sensors Hang the HMD and controllers enter sleep mode (inactive ≥ 30min), on the storage hooks. Ensure the click the main button and shake the anti-slip protection lock is enabled shoes. Check the sensor light: and the base surface is clean. - Page 37 (repeat at any time If the walking direction is incorrect). Once complete, you're set to go! * Calibration can be also carried out in Gateway - Press the System Button on the control- ler, open Gateway via KAT icon in SteamVR dashboard. GETTING OFF: Before getting off, enable the anti-slip lock.
-
Page 38: First Steps - How To Walk
Charge the sensors as shown. * Flashing Shoe Sensor Light / Dimming Inner Sensor Light indicates charging. It may occur that the rotational structure gets continuously pulled towards a certain side of the platform due to uneven ground or other reasons. If that happens, please follow the steps below to adjust the device: Loosen the nuts holding the If the beam tends to continu-... - Page 39 To trigger movement forward in When on the platform, try to Try to squat. VR, move your feet alternately. take a few slow steps. Single-foot micro-operation can Pick the headset and controllers To trigger continuous movement in achieve subtle movement in the from the storage hooks at the all directions other than forward, corresponding direction.
- Page 40 When the charging cable is not in use, pay attention to storage and roll it up to prevent stepping on it. KAT Vehicle Hub - User Guide The Vehicle Hub can only be used with KAT Walk Coord 2, and other application is prohibited. Inner Mounting Sitting Posture...
- Page 41 (follow the instructions indicator light: Blinking light - the figure. Note: The cushion in KAT Gateway). pairing. Continuous light - pairing material is fabric, it is normal to completed. deform during use.
-
Page 42: Disassembly & Maintenance
Disassembly procedure: If you need to move your KAT Walk Coord 2 to another location, you should carry out the device disassembly in the reverse order to the device installation procedure, that is, starting from pulling out the USB cable from your PC, through removing the waist harness and the back support plate to taking out the supporting rods in order to ensure that the structure and components are not damaged during transportation. - Page 43 Component Maintenance: 1. Before use, always ensure that the platform is wiped clean and free of any objects, substanc- es or dust. Scratches on the platform surface are a natural result of wear and tear and will not influence the operation of the device. 2.
-
Page 44: Contact Information
Contact Information Company: Hangzhou Virtual and Reality Technology Co., Ltd Add: China, Zhejiang Province, Yuhang district of Hangzhou. Wen Yi Xi Lu,1818-2 China Artifi- cial Intelligence Town, Building 6, 9th floor. Postal code: 311100 Email: service@katvr.com Web: www.kat-vr.com/... - Page 45 Version: 202009...
Need help?
Do you have a question about the Walk Coord 2 and is the answer not in the manual?
Questions and answers