
Subscribe to Our Youtube Channel
Related Manuals for SUREHATCH SH2000 COMBO


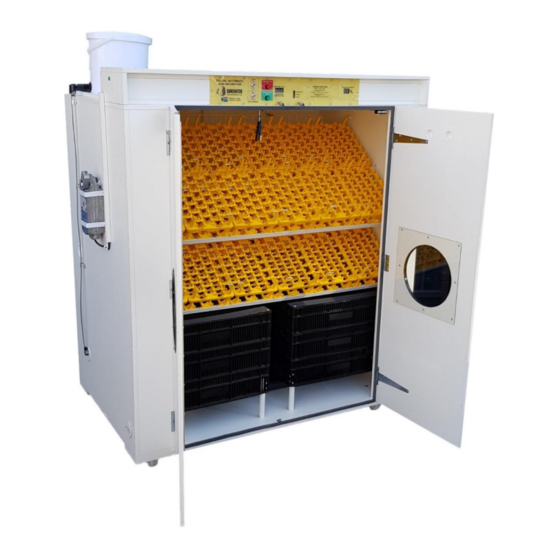
Summary of Contents for SUREHATCH SH2000 COMBO
- Page 1 USER MANUAL : SH2000 C ODEL OMBO DIGITAL AUTOMATIC EGG INCUBATOR & HATCHER VERY IMPORTANT! READ THIS USER MANUAL BEFORE USING YOUR INCUBATOR...
- Page 2 We wish you all the best and hope that you enjoy this journey as much as we do! Feel free to contact us for advice or assistance at the details below. Join the Surehatch Egg Incubator Owner’s Club on Facebook and meet some fellow Surehatch users!
- Page 3 All Surehatch incubators and hatchers have been tested in our factory and are made to high quality standards. Ultimately the success of your hatchery operation lies in the hands of the hatchery manager/user and the quality of the hatching eggs.
- Page 4 Hatching Egg quality and Pre-Incubation Egg Storage It is important to note that the incubator can only give good hatch rates if the eggs which are placed in it is of good quality. Infertile eggs will never hatch, poor quality eggs will give low hatch rates. Good quality hatching eggs have the best chances of successful hatching.
- Page 5 Only use good quality, clean fertile hatching eggs Do not store eggs for longer than 7 days before incubating. On average, one day’s storage adds one hour to incubation time. This must be taken into account when eggs are set, so fresh and stored eggs should be set at different times The longer you store the eggs, the lower the hatch rate.
- Page 6 • Incubator/hatcher must be placed INDOORS. • Select a suitable room which has an average temperature of 68°F - 82°F • Don’t let the room temperature exceed 86° F. The incubator/hatcher cools down via the air which it pulls in from the room. If the room temperature goes over 86°F the incubator will struggle to cool down and can potentially overheat the eggs •...
- Page 7 • Chicken eggs take 21 days to incubate • For the first 18 days eggs are placed in plastic egg trays (Also called the setter) • On the morning of day 18 the eggs must be moved from the plastic egg trays (setter) to the hatcher (Hatching crates below the egg tray).
- Page 8 CONTENTS INSIDE YOUR INCUBATOR: Temperature and humidity Sensor: Water Bucket: Sensitive to water - Auto ON/OFF Switch: Must be filled with clean Don’t spray water directly Incubator will switch off water. Bucket supplies onto sensor when cleaning when you open the door water to water pan inside.
- Page 9 STARTING UP YOUR INCUBATOR: STEP 1: Plug in your incubator: Switch ON your incubator by plugging it in to the wall plug. STEP 2: Connect water bucket to incubator and fill bucket with water Your incubator has an automatic float valve inside that will allow water to flow into the inside water pan from the bucket on top of the machine.
- Page 10 Turner ON/OFF Switch Humidity Control Air Vents STEP 4: SETTING INCUBATOR HUMIDITY (Slide to adjust (This will take 1 to 2 hours) humidity) You can start adjusting humidity once the incubator has been running at a temperature of 99.5°F for an at least 1 hour.
- Page 11 ECREASE UMIDITY 1) Adjust the AIR VENT in front to a MORE OPEN / LESS CLOSED position 2) Remove one of the water containers If the above two steps fail to decrease humidity, do the following: 3) Remove both water containers completely (Only in very humid / wet areas) 4) Place a dehumidifier in the room (Only in very humid / wet areas) After you are satisfied with the temperature and humidity you may place the eggs in the incubator...
-
Page 12: Important Notice
REMEMBER TO PLACE THE EGGS WITH THEIR SHARP END POINTING DOWNWARDS IN THE TRAY AS SHOWN BELOW Sharp end of the egg must point downwards in the tray Eggs must be in the egg trays for the first 18 days before transferring them to the hatching baskets. -
Page 13: Egg Turning
Egg Turning: Your Surehatch Incubator is automatically set to turn the eggs every hour. When loading eggs into the incubator you can disengage the egg turner motor by pressing the clutch button. Remember, eggs must be in the setter trays for the first 18 days and must be moved by hand to the hatcher on the morning of day 18. - Page 14 Press Clutch Button and racks will move freely Step 5: Release the clutch button – the tray will now stay in position Step 6: Load the eggs/trays Step 7: Once trays are loaded onto the racks, Flip the EGG TURNER switch back ON. The racks will start turning immediately.
- Page 15 VERY IMPORTANT: Don’t leave the light on as this will negatively effect the functioning of the incubator. Only use the light when necessary. Switch the light OFF after you have viewed the eggs/chicks inside the incubator. CONGRATULATIONS! OU HAVE NOW SUCCESSFULLY SET UP YOUR UREHATCH NCUBATOR EXT YOU NEED TO FOLLOW THE DAILY CHECKLIST...
- Page 16 AILY HECKLIST FOR YOUR UREHATCH NCUBATOR Check the following once per day — Correct where necessary CHECK Electricity - Electricity must always be ON. Power interruptions will negatively affect the eggs. CHECK Incubator Temperature Ideal temperature is 99.5°F (Fluctuation between 96°F to 101°F is normal) CHECK Incubator Humidity Ideal humidity % for incubation is between 50% and 65%.
- Page 17 Trouble Shooting Failures with Egg Incubation When incubation of eggs fails, indications are often available that a well trained professional uses for diagnosing the causes for failure. The information listed below includes the more common symptoms for incubation failures, the causes for each symptom, and the recommended corrective measures Symptoms of incubation/breeder management problems include: •...
- Page 18 Improper artificial insemination techniques or Follow recommendations of primary breeder use of old/over-diluted company. semen. Eggs damaged by Gather eggs frequently (at least once daily). environment Store eggs at 50-60 degrees F. and 60% Eggs stored too long or relative humidity. Incubate eggs within 7 incorrectly days of lay.
- Page 19 Symptoms Probable Cause Corrective Measures Pipped eggs, but died without Insufficient moisture Increase humidity during the hatching period. hatching Increase ventilation rate in incubator and/or Improper ventilation room, but avoid drafts. Improper setting of eggs Set eggs with small end down. Turn eggs causing malpositioned properly but avoid turning within 3 days of embryos...
- Page 20 Symptoms Probable Cause Corrective Measures Crippled and Improper incubation Follow recommended incubation temperatures. malformed chicks temperatures (usually too high) Increase incubation humidity by increasing water Low incubation humidity evaporation. Embryos dried too much. Set eggs with small ends down. Turn eggs at least Improper egg setting position or 3 times daily.
- Page 21 Holding chicks in hatcher too long Remove all chicks as soon as fluffy but within 24 after hatching hours after hatching. Symptoms Probable Cause Corrective Measures Excessive yellow Improper and excessive Follow recommended fumigation procedures. coloring of down fumigation in hatcher unit...
- Page 22 Trouble Shooting Failures with Surehatch Egg Incubators In general there is very little that will go wrong with your Surehatch incubator. In the unlikely event that something goes wrong, please contact us or consult the trouble shooting below. NB Always switch off the incubator when making repairs.
- Page 23 LIMITED WARRANTEE & LIMITED LIABILITY Whereas Surehatch has no control over usage of equipment supplied, it assumes no responsibility for losses or damage from their equipment. No guarantee on hatchability of eggs. Do not expose electrical parts to water. Installation of replacement electrical parts should be done by qualified electrician.
Need help?
Do you have a question about the SH2000 COMBO and is the answer not in the manual?
Questions and answers