Table of Contents
Advertisement
Advertisement
Table of Contents

Subscribe to Our Youtube Channel
Related Manuals for LILYGO T-Beam


Summary of Contents for LILYGO T-Beam
- Page 1 T-Beam User Guide Version 1.1 Copyright © 2022...
- Page 2 About This Guide This document is intended to help users set up the basic software development environment for developing applications using hardware based on the T-Beam. Through a simple example, this document illustrates how to use Arduino, including the menu based configuration wizard, compiling the Arduino and firmware download to the ESP32 module.
-
Page 3: Table Of Contents
Table of Contents 1. Introduction ..........................1.1. T-Beam ..........................1 1.2. Arduino ............................. 1.3. Preparation ..........................2. Get Started ..........................2.1. Download the Arduino Software ....................2 2.1.1. Install Prerequisites .......................2 2.1.2. Toolchain Setup ......................2 2.2. Install the Arduino Software ......................3 2.3. Set up Path ..........................3 3. -
Page 4: Introduction
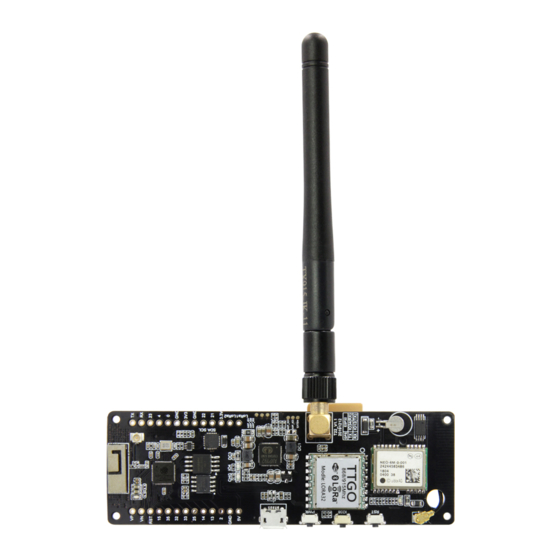
1. Introduction Introduction 1.1. T-Beam T-Beam is a development board. It can work independently. It consists of ESP32 MCU supporting Wi-Fi + BT+ BLE communication protocol and motherboard PCB. And this product has GPS positioning and LoRa function. GPS chip is NEO-6M, LoRa chip is SX1276. -
Page 5: Get Started
2. Get Started Get Started 2.1. Download the Arduino Software The quickest how to install the Arduino Software (IDE) on Windows machines 2.1.1. Quick Start Guide The website provides a quick start tutorial Windows: • https://www.arduino.cc/en/Guide/Windows Linux: • https://www.arduino.cc/en/Guide/Linux Mac OS X: •... -
Page 6: Install The Arduino Software
2. Get Started 2.2. Install the Arduino Software Wait for installation Xinyuan 2022.03 ! /12... -
Page 7: Configure
3. Start a Project Configure 3.1. Download Git Download the installation package Git.exe 3.2. Pre-build configuration Click Arduino icon, then right click and select ``Open folder where `` Select hardware -> Mouse ** Right click ** -> Click Git Bash Here 3.3. -
Page 8: Connect
4. Connect Connect You are almost there. To be able to proceed further, connect ESP32 board to PC, check under what serial port the board is visible and verify if serial communication works. Xinyuan 2022.03 ! /12... -
Page 9: Test Demo
4. Configure Test Demo Select File>>Example>>WiFi>>WiFiScan Xinyuan 2022.03 ! /12... -
Page 10: Upload Sketch
5. Build and Flash Upload Sketch 6.1. Select Board Tools<<Board<<ESP32 Dev Module 6.2. Upload Sketch << Upload Xinyuan 2022.03 ! /12... -
Page 11: Monitor
5. Build and Flash 6.2. Serial Monitor Tools << Serial Monitor Xinyuan 2022.03 ! /12... -
Page 12: Ssc Command Reference
6. SSC Command Reference SSC Command Reference Here lists some common Wi-Fi commands for you to test the module. 7.1. op Description op commands are used to set and query the Wi-Fi mode of the system. Example op -Q op -S -o wmode Parameter Table 6-1. -
Page 13: Mac
6. SSC Command Reference Parameter Description -s ssid Scan or connect Access Points with the ssid. -b bssid Scan the Access Points with the bssid. -n channel Scan the channel. Show scan results with hidden ssid Access Points. Show STA connect stutus. Disconnected with current Access Points. -
Page 14: Dhcp
6. SSC Command Reference Parameter Table 6-4. mac Command Parameter Parameter Description Show MAC address. • mode = 1: MAC address in STA mode. -o mode • mode = 2: MAC address in AP mode. 7.5. dhcp Description dhcp commands are used to enable or disable dhcp server/client. Example dchp -S [-o mode] dhcp -E [-o mode]... -
Page 15: Reboot
6. SSC Command Reference Parameter Table 6-6. ip Command Parameter Parameter Description Show IP address. • mode = 1 : IP address of interface STA. • -o mode mode = 2 : IP address of interface AP. • mode = 3 : both Set IP address. -
Page 16: Appendix - Notices
FCC Caution: Any Changes or modifications not expressly approved by the party responsible for compliance could void the user's authority to operate the equipment. This device complies with part 15 of the FCC Rules. Operation is subject to the following two conditions: (1) This device may not cause harmful interference, and (2) this device must accept any interference received, including interference that may cause undesired operation.
Need help?
Do you have a question about the T-Beam and is the answer not in the manual?
Questions and answers