Table of Contents
Advertisement
Advertisement
Table of Contents

Summary of Contents for TYSTVideo Mini Vmix Panel
- Page 1 MINI VMIX PANEL MANUAL...
-
Page 2: Table Of Contents
Contents Mini Vmix Panel ...............................1 Foreword ................................1 Product and Service Disclaimer ........................1 Product Warranty Guidelines ........................... 4 1. Product Introduction ............................5 2. Product Package .............................. 5 3. Usage of the Switcher ............................ 6 4. Switcher Button Description ........................10... -
Page 3: Mini Vmix Panel
Foreword Thank you for choosing our product! Before you use this product for the first time, please be sure to read this manual and the related materials delivered with it carefully, and use, install and maintain it according to the manual. - Page 4 Installation Precautions 1. Before using the panel, please read this manual carefully, and please keep this manual properly. 2. Please comply with the warning signs and instructions on the product. 3. Before cleaning the panel, please unplug the power cable. Do not use liquid or corrosive cleaners, just use a normal damp cloth to clean.
- Page 5 service personnel for after sale services. 12. If the following situations occur, please unplug this product and consult a qualified dealer or service staff: a. The plug is damaged or unraveled. b. Liquid seeps into the product. c. If this product has been exposed to rain or water. d.
-
Page 6: Product Warranty Guidelines
Product Warranty Guidelines Products are warranted against production defects for one year from the date of purchase Any repairs during the warranty period require the original purchase invoice or other relevant documents as proof The warranty period of the product starts from the purchase date; if the purchase certificate ... -
Page 7: Product Introduction
1. Product Introduction Mini vMix panel is an external director switcher designed for our company's Vmix system and virtual studio system. It has an elegant design and is a professional-grade hardware designed for the realization of director switcher, live broadcast, recording and PTZ control. It has modern appearance and MIDI communication protocol interface, which can greatly speed up the workflow of live playback. -
Page 8: Usage Of The Switcher
3. Usage of the Switcher 1). Connect the switcher to a computer with VMIX software via a USB cable. Download the setup template for the switcher. Template name is “VMIX MINI PANEL” Download link: 2). Open the VMIX software and click the Settings button in the upper right corner. - Page 9 Click "Import" in the image above to add a configuration file, as shown below: Click "Shortcut Keys", select MIDI settings, check "TY HD 500 Switcher", and save, so that the panel keys can be used. 第 7 页...
- Page 10 Click "Activator" to select "Allow Device", check "TY HD 500 Switcher" and save it, the purpose is to make the button light up when it is in use. So far, if your computer system is Windows 10, and the VMIX software version is the latest version 22 and above, when you complete the above operations, the switcher can be used, and the 1 and 2 channel buttons on the switcher are 第...
- Page 11 displayed with color, as shown below: If your computer system is Windows 7 or Windows 8, or your vMix software is not the latest version 22, after you finish loading the configuration, restart the vMix software, and then you can use it. 第...
-
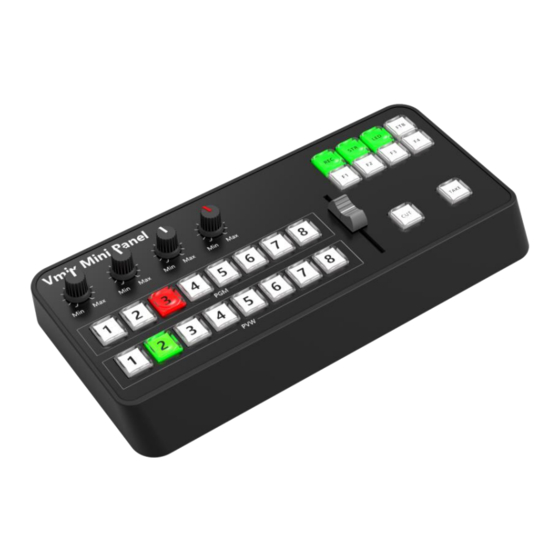
Page 12: Switcher Button Description
4. Switcher Button Description 第 10 页... - Page 13 1) Audio Control From left to right, corresponding to the PGM total output, input 1, input 2, and PVW preview for volume control. 2) PGM /PVW 1-8 PGM/PVW main cut output and preview monitoring buttons, providing 1-8 switching buttons. 3) Functions and special effects Record button, press to record, press again to cancel recording, the status can be viewed in real time at the record button on the vMix software window.
- Page 14 Black burst button, output the silent color bar signal in an emergency situation. Custom buttons, can be set according to actual needs, such as transition effects, picture/video/PPT control buttons, etc. 4) T-bar Switch PVW screen to PGM window for streaming. 5) Cut button Hard cut Toggle button with special effects,...
-
Page 15: Interface Description
5. Interface Description USB: connect the switcher to the computer, free drive. TALLY Phoenix terminal: as shown below, 1-9pin from left to right. Note: Only the upgraded version has tally interface. TALLY A/B:1-4 channels are Tally and 5-8 channels are output, please refer to the table below for the definition of tally A/B interface.
Need help?
Do you have a question about the Mini Vmix Panel and is the answer not in the manual?
Questions and answers