Advertisement
Quick Links
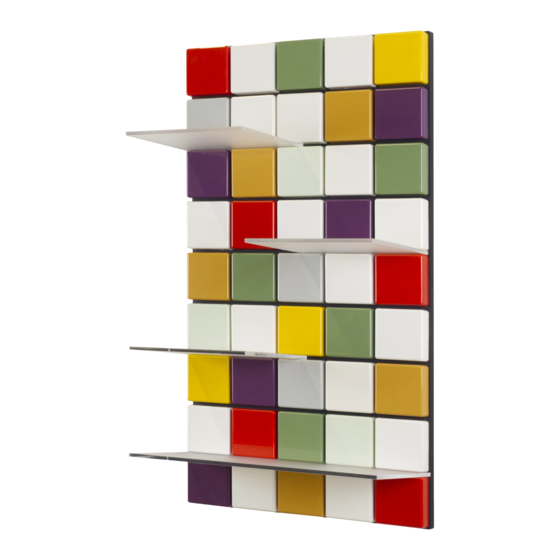
Mounting Instruction
Observe that depending on wall and load it could be necessary with more than two screws
to mount the shelf to the wall. Use screws adapted to the wall, typical dimension is 5x60mm.
One unit can bear max 24kg, the short shelves 3kg and the long 6kg.
Make sure you turned the backplate correctly before you start placing the bricks: see below.
The bricks also has an top/bottom side, makes sure to turn them right!
Horizontal Unit
(upper left corner)
In the package, the bricks are
turned to fit a horizontal shelf
unit. If a vertical unit is prefered
please turn the bricks!
Large holes= Up
Mounting Hole
Vertical Unit
(upper left corner)
Large plug= Up
Advertisement

Summary of Contents for Pellington Design Confetti
- Page 1 Mounting Instruction Observe that depending on wall and load it could be necessary with more than two screws to mount the shelf to the wall. Use screws adapted to the wall, typical dimension is 5x60mm. One unit can bear max 24kg, the short shelves 3kg and the long 6kg. Make sure you turned the backplate correctly before you start placing the bricks: see below.
- Page 2 Arrange the bricks. Leave two (or four) bricks for easier mounting to the wall. Lightly push the bricks in to the holes. Use the foam in the package, cover the bricks as protection and push firm or gently “walk” them in to place! Mounting holes Use the mounting holes and mount the shelf on the wall with two (or four)
- Page 3 Tip! Depending on screw, it’s possible to fine tune the level with the screw head. Push the remaining bricks in to place and place the shelfs. Sometimes some shelves can be a bit tight to place: It’s easier to start with one of the corners when pushing them in.