Advertisement
Advertisement
Table of Contents

Summary of Contents for BLUBERY GSW02A
- Page 2 User Manual & Warranty Card Gas Pressure Washer Model:GSW02A Congratulations on the purchase of your new pressure washer. In order to ensure you have the best possible experience please read through the following instructions.
-
Page 4: Table Of Contents
Table of Contents 1. Safety Advice......................2 2. Parts List........................7 3. Assembled Model Diagram..................9 4. Assembly Instructions....................11 5. Operating Instructions....................14 6. Engine Operation......................16 7. Cleaning and Maintenance..................19 8. Technical Specifications....................22 9. Troubleshooting......................23... -
Page 5: Safety Advice
TOXIC GASES 1. S AFETY DVICE Alerts against possible toxic gases which can be harmful to your health or deadly if IMPORTANT, RETAIN FOR FUTURE you are exposed to them. REFERENCE AND READ CAREFULLY! FLAMMABLE AND COMBUSTIBLE MATERIALS Do not attempt to install or operate this product Alerts against the presence of materials until you have read the safety instructions in /gases which can be extremely... - Page 6 1.2 Safety Warnings CAUTION–HOT ENGINE AND MUFFLER DANGER–WORK AREA THE ENGINE AND MUFFLER BECOME VERY SAFETY AND EXHAUST FUMES HOT DURING AND AFTER USE. AVOID • Keep work area clean and well lit. Cluttered TOUCHING THE ENGINE OR THE MUFFLER and dark areas incite accidents.
- Page 7 1.2 Safety Warnings CAUTION–ENGINE SAFETY • Certain components in this product and its related FLAMMABLE AND accessories contain chemicals which are known to POISONOUS MATERIALS cause cancer, birth defects, or other reproductive harm. Wash hands after handling. • Gasoline is highly flammable and its vapors can •...
- Page 8 1.2 Safety Warnings CAUTION–SPECIFIC SAFETY ADVICE CAUTION–SPECIFIC SAFETY •This product is capable of producing high pressure as ADVICE rated in the Technical Specifications. To avoid rupture • Avoid dangerous conditions. Always operate this and injury, do not operate this product with components rated less than the unit itself (including but not limited to product on dry, solid and level ground.
- Page 9 1.2 Safety Warnings IMPORTANT–STORAGE CAUTION–SERVICE •Store the product in a well-ventilated area, with an •Before cleaning, repairing, inspecting, or adjusting, empty fuel tank. Fuel should never be stored or shut off the engine and make sure that all moving placed near the product. parts have stopped.
-
Page 10: Parts List
2. P Ref. Description Qty. Visual Main frame Wheel with axle Handle and panel with five nozzles Spray gun with metal wand High-pressure hose 20’ (6 m) Gun Holder... - Page 11 Gun Hook Hose Hook Knob with bolts Water inlet filter Spray tip cleaner Spark plug wrench Spare O-rings (two for high-pressure hose, one for quick-connector)
-
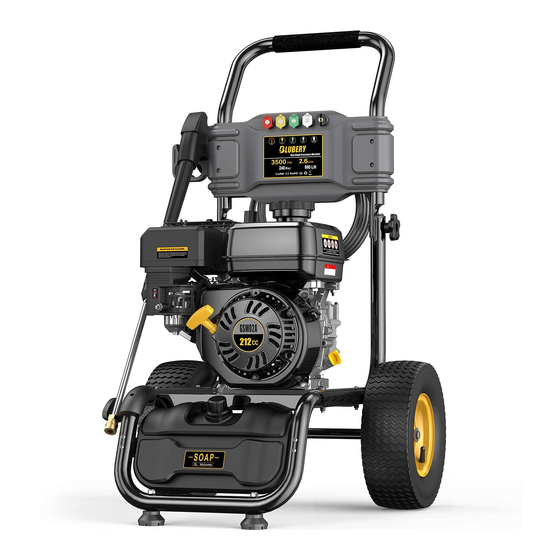
Page 12: Assembled Model Diagram
3. A SSEMBLED ODEL IAGRAM... - Page 13 3. A SSEMBLED ODEL IAGRAM Ref. Description Ref. Description Gun with Trigger safety lock Air filter Pressure hose Start cord handle Pump Outlet Connector Detergent Bottle Cap Pump Inlet Connector Spray nozzles(x5) Pump Thermal Valve Knob Switch Tyre Fuel tank cap Muffler Fuel tank Spark Plug...
-
Page 14: Assembly Instructions
4. A SSEMBLY NSTRUCTION Frame Assembly Position handle assembly and main frame and connect them with Wheel Assembly square neck bolt, then fasten with NOTE: Make sure that there is the knob. Repeat this procedure for enough air in wheel before the opposite side. - Page 15 Hose Hook Assembly Insert hose hook to the groove then to the end as per instruction. Gun & Wand Assembly Assemble the spray gun with the metal wand. Pull back the rubber piece to expose the threaded fitting. Then, screw the two pieces together and move the rubber piece back.
- Page 16 Gun/Hose Assembly Remove the air shield on pump outlet, then connect one end of pressure hose to pump outlet, and secure the plastic nut. Connect the other end to pressure gun, and fasten the plastic nut.
-
Page 17: Operating Instructions
5. O PERATING NSTRUCTIONS 5.3 Starting Pressure Washer 5.1 Using Spray Nozzle • Attach one end of garden hose to pump inlet, and This pressure washer comes with five different fasten the plastic nut counter-clockwise. Then attach nozzles that can be installed on the metal wand. the other end to water source.. - Page 18 5.5 Shutting Down and Cleaning 5.4 Cleaning with Detergents IMPORTANT 1. Skip step 2 if you are not using detergent. This pressure washer is intended for use with 2. After cleaning with detergent, fill the detergent tank special pressure washer detergents only. Do not with clean water.
-
Page 19: Engine Operation
6.2 Adding Fuel 6. E NGINE PERATION WARNING 6.1 Adding/Checking Oil •Make sure there is enough fuel in the fuel tank before operating the pressure washer. IMPORTANT • Use only clean, fresh, unleaded fuel. Use a Oil has been drained for shipping. Failure to fill minimum of 87octane/87 AKI (91 RON). - Page 20 6.3 Starting Engine IMPORTANT, Before each use: • Check the oil and fuel level and fill if necessary. • Make sure that spark plug, muffler, fuel cap, and air filter are in place and secured. • Do not crank engine with spark plug removed. See Section 5.3 Starting Pressure Washer to start the pressure washer.
- Page 21 6.4 Adjusting Water Pressure: 1.The water pressure is regulated by the throttle lever (E). 2.Moving the throttle lever towards the left (Fast direction) will increase the engine speed thus increasing the water pressure. 3.Moving the throttle lever towards the right (Slow direction)will decrease the engine speed thus decreasing the water pressure.
-
Page 22: Cleaning And Maintenance
7. C LEANNING AND AINTENANCE 7.1 Cleaning Water Inlet Filter Recommended Engine Oil Add oil as described in chapter → Adding/Checking Oil. IMPORTANT •This pressure washer is equipped with a water inlet Used oil is a hazardous waste product and must be filter. - Page 23 Inspecting, Replacing or Cleaning the Spark Plug The spark plug should be checked after every 100 hours of operation or every six months. To replace or clean the spark plug: 1.Disconnect the spark plug wire by pulling it off the spark plug.
- Page 24 • Try to use up the fuel before storage. • Remove the hex screw from the carburetor. Drain 7.3 Cleaning the Carburetor the fuel from the tank, carburetor, and hose. Screw 1. Screw down the bolt on the bottom of carburetor the carburetor drain hex screw back once the fuel has with wrench.
-
Page 25: Technical Specifications
8. T ECHNICAL PECIFICATIONS 7.6 Winterizing Procedure • Pressure washer might be damaged if subjected Maximum Pressure 3500 PSI to freezing temperatures. This type of damage is not covered by the limited warranty. To avoid Rated Water Pressure 2900 PSI possible damages, use a small amount of Maximum Water Flow 2.6GPM... -
Page 26: Troubleshooting
9. T ROUBLE HOOTING PROBLEM POSSIBLE CAUSE SOLUTION The engine power switch is in Ensure the switch is in ON (I) position OFF (o) position No fuel Fill the fuel tank with regular gasoline Low oil shut down sensor Add oil until it reaches minimum level on tripped to protect engine dip stick Excess water pressure in... - Page 27 PROBLEM POSSIBLE CAUSE SOLUTION Nozzle tip not attached Attach required nozzle tip Turn on faucet. Ensure there are no Water supply faucet closed kinks or blockage in hose Ensure faucet is fully opened. Check Water supply pressure is to make sure water supply is a minimum 30 psi, 4 GPM Clean the water filter.
- Page 28 BLUBERY Shenzhen Aoyi Technology Co., Ltd. E-mail:support@aoyis.com ADD:No D710, South China Development Center, South China City, Pinghu Street, Longgang District, Shenzhen...
Need help?
Do you have a question about the GSW02A and is the answer not in the manual?
Questions and answers
Won’t start. Has spark/ has fresh gas.backfires thru exhaust.bought last summer. Hard to start but would if I keeper trying. Used 2 days ago,and it cranked after extended effort…stopped for lunch, has’nt started again. Gas is fresh non ethanol,90 octain,hoping that would help it start easier.
If the BLUBERY GSW02A won't start despite having spark and fresh gas, possible reasons and solutions include:
1. Choke lever in Close position: Move the choke lever to Open position immediately after starting.
2. Clogged air filter: Clean or replace the air filter.
3. Clogged carburetor: Clean the carburetor.
4. Low oil level: Check oil level; if low, add oil. The low oil shut-down sensor may prevent starting.
5. Incorrect starting method: Follow the correct starting procedure as outlined in the manual.
6. Carbon build-up on spark plug: Clean the spark plug.
Address each potential issue one by one to restore proper engine function.
This answer is automatically generated
where can i get an air filter for a GSW02A
You can find an air filter for the BLUBERY GSW02A 3500 PSI Pressure Washer on the eBay listing titled "Air Filter Cleaner For BLUBERY 3500 PSI Pressure Washer 2.6 GPM 212cc GSW02A." The item is sold by a seller specializing in mini bike, ATV, and scooter parts.
This answer is automatically generated
Is there a replacement pump for a GSW03A ?
I need a gas cap for a blueberry 3500 psi power washer. It’s the 212 cc model.