
Summary of Contents for Oldelft Benelux Easy DR
- Page 1 User Manual: Easy DR User Manual Easy DR Rev.: 17-04-2020 0344 ODB-100-5070ENG Rev.:17-04-2020...
- Page 2 User Manual: Easy DR Blank Page ODB-100-5070ENG Rev.:17-04-2020...
- Page 3 Changes regarding 60601- 3e edition and text updates 31-05-2016 Changed Sedecal interface to CPI interface Added detailed power on/off instructions. Updated collimator info. 29-09-2016 List with manuals delivered with the Easy DR Add Harmony3-ST Docking 02-03-2017 Correction telephone- and faxnumber 07-09-2018 Add Variant 183cm arm/correction environment conditions...
- Page 4 User Manual: Easy DR Oldelft Benelux offices Head Office The Netherlands Oldelft Benelux B.V. Wiltonstraat 41 3905 KW VEENENDAAL Tel. (31) 318 583 400 Fax. (31) 318 583 401 E-mail: info@oldelftbenelux.nl Internet: http://www.oldelftbenelux.nl ODB-100-5070ENG Rev.:17-04-2020...
- Page 5 CE mark on the front page. The number behind the CE Mark defines the responsible notified body. Oldelft Benelux B.V. systems are classified according to IEC 60601-1 as Class I, type B. Oldelft Benelux B.V. systems meet the relevant provisions of the European Medical Device Directive 93/42/EEC;...
- Page 6 User Manual: Easy DR Date of manufacture Serial number This mark indicated that this is a Type B Applied Part according to EN60601-1. This unit can be installed in the patient environment. Caution: Consult Instructions for Consulting the accompanying documents is advised.
- Page 7 User Manual: Easy DR Conventions The Easy DR has been designed to meet all safety requirements applicable to medical equipment. However, anyone using the Easy DR must be fully aware of potential safety hazards. The information contained in this chapter is provided to help users to operate the Ease DR safely.
- Page 8 Easy DR‘s save operation, call the service number of your vender for further instructions. c. The Easy DR should be cleaned regular to prevent the accumulation of dust. The contact surface should be cleaned after each patient for hygienic reasons.
-
Page 9: Table Of Contents
User Manual: Easy DR Introduction ..............10 Variants ................10 About this manual .............. 10 Classification ..............10 Installation ............... 11 Technical description ............11 Label and symbols ............. 12 Reference manuals ............12 General description/indications for use ........13 Physical description ............ -
Page 10: Introduction
Al other functions are similar as variant 1. About this manual This user manual is a guide for the operator of the Easy DR multifunctional X- ray unit. In this manual it is assumed that the operator is a professional and trained X-ray user, who has gained sufficient knowledge to operate Easy DR system safely. -
Page 11: Installation
User Manual: Easy DR Installation The installation procedure can be found in the: • Service Manual / ODB-100-5080ENG Technical description The technical description can be found in the: • Technical specifications Easy DR / ODB-100-5090ENG ODB-100-5070ENG Rev.:17-04-2020... -
Page 12: Label And Symbols
When this document and the reference manual differs, the reference manuals are considered as leading. List with manuals delivered with the Easy DR ODB-100-5070ENG User manual Key-User Manual Easy DR... -
Page 13: General Description/Indications For Use
User Manual: Easy DR General description/indications for use The Easy DR is a film-less X-ray system suitable for a wide range of radiological exams. The design is based on the WHO recommend WIS-RAD system and together with the Rogan ROX and VPX viewing station is very suitable for (mass) screening on TBC. - Page 14 User Manual: Easy DR The Easy DR is equipped with an elevator stand, which is firmly bolted to the floor. It can lift the support frame to the desired height. The support frame can also turn between o and -90 degree. This allows for a bed trolley to be placed over the detector so bed patients can be done.
-
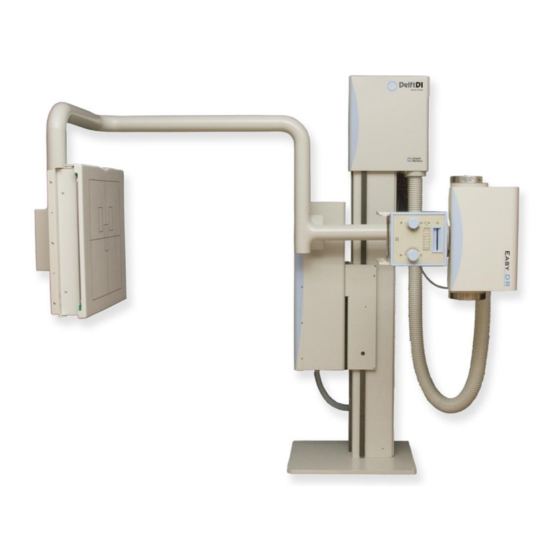
Page 15: Physical Description
User Manual: Easy DR Physical description In this paragraph only the Easy DR main hardware items are described. These are: • Elevator stand • Support frame • Control computer • X-ray tube unit • X-ray generator and control panel •... - Page 16 User Manual: Easy DR 1.9.3 Control computer The control computer is used to operate the detector and X-ray unit. The system comes with a wide range of preconfigured protocols for an optimal image quality. By selection of a protocol the correct X-ray settings (kV, Ma and Ms) are automatically set.
- Page 17 1.9.7 Lateral Positioning Arm. As an option, for the Easy DR, a Lateral Positioning Arm can be mounted to the detector frame. The mounting hardware is already set by the manufacturer when the equipment is ordered with this option. It only requires to insert the arm bar into its working position.
-
Page 18: 1.10 Functional Description
User Manual: Easy DR 1.10 Functional description The Easy DR operates without X-ray film: the X-ray image is captured with the X-ray detector and stored in digital memory. Digitized images are stored as DICOM 3.0 compatible files a local hard disk (short term) and automatically via a network link to the PACS and diagnostic viewer station. - Page 19 User Manual: Easy DR 1.10.2 Elevator stand The elevator stand moves the support frame up and down to accommodate the patient height. This movement is controlled by means of the elevator control switches on the hand control unit. When actuated, a safety switch fitted to the bottom of the detector unit prevents the elevator from moving down.
- Page 20 User Manual: Easy DR 1.10.4 Control computer The control computer is the controlling device for the Easy DR rather than a means for advanced diagnostics, which would require very high resolution/brightness as in fast viewing stations. These are beyond the scope of this manual.
-
Page 21: Safety Devices
Safety devices General safety The Easy DR and X-ray generator are equipped with safeguards to prevent injury to operator and patient during use and in case of system malfunctions. For the safeguards of the X-ray generator refer to the X-ray generator documentation. -
Page 22: System Safety
User Manual: Easy DR System safety 2.2.1 Safety switch A safety switch is mounted underneath the detector unit. When the pressure of an obstacle pushes on this plate, the control switch for downward and rotation movement on the hand control unit becomes inactive. The upward movement, however, remains possible. -
Page 23: Operating Controls
Hand control Motorized movements are only allowed if operator stands in front of and outside the working area of the Easy DR. WARNING: Motorized movements are only allowed if patient and system are observed by the operator, because of squeezing hazards. -
Page 24: X-Ray Generator Control Panel
X-ray generator control panel The description in this paragraph applies to the CPI MP200 generator with a special interface to the Easy DR system. For more details, see the documentation of the X-ray generator. Advice to consult the accompanying documentation: Operation manual HF generator. -
Page 25: Collimator Controls
User Manual: Easy DR Collimator controls The collimator unit contains three control knobs, a push button and a filter. • Control knob (1) controls both lateral X-ray field collimator blades • Control knob (2) controls the upper X-ray field collimator blade •... -
Page 26: The User Interface Of Control Computer
User Manual: Easy DR The user interface of control computer Canon Inc. is the legal manufacturer of the CXDI Control Note: Software used on the Easy DR Acquisition/Control Computer. The control computer is operated by; • touch screen buttons ODB-100-5070ENG... -
Page 27: Operating Instructions
Operating instructions Releasing the shipping locks Mobile Easy DR units are fitted with a two shipping locks: a locking screw or bolt to secure the elevator (only used during installation/transport) and a locking device for the support frame bolted on the floor. Fixed units do not have shipping locks. - Page 28 User Manual: Easy DR Turning on the x-ray generator The generator mini console is a small box with on the upper side the on and off button and on the lower side the prep and exposure button. In the middle there are indicators for fluoro and exposure when active the indicator will light.
-
Page 29: Switching Off, Applying The Shipping Locks
User Manual: Easy DR Switching off, applying the shipping locks On mobile Easy DR units there is a shipping lock bolted on the floor that must be applied before the Easy DR is transported. Fixed units do not have shipping locks. - Page 30 User Manual: Easy DR Press in the upper right corner for power down the generator. ODB-100-5070ENG Rev.:17-04-2020...
-
Page 31: Entering Patient And Exposure Related Data
User Manual: Easy DR Entering patient and exposure related data The patients' demographic data are stored locally in a master database, which may be connected to a Hospital Information System, a Radiology Information System, filled by typing in the individual patient record, or filled using a barcode scanner. -
Page 32: Patient Data Entry
User Manual: Easy DR Patient data entry Press the patient button to retrieve the patient worklist (optional) ODB-100-5070ENG Rev.:17-04-2020... - Page 33 User Manual: Easy DR If no worklist is available a patient input screen will be shown. ODB-100-5070ENG Rev.:17-04-2020...
-
Page 34: Protocol Selection
User Manual: Easy DR Protocol selection Select a category tab and the appropriate organ protocol. The exposure data for the selected protocol is displayed next to the system button. For changing the exposure settings press the CHANGE or XRAY CONTROL... -
Page 35: Making An Exposure
User Manual: Easy DR When the upper right corner shows READY the system is standby for taking an exposure. Making an exposure Setting Up: • Insert the patient data (see paragraph 4.6) • Select the appropriate protocol (see paragraph 4.7) ODB-100-5070ENG Rev.:17-04-2020... -
Page 36: Making A Pa Thorax X-Ray
WARNING: Motorized movements are only allowed if operator stands in front of and outside the working area of the Easy DR. WARNING: Operating the Easy DR from the hand control unit is only allowed when patient and system are observed and are... - Page 37 User Manual: Easy DR • Adjust the collimator using the collimator control. • Go to a "X-ray free" position. • Push the exposure button halfway for preparing the exposure. • If needed give breathing instructions. • Press the exposure button further down for exposure. The recording is accompanied by an audible and visual signal.
-
Page 38: 4.10 Reviewing Images
User Manual: Easy DR 4.10 Reviewing images On the tabs on the right one can optimize the image and add left or right markers in the image. The left or right marker may vary per protocol, the position of the marker is shown above the L and R button. - Page 39 User Manual: Easy DR Press the Reject button if the image is bad. A rejected image will not be sent to the PACS. When an image has been rejected one can return to the main screen via the OK button and select the appropriate organ protocol for a retake. A rejected image is not deleted from the system and can be un-rejected by pressing the reject button again.
-
Page 40: Maintenance
User Manual: Easy DR Maintenance All maintenance to the Easy DR system is described in the relevant manufac- turer's manuals. Advice to consult the accompanying documentation: • relevant manufacturer's manuals. No corrective maintenance should be performed by the operator, other than solving problems as mentioned in Paragraph 5.3... - Page 41 User Manual: Easy DR To display the studies in the study list, first the transmission to the PACS must be cancelled. Press the ERR button Press the CANCEL button Press OK This will interrupt the transmission to the PACS and the patient can now be found in the Study list.
-
Page 42: Sending Images Afterwards
User Manual: Easy DR If the PACS system is reachable again the studies can be resend from the Study List. Sending images afterwards If a fault on the network did not sent the images to the PACS, it is necessary to send these image manually after the fault has been corrected. -
Page 43: Calibrate
User Manual: Easy DR Calibrate To maintain a consistent image quality is important to regularly perform a calibration procedure. Calibration equalizes the individual differences of the pixel units. These differences are calculated for each pixel so that individual differences are not visible in a photograph. - Page 44 User Manual: Easy DR Select CALIBRATION Collimate so that the complete sensor is radiated. Check the remarks in the memo field Press the START button Press the Exposure switch for exposure ODB-100-5070ENG Rev.:17-04-2020...
- Page 45 User Manual: Easy DR If calibration data is correct a notification “Perform an Exposure” appears. A full calibration cycle contains 4 exposures If calibration data is incorrect. An error appears. Press OK to continue. Choose RETAKE and check settings, change exposure settings if appropriate ODB-100-5070ENG Rev.:17-04-2020...
- Page 46 User Manual: Easy DR Calibrate ready. The system shows “Calibration has succeeded” Press CHECK Set exposure settings and memo field as desired ODB-100-5070ENG Rev.:17-04-2020...
-
Page 47: Troubleshooting After Calibration Procedure
User Manual: Easy DR Troubleshooting after calibration procedure Problem: There is a marker in the image continually while I do not use a marker. The calibration is performed with a lead marker. This is calibrated along and is shown in the image... -
Page 48: Technical Specifications
Class I type B (according to EN 60601) Typology of installation Permanently connected Operation mode Continuous with intermittent load Note: Easy DR 183cm / Non-Rotation C arm Focus/film distance 183cm Angle of rotation around the Non-Rotation telescope vertical axis ODB-100-5070ENG... - Page 49 30 % ~ 80 %, non- condensing Atmospheric pressure 700 ~ 1060hPa range *Note: The Easy DR may only be used 1. Manufacturer CPI, type: CMP200D in combination with generator: 2. Manufacturer Sedecal, type: SHF515C Powering CPI generator Voltage, frequency...
Need help?
Do you have a question about the Easy DR and is the answer not in the manual?
Questions and answers