Table of Contents
Advertisement
Advertisement
Table of Contents

Summary of Contents for RUNOW 6310CB
- Page 3 Most families or individuals can't afford such a high cost. In order to help more families or individuals to do fitness training, embrace health and enjoy life at home, RUNOW came into being in 2015.
- Page 4 With this fitness equipment, you can enhance cardiovascular health and build stronger muscle strength at home. RUNOW's low decibel bearings are designed for home use. This product occupies a small space for storing conveniently. It can be stored quickly and easily without any tools or screws.
-
Page 5: Table Of Contents
CONTENT -----02 Your Warranty -----03 Safety Information -----04 Different Views -----05 Product Profile -----06 Packing List -----07 Main Part -----08 Screw Kit List -----09 Assembling Instructions -----13 Instruction Manual -----14 Operation Procedure -----23 ... -
Page 6: Your Warranty
YOUR WARRANTY This product is supplied with a 1 year warranty as follows: Warranty service for product accessories is provided free of charge within 1 year after purchasing the product. We only provide 1 year free warranty for home use. ... -
Page 7: Safety Information
SAFETY INFORMATION A great deal of emphasis was placed on safety in the design and manufacture of this fitness device. Still, it is very important that you strictly adhere to the following safety instructions. We cannot be held liable for accidents that were caused due to your negligence. -
Page 8: Different Views
DIFFERENT VIEWS... -
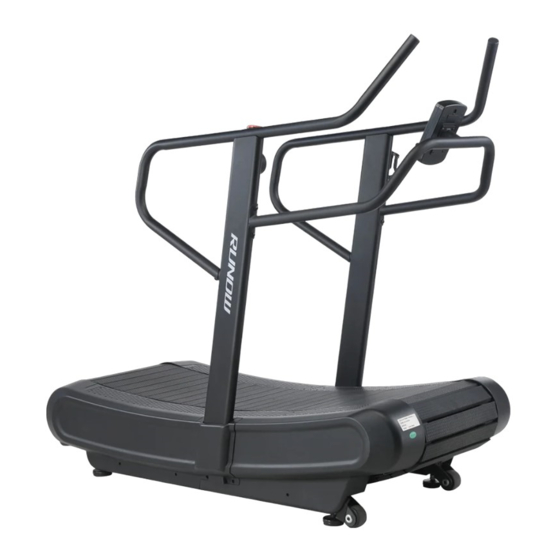
Page 9: Product Profile
PRODUCT PROFILE Console Manual Adjustable Handle Hand Rail Console Frame Upright Post Bottle holder Chain with Plastic Cover Upright Post Cover Plastic Side Cover Rear Main Frame Lifting Handle Metal Material 67” x 66” x *32” Dimension 63” x 17” Running Surface 287 LBS Item Weight... -
Page 10: Packing List
PACKING LIST Upright Post Console Frame Main body Upright Post Cover Hand Rail Left + Right Console User Manual Screw Kit User Manual... -
Page 11: Main Part
MAIN PART Plastic Cover Chain with Plastic Cover Fixed Aluminum chain belt Upright Post Front Roller Rear Roller... -
Page 12: Screw Kit List
SCREW KIT LIST Allen head C.K.S Allen head C.K.S Allen head C.K.S Phillip head C.K.S half thread bolt full thread bolt full thread bolt self-tapping screw M8×55×20. 8pcs M8*25 M8*15 ST4×16 8pcs Curve washer Hexagon socket head full Cross groove big flat head Φ8.5×R25×t2.0 thread bolt M8*45 pointed mouth full M4×16... -
Page 13: Assembling Instructions
ASSEMBLING STEPS Before assembly, take a close look at the individual assembly steps shown and carry out the assembly in the order given. Or you can assemble according to this video: https://youtu.be/a_fIKrXfbw8 1) Take out the console frame and console from the carton, connect the communication cable, then fix them with 4 pcs of M5X10 screws. - Page 14 3) Connect the right side upright post connecting wires, insert the redundant wire into the upright post, put the right side upright post on the bracket, then fix it with 4 pcs M8×55×20 screws.We do not recommend tightening the screws until all installations are completed. Same assembly step on the left side upright post.
- Page 15 5) Connect the wires from right side upright post and console frame, then fix them with 4 pcs M8*25 screws through 4pcs of washer. 6) As shown in the figure, first connect the left and right riser cover with the main frame cover, and then fix the left and right riser cover with 4 ST4*15 screws.Fix the bottle holder to the left riser with 2 cross grooved flat head tapered full tooth bolts M4*16.
- Page 16 7) Assembling finished.
-
Page 17: Instruction Manual
INSTRUCTION MANUAL DISPLAY FUNCTION: ITEM DESCRIPTION Display user workout time. TIME Display range 0:00~1:59:00 Display user workout distance. DISTANCE Display range 0.5~100 Display calories consumption during workout . CALORIES Display range 0 ~ 2000 WATT Display the power consumption during training. SPEED Display current training speed. -
Page 18: Operation Procedure
OPERATION PROCEDURE POWER ON-- 1) When POWER ON, LCD will fully display 1s (Figure 1) with a long beep sound, then enter into display standby mode( FIG 2), the pictures will be displayed from top ICON to bottom in sequence. Press STOP button for 2s, then turn into standby mode. - Page 19 3) Break mode: When START, press “START” button one time, enter break mode with buzzer sound 0.5s by every 30s. Computer still displays all functions ,but LCD windows will display”P” .Buzzer will sound for 1s and enter standby mode if the pause lasts for 5 minutes. Press ”...
- Page 20 Quick start : In standby mode, with single RPM>20 input, quick press “START”,buzzer sound 0.5s, then TIME、CALORIES、DISTANCE、WATTS、SPEED、& PACE shall light up in sequence ,and starts counting according to the operation value. (FIG 6) ”PULSE” ICON is lighten, if any heart rate loaded, the “PULSE” ICON will flash with current value,if no heartbeat signal input,LCD will display “P”.
- Page 21 6) INTERVAL10/20: Press” INTERVAL10/20” button ,enter to this mode , LCD will display ICON , with buzzer beeps 0.5s. If there is no signal input for more than 30 seconds during manual setup, the computer will return to standby mode. ...
- Page 22 If the moving result is displayed, press the "STOP" key to exit and return to the standby state. 7) INTERVAL 20/10: Press” INTERVAL20/10” button ,enter to this mode , LCD will display ICON(FIG 10) , with buzzer beeps for 0.5s. ...
- Page 23 Press the “STOP” button to sound the buzzer for 0.5s and enter into the stop mode. If the moving result is displayed, press “STOP” button to leave and return to standby mode. 8) INTERVAL CUSTOM: Press” INTERVAL CUSTOM” button, enter to this mode, LCD will display ICON(FIG 13) , with buzzer beeps for 0.5s.
- Page 24 mode. (FIG 14) (FIG 15) (FIG 16) 9) TARGET TIME: Press” TARGET TIME” button ,enter into this mode , LCD will flash and display TARGET& TIME . LCD “TIME” window displays the presetting value1:00 or the last setting value.Press “UP or DOWN”button to set (setting range 1:00~1:59:00), it is non-cyclic .
- Page 25 10) TARGET CALORIES: Press” TARGETCALORIE” button ,enter to this mode , LCD will flash and display TARGET& CALORIE. LCD “CALORIE” window displays the presetting value 2:00 or the last setting value.Press “UP or DOWN”button to set (setting range1~2000), it is non-cyclic. ...
- Page 26 11) TARGET DISTANCE: Press” TARGETDISTANCE” button ,enter to this mode , LCD will flash and display TARGET& DISTANCE. LCD “DISTANCE” window displays the presetting value 0.5KM/0.5Miles or the last setting value.Press “UP or DOWN”button to set (setting range0.5~100), it is non-cyclic. ...
-
Page 27: Treadmill Mobile Teaching
USING INSTRUCTION TREADMILL MOVING: When moving the machine, make sure that: 1) Place the device on a smooth, clean and sturdy surface. 2) After completing the above steps, hold the treadmill with both hands, stand up straight and lift the machine from the end, then allow the machine to slowly move forward or backward. -
Page 28: Exploded Drawing
Exploded Drawing:... - Page 29 Description Q'ty Description Q'ty Main frame 2 pin connected wire L-1250mm Upright post - right side VR 3 pin connected wire L-1250mm Upright post - left side 2 pin connected wire L-950mm Console frame VR 3 pin connected wire L-950mm Rear main frame lifting handle 3 pin connected wire L-500mm 2 pin - plug bottom section connected wire...
- Page 30 Driving wheel axle Allen head C.K.S half thread bolt M8×30×20 Driving wheel plate - Hex head lock-nut M8 Slat fixing belt Flat washer Φ8 EVA mat - t2.0×50×3600 Allen head C.K.S half thread bolt M10×25×15 Front plastic side cover - right side Hex head lock-nut M10 Front plastic side cover - left side Flat washer Φ10...
Need help?
Do you have a question about the 6310CB and is the answer not in the manual?
Questions and answers