Table of Contents
Advertisement
Advertisement
Table of Contents

Summary of Contents for Velieta KMHJ408
- Page 1 INSTRUCTION MANUAL MODE L: KMHJ408 24 Inch Wine Cooler Refrigerator...
-
Page 2: Table Of Contents
TABLE OF CONTENTS WINE CHILLER SAFETY IMPORTANT SAFE-GUIDES PARTS BREAKDOWN IMPORTANT SAFETY INSTRUCTIONS INSTALLATION INSTRUCTIONS Before using your wine chiller Installation of your wine chiller Electrical connection Extension cord Power bar with surge protector Installing stainless steel handle OPERATING YOUR WINE chiller Recommended temperature settings Storage Door lock... -
Page 3: Wine Chiller Safety
WINE CHILLER SAFETY Your safety and the safety of others are very important. We have provided many important safety messages in this manual and on your appliance. Always read and obey all safety messages. This is the Safety Alert Symbol. This symbol alerts you to potential hazards that can kill or injure you and others. -
Page 4: Important Safeguides
IMPORTANT SAFEGUIDES Before the appliance is used, it must be properly positioned and installed as described in this manual, so read the manual carefully. To reduce the risk of fire, electrical shock or injury when using the appliance, follow basic precaution, including the following: Plug into a grounded 3-prong outlet, do not remove grounding prong, do not use an adapter, and do not use an extension cord. - Page 5 Use two or more people to move and install appliance. Failure to do so can result in back or other injury. To ensure proper ventilation for your appliance, the front of the unit must be completely unobstructed. Choose a well-ventilated area with temperatures above 16°C (60°F) and below 32°C (90°F). This unit must be installed in an area protected from the element, such as wind, rain, water spray or drips.
-
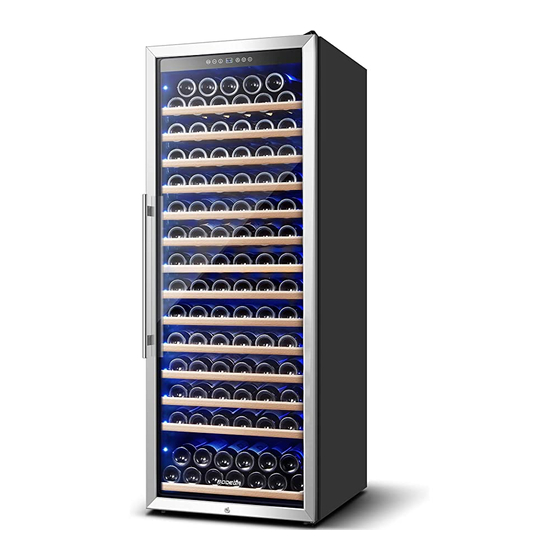
Page 6: Parts Breakdown
PARTS BREAKDOWN Control Panel Top Hinge Wooden Shelves Glass Door with Handle Kick plate Safety Child Lock Leveling Legs IMPORTANT SAFETY INSTRUCTIONS To reduce the risk of fire, electrical shock, or injury when WARNING using your appliance, follow these basic precautions: Read all instructions before using the wine chiller. -
Page 7: Installation Instructions
INSTALLATION INSTRUCTIONS Before using your wine chiller Remove the exterior and interior packing. Check to be sure you have all of the following parts: shelves 2 Keys Stainless Steel Handle Instruction Manual Before connecting the Wine Chiller to the power source, let it stand upright for approximately 2 hours. This will reduce the possibility of a malfunction in the cooling system from handling during transportation. -
Page 8: Extension Cord
3-prong wall outlet. The cord should be secured behind the appliance and not left exposed or dangling to prevent accidental injury. The appliance should always be plugged into its own individual electrical outlet which has a voltage rating that matches the rating label on the appliance. This provides the best performance and also prevent overloading house wiring circuits that could cause a fire hazard from overheated. -
Page 9: Operating Your Wine Chiller
Replace the door gasket to its original position. If you choose not to use the handle supplied, simply follow step 1 to access the installation screws and remove them and then place the two decorative plugs into the two holes separately. Continue on to step 3 to replace the door gasket to its original position. -
Page 10: Storage
Temperature setting range:5-18℃(40-65℉) Turns the interior light on or off Toggles the temperature display between Celsius and Fahrenheit Press to begin adjusting the temperature for upper or lower zone Adjusts the temperature in 1 degree increments Adjusts the temperature in 1 degree decrements Press for 3 seconds to turn on /off the appliance Light Control The light will automaticall turns off 10 mins later for energy saving. -
Page 11: Shelves
Romving Shelf ●To avoid the dam age of door se aling , please open the door fully whe n yo u sl ide out the sh elve s. ● Fo r yo u r co nvenie nce of taki ng wine , yo u ca n pull out the sh elf by 1/3 . O u r product is designed with sh elf holde r to prevent the sh elf pull ove r and fall off the ca binet . -
Page 12: Energy Saving Tips
Energy saving tips The wine chiller should be located in the coolest area of the room, away from heat producing appliances, and out of the direct sunlight. Charcoal filtration system Your wine is a living object that breathes through the cork ofits bottle. In order to preserve the quality and taste of your fine wines, they must be stored at the ideal temperature and ambient conditions. -
Page 13: Troubleshooting Guide
TROUBLESHOOTING GUIDE You can solve many common wine chiller problems easily, saving you the cost of a possible service call. Try the suggestions below to see if you can solve the problem before calling the servicer. PROBLEM POSSIBLE CAUSE SOLUTION Not plugged in. - Page 14 Check to assure that the chiller is level. The chiller is not leveled Make sure the bottles don’t touch each Vibrations. The bottles are vibrating. others. There is an object under the chiller. Remove the object. Level the chiller. The rattling noise may come from the flow of the refrigerant, which is normal.
- Page 15 15 days upon receipt of the product. 2. Customers are entitled to free repair service from Velieta for any product proven defective in material or workmanship that results in product failure during normal consumer usage and conditions within the valid warranty period, which is 12 months counting from the date of selling.
Need help?
Do you have a question about the KMHJ408 and is the answer not in the manual?
Questions and answers