Table of Contents
Advertisement
Quick Links
Advertisement
Table of Contents

Related Manuals for Coachsound TourMaster MLA2504


Summary of Contents for Coachsound TourMaster MLA2504
- Page 1 Coachsound The TourMaster User Manual Multichannel Audio Server Model: MLA2504...
-
Page 2: Table Of Contents
Contents 1.0 TourMaster System Overview .......................... 4 1.1 Head Unit – Electrical Ports and Connections Diagram ................4 1.2 Power Connection ............................4 1.3 Control Panel Port (CPANEL) ......................... 5 1.4 GPS Aerial Port .............................. 6 1.5 USB Port ................................ 6 1.6 Main Loom Ports ............................ - Page 3 4.0 Advanced System Operation .......................... 15 4.1 Saving GPS Waypoints ..........................15 4.1.1 Saving a Waypoint-Manual Method ....................15 4.1.2 Error messages when Manually saving GPS Waypoints ..............16 4.2 Modifying System Settings ......................... 16 4.2.1 Entering the Option Menu ........................17 4.2.2 Modify Initial Route and Segment .......................
-
Page 4: Tourmaster System Overview
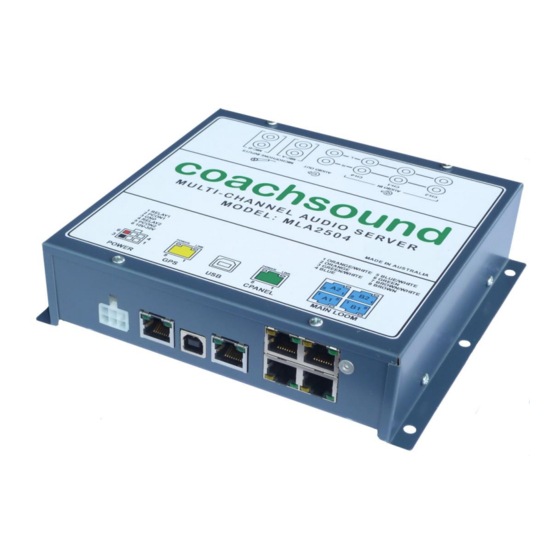
1.0 TOURMASTER SYSTEM OVERVIEW The Coachsound TourMaster is a multichannel tour commentary system that distributes audio to individual seats providing your passengers choice and control of volume and channels. The Coachsound TourMaster system consists of a central head-unit to which the GPS antennae, drivers control panel, microphones and other external audio sources such as DVD players are connected. -
Page 5: Control Panel Port (Cpanel)
• 10V-30V, GROUND - POWER SUPPLY: These are the power supply connections to the system. The system is internally over-current protected but external fuse protection is recommended: Connect power to ignition side of key and after isolating switches; Recommended external fuse protection: 10 Amp Maximum current (operational –... -
Page 6: Gps Aerial Port
“USB CONNECTED” and the PC will show the system as a disk drive called “TOURMASTER” within Windows Explorer. The USB port is used in conjunction with the coachsound “Route Builder” software tool to update and synchronize audio tour commentary for the system. (See document: “Using the Route Builder Tool”) 1.6 MAIN LOOM PORTS... -
Page 7: Auxiliary Audio Channels
1.7 AUXILIARY AUDIO CHANNELS 1.7.1 AUDIO IN Stereo RCA input connections provide the option to connect up to three external audio systems such as DVD players, CD players etc to the system. Audio on these connections appear on the audio controller channels after the microphone channels (if enabled) and after any commentary channels and music zones. -
Page 8: Getting Started
• Activation of the systems VOX (voice override) circuit can cause either MIC-A or MIC-B channels to override all other channels. This can be used (for instance) for live information or alert messages from the driver or tour guide. See option: “4.2.8 Enable or Disable Microphone VOX Overrides” for information on this feature. -
Page 9: System" Folder
Music channels (ZONES) will appear on headphone channels after both the microphone and commentary channels, but before the external “AUDIO IN” channels. “ZONE 1” audio can be used as “silence filler” audio between audio commentaries. See option: “4.2.9 Set the Commentary-Idle Function”... -
Page 10: Headphone Channel Ordering
2.3 HEADPHONE CHANNEL ORDERING The coachsound system offers a total of 22 mono or 11 stereo audio channels maximum. This channel ‘stack’ can be a mixture of mono and stereo channels. One stereo channel consumes two of the available 22 channels;... -
Page 11: Basic System Operation
3.0 BASIC SYSTEM OPERATION This section explains the basic operation of the system of which the driver or guide would typically need to know: • Powering the system; • GPS Status messages; • Manual versus Autonomous mode; • Selecting Routes and Segments; •... -
Page 12: Gps Status Messages
• When the system is turned ON, the backlight of the display will light up and a sequence of boot messages will be displayed: coachsound.com (c)2013 TOURMASTER MLA2504 v1.00 BUILDING DB PLEASE WAIT... • When the system has booted, the following messages may be displayed: No commentary has been found. -
Page 13: Manual Vs Autonomous (Gps) Mode
3.4 MANUAL VS AUTONOMOUS (GPS) MODE • Manual Mode System operation without GPS tracking is called “manual mode”. In this mode, the Route and Segment must be pre-selected before manually playing the audio segment via the PLAY key. (The selected Route and Segment is displayed on the control panel). -
Page 14: Playing, Pausing And Stopping Audio Segments
3.7 PLAYING, PAUSING AND STOPPING AUDIO SEGMENTS In MANUAL mode, pressing PLAY will play the currently selected segment displayed on the panel second line. The system will auto-increment to the next segment in the playlist once the current segment has finished playing. -
Page 15: Advanced System Operation
4.1 SAVING GPS WAYPOINTS Before coachsound systems can be used autonomously with GPS, all audio segments in the route (tour) must have valid GPS information. The best way to do this is via the “Route Builder” tool and this is the preferred method. -
Page 16: Error Messages When Manually Saving Gps Waypoints
4. You should have the following message on the panel. If you accidentally play the audio instead, you must pause and stop the audio and try again; SAVE WAYPOINT? 5. Press the PLAY key to enter the “save waypoint” function. You should then see the following message: PLAY=Y, OTHERS=N ARE YOU SURE? PLAY=Y, OTHERS=N... -
Page 17: Entering The Option Menu
System settings include: • Set to load-default or resume-previous route and segment at power-up (manual mode) • Set default route and segment at power-up (manual mode); • Turn GPS autonomous mode on and off; • Adjust volumes of the AUDIO-IN and MICROPHONE inputs; •... -
Page 18: Set Default Route And Segment
The new setting has been saved; press any key to return to OPTIONS UPDATED. normal operation. PRESS ANY KEY... 4.2.3 SET DEFAULT ROUTE AND SEGMENT Pressing PLAY will allow modification of this option. Pressing SET DEFAULT R/S? another key will skip to the next option. PLAY=Y, OTHERS=N This option changes the default Route and Segment that loads at power up in manual mode. -
Page 19: Adjust Volumes Of Auxiliary Audio Channels
4.2.5 ADJUST VOLUMES OF AUXILIARY AUDIO CHANNELS Pressing PLAY will allow modification of this option. Pressing ADJUST VOLUMES? another key will skip to the next option. PLAY=Y, OTHERS=N It is advisable that all headphone channels have approximately the same apparant volume level. This option allows the volume levels of the audio inputs (AUDIO-IN and MICROPHONES) to be adjusted so they have approximately the same volume as the recorded commentary and ZONE’s when selecting between different headphone channels. -
Page 20: Enable Or Disable Microphone Channels
4.2.7 ENABLE OR DISABLE MICROPHONE CHANNELS Pressing PLAY will allow modification of this option. Pressing SET MICS ON/OFF? another key will skip to the next option. PLAY=Y, OTHERS=N This option enables or disables both microphone channels in the system. If the microphones are set to OFF, then the VOX override circuits are also disabled. -
Page 21: Set The Commentary-Idle Function
The setting has been saved; press any key to return to normal OPTIONS UPDATED. operation. PRESS ANY KEY... 4.2.9 SET THE COMMENTARY-IDLE FUNCTION Pressing PLAY will allow modification of this option. Pressing SET LING’L IDLE? another key will skip to the next option. PLAY=Y, OTHERS=N This option changes what audio appears on the audio commentary channels between commentaries (This is commonly known as “Silence Filler”... - Page 22 Modifications: Any modifications made to this device that are not approved by Coachsound Pty Ltd may void the authority granted to the user by the FCC to operate this equipment.
Need help?
Do you have a question about the TourMaster MLA2504 and is the answer not in the manual?
Questions and answers