Advertisement
Quick Links
WaterGreat SR-2
TM
Installation
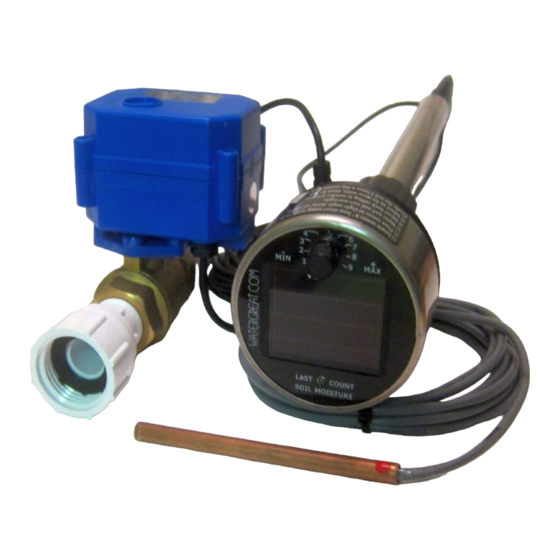
Thank you for purchasing the WaterGreat LLC SR-2 gravity feed watering controller.
1) Attach stake and stainless steel tube to the control assembly as shown and place in
the ground where the sun shines
at least 5 hours a day. Turn knob
to below "1" for no watering (as
shown in picture) until the unit
charges in the sun (up to 24
hours).
2) Place the slender sensor rod in
an area watered by the system,
about 4 inches from a dripper if
using drip irrigation. Push the rod
into the soil, red dot UP at a slight
angle, so that lower tip is about 1
1/2 inches from the surface. Use
undisturbed soil. It is best to
place the sensor in an area that
dries the quickest. GIVE THE
AREA A GOOD WATERING
AFTER INSERTION.
3) Connect the motorized gate valve
to a spigot or hose as shown.
Alternately, you may remove the
hose fittings and directly plumb to
1/2" NPT (gives maximum flow).
Connect the outlet to the drip
irrigation system or other watering
system. Gravity feed systems need
special care to ensure even
watering. Use big tubing and low
flow dripping if irrigating more than a
couple of plants. Use adjustable
drippers and make each dripper
output the same quantity of water. If
only watering one or two plants,
direct water so that each is watered
equally. See the section on
"Watering considerations for Gravity Feed Systems." If desired, the valve can be directly
installed into PVC pipe or plumbing as well. Note the IN and OUT can be either side. If
sand or debris is present in the water, place a filter in-line prior to the valve.
WaterGreat LLC
https://watergreat.com
Advertisement

Summary of Contents for WaterGreat SR-2
- Page 1 WaterGreat SR-2 Installation Thank you for purchasing the WaterGreat LLC SR-2 gravity feed watering controller. 1) Attach stake and stainless steel tube to the control assembly as shown and place in the ground where the sun shines at least 5 hours a day. Turn knob to below “1”...
- Page 2 We reserve the right to inspect the defective Emitting Diode) will blink and indicates the ‘Current’ or part prior to replacement. WaterGreat LLC will not be measured moisture level. At any time a watering cycle is responsible for consequential or incidental cost or initiated when the knob is turned wetter than the current damage caused by the product failure.
- Page 3 Please consider purchasing our 100 foot 25 dripper watering add on for gravity feed systems. It hooks directly to the SR-2, or you may use PVC or a 5/8” garden hose to extend the water to your garden area. WaterGreat LLC...
- Page 4 WaterGreat SR-2 Advanced Instructions This document covers Setting the Watering Time, Connecting Wiring, and some basic troubleshooting guides. Contact support@WaterGreat.com if you have inquiries or suggestions for clarifying these procedures. Setting the Watering Time 1) Twist the control head counter clockwise until it hits the stop (a small amount), then separate the control head from the black support housing.
- Page 5 WaterGreat LLC Support To extend the wiring, just pay attention to the We at WaterGreat LLC want you to be our customer for life. We will color coding and carefully remove the existing only sell you the same quality...
-
Page 6: Error Codes And Conditions
Very low moisture readings (few or Check that sensor is close to the no blinks) irrigation source, and that the soil appears moist. Reposition the sensor to firm soil near the water source or in the sprinkler pattern. WaterGreat LLC https://watergreat.com...
Need help?
Do you have a question about the SR-2 and is the answer not in the manual?
Questions and answers