Advertisement
Quick Links
Advertisement

Summary of Contents for APUP SPC-150
- Page 1 SPC-150 Air/Hydraulic Strut Spring Compressor Operating Manual...
-
Page 2: Safety Cautions
SAFETY CAUTIONS ONLY qualified mechanics/technicians should use this equipment. Do NOT overload or serious injury may result. Do NOT Compress spring until coils touch or bind. A compressed spring is VERY DANGEROUS. ALWAYS unload spring before removing from strut. Do NOT compress spring if it tends to bow. Do NOT drop spring compressor assembly. -
Page 3: Technical Specifications
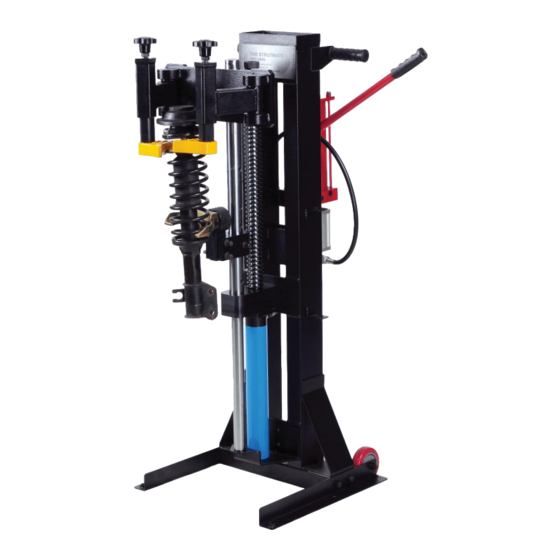
This unit is NOT designed for Heavy-Duty purpose. It is for light to medium- duty only. Technical Specifications Max. Spring Compression Capacity 900kg (1,984 LBS) Max. Spring Compression Range 25cm (10”) Max. Spring Width 20cm (7.87”) Max. Spring Width on Large Shoe 19.5cm (7.67”) Recommended Pounding Pressure Limit 100~250kg (220~550 lb) -
Page 4: Owner's Responsibility
1. Owner’s Responsibility To maintain machine and user safety, the responsibility of the owner is to read and follow all instructions on this manual. A. Read and follow the safety instructions and keep this manual readily available for machine operators. B. - Page 5 3. Assembling Wheel Casters Assemble two (2) wheel casters by using provided bolts, washers and nuts. 4. Understand your adapters Each shipment includes two (2) different types of sturt adapters. One is used for holding the horseshoe mount and the other is used for holding the bottom of the strut.
- Page 6 5. Mount the strut correctly Spring must FULLY nest on the adapter to hold downward pressure. Pay particular attention when selecting the spring mount adapter. Strut spring MUST fully nest on the adapter. If spring mount adapter is too large, the strut can be slipped or tilted due to a heavy downward-travel pressure.
- Page 7 6. Spring Arms Be sure to set spring arms center-aligned as shown on above pictures. It is very important to set up correctly to distribute load/pressure as even as possible. Spring MUST be inside Guide and must be fully nested on horseshoe...
- Page 8 Spring must be FULLY nested inside the claws of the spring clasp assemblies and Spring Clasp Claw assemblies must be FULLY tightened by its two (2) fasteners. With the strut assembly properly positioned, compress spring until the bottom coil of spring is free of the lower spring seat.
- Page 9 7. Restraint Chain & Safety Cage ALWAYS Wrap Restraint Chain around the Spring Compressor and strut as shown on below photos. Adjust the chain ends and close the safety shield cover...
- Page 10 8-1. Compress Spring Before compressing the spring, be sure to understand below figures...
- Page 11 8-2. Compress Spring After positioning the strut on correct adapter and with top spring arms secured, compress spring either by hand-pump or by compressed-air from service shop. COMPRESS SPRING ONLY FAR ENOUGH TO RELIEVE PRESSURE ON THE STRUT END RETAINER. DO NOT OVER COMPRESS THE SPRING! LOCK Check to make sure that the spring is safely secured and then start to compress the spring coils.
-
Page 12: Support Plate
9. Support Plate SPC-150S comes with built-in strut support plate. It is used for holding weight of the strut TEMPORARILY when positioning the strut to the mount adapter. CAUTION: Make sure to keep support plate AWAY from the bottom of strut assembly before compressing spring. - Page 13 Do NOT stand in front of protective cage at all times. This unit is manufactured under strict quality control in APUP’s factory in South Korea. If you encounter any technical difficulty while using the unit, contact your distributor or retailer for support.
Need help?
Do you have a question about the SPC-150 and is the answer not in the manual?
Questions and answers