Advertisement
Quick Links
Safety warning
Fast rotation propellers can hurt humans and animals
To prevent injury, do:
•
Keep hands off a running vehicle
•
If you loose control of the vehicle, stop immediately
Lithium batteries can release smoke or cause a fire
To prevent damage, do:
•
Don't charge the batteries unattended
•
Don't use a damaged or punctured battery
•
Do not short circuit the battery
•
Avoid temperatures below -10 and above 50 degrees celcius.
•
Don't use batteries that are colder than 15 degrees celcius
•
Always have a plan for what to do in case of a fire: If you are
indoor, open a window and get the battery outside to prevent
smoke or fire.
•
Do not open or modify the battery in any way.
•
For optimal performance, store the battery at around 30%
capacity and between 10 and 20 degrees celcius
•
Follow airport regulations for carrying lithium batteries on
airplanes. (Usually hand luggage only)
1
Advertisement

Related Manuals for MakeKit hover:bit

Summary of Contents for MakeKit hover:bit
- Page 1 Safety warning Lithium batteries can release smoke or cause a fire Fast rotation propellers can hurt humans and animals To prevent damage, do: To prevent injury, do: • Don’t charge the batteries unattended • Keep hands off a running vehicle •...
- Page 2 Reset button Meet the micro:bit Antenna Battery 3V 2,4 gHz Screen (5x5 pixels) Haircut Button A Button B Sensors Gold teeth Front Backside micro:bit is a small computer with prosessor, sensors, display and radio. It has connection pins for external components like LEDs, speakers or various sensors.
-
Page 3: Hand Control
Hand control Rolll / turn Decrease throttle Increase throttle micro:bit Battery gauge Throttle indicator Holder, airply Motion based control with accelerometer AA battery pack (Farnell) -
Page 4: Control Board
Charge port + Control board firmware update (micro USB) By MakeKit and SPRacing Main switch Battery plug Servo connector Motor 1 (push) Motor 2 (skirt) STM32 F303 processor With Betaflight software... -
Page 5: How It Works
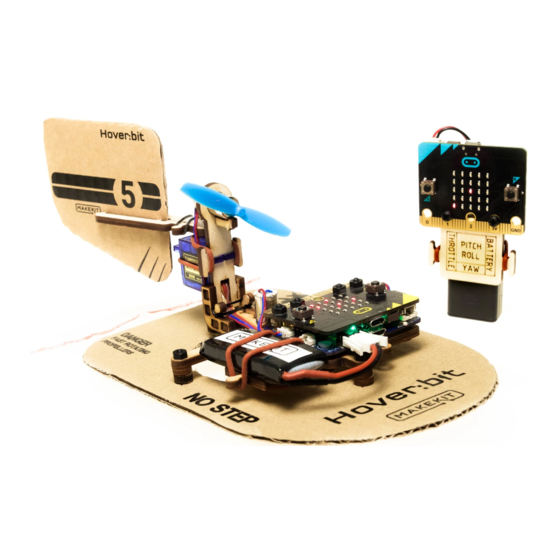
How it works Micro:bit - receiver Rudder control Rudder SERVO Air pillow fan Pusher fan 46000 RPM 46000 RPM Control board with motor drivers... - Page 6 Charging Power off Parts: Off / On Battery Air:bit control board The battery can be charge with or without the micro:bit mounted 1. Switch off the power 2. Plug the big white plug into the grey connector “1s LiPo” 3. Connect the micro USB into control board 4.
- Page 7 Tools Must have: Recommended: Piece of A4 paper Small Marker Glue gun Utility knife Small cutting pliers philips Socket wrench screwdriver contact 5.5mm Scissors Ruler Nose pliers adhesive glue...
- Page 8 Parts Remote holder Tail fin holder Motor holder 2x angle connectors Base frame Wedges 8x spacers 2x small O-rings 3 Large o-rings 1 CW propeller 1 CCW propeller 4 stk knurled 2x m3x8 nylon 4x m3x12 nylon 4x m3x15 nylon 2x m3x12 14x nylon nuts screws...
- Page 9 Parts (electronics) Servo motor Servo horn 2x Motors Ziplock bag, 15x20 cm Control board Lithium battery 1-2 Micro:bit start kit (sold separately)
- Page 10 Assembly...
- Page 11 Assemble the remote (skip if you made the Air:bit) Tools: Philips Screwdriver Parts: 2 nylon screw 2 nylon m3x8 nuts m3 Remote holder • Place the micro:bit with screen facing up on top of the holder (1) • Make sure the remote holder also is facing up •...
- Page 12 Control board (skip if you made the Air:bit) Tools: Philips Screwdriver Deler: 4 stk nylon screws m3x12 • Screw the barrel nuts to the control board. They will 4 knurled provide a connection to the micro:bit barrel nuts Airbit control board •...
- Page 13 Countersunk screws (skip if you made the Air:bit) Tools: Philips Screwdriver Parts: Nylon nuts countersunk screws • Pull the screws trough and attach the nuts on the bottom side of the board Assembled control board...
- Page 14 micro:bit (skip if you made the Air:bit) Tools: Philips Screwdriver, pipe wrench 5.5mm Deler: Assembled control board • Place the micro:bit on the barrel nut on the control board micro:bit 4 nuts • Screw on the nuts “finger tight” so the connection is solid but you don’t damage the plastic screws.
- Page 15 Making the raft Tools: Utility knife or scissors Parts: • Carefully cut along the dotted lines Cardboard box from kit • Cut out one of the tail fins...
- Page 16 Making the raft Tools: Marker Parts: Cardboard parts Large ziplock bag from kit • Place cardboard exactly in the middle of the ziplock • Mark the inner circle and the outer line with a marker...
- Page 17 Making the raft Tools: Marker Parts: Cardboard raft 4 nylon screw m3x15 • With a small screwdriver or sharp tip, punch 4 thin holes in the marked crosses. • Insert the four screws as shown above...
- Page 18 Making the raft Tools: Scissors Marker Parts: 4 cm 4 cm Ziplock bag • On one side of the ziplock bag, cut out the marked hole with a pair of scissors • On the other side of the bag, use a ruler to draw a square 4 cm from the edges.
- Page 19 Making the raft Tools: Scissors Parts: Ziplock bag • Carefully cut out the square on back side only • The bag should have a square hole on one side and a hole on the other side.
- Page 20 Making the raft Tools: Hot glue or contact adhesive glue Parts: • Turn the raft upside down. • Place hot glue around the hole • Place the bag so it matches the markings. • Make sure the big squared cutout is on top and the circular hole is at the bottom.
- Page 21 Making the raft Tools: Hot glue or contact adhesive glue Parts: • To protect the bag from melting, fold a • Notice the “glue line” where A4 paper and insert into the bag the glue should be placed • This is only needed if using hot glue Glued raft •...
- Page 22 Making the raft Tools: Parts: • Your raft should now look like this! Glued raft • Zip the bag together to keep the air pressure inside when drifting...
- Page 23 Assembly Tools: Parts: • Mount the control board • Place two spacer rings on each assembly to the base frame screw Glued raft Base frame • Screw on all four bolts • The screw can not go above above the nut as this can block the battery plug.
- Page 24 Assembly Tools: Parts: • Use the angle connectors to • Insert the servo and pull the cable mount the motor holder to the trough. The servo head (white base frame circle) should on the left side. 2 angle connectors Motor holder Large o-ring Servo •...
- Page 25 Assembly Tools: Parts: • Press the tail fin assembly onto the servo head (1). Make sure it sits firmly Tail fin assembly Wedge • Insert the wedge (2) 2 motors • Insert the 2 motors so they sit firmly • Underneath, make sure the motor is flush with the base frame and doesn´t stick out too much.
- Page 26 Assembly Tools: Parts: Small o-ring • Pull the small o-ring over the motor cable and the servo cable to keep them away from propeller motion Left side Servo Motor 2 ORANGE BROWN Motor 1 Right side • Make sure to plug •...
- Page 27 Assembly Motor 1: CW Tools: Parts: Motor 2: CCW Tail fin • Slide the tailfin into the tail fin holder • Attatch a CW propeller at motor 1 • Attach a CCW propeller at motor 2 1 CW 1 CCW propeller propeller Large o-ring...
- Page 29 Contact: www.makekit.no henning@makekit.no makekit gomakekit (also twitter) Get fast response at our facebook group: www.facebook.com/groups/goairbit/...
Need help?
Do you have a question about the hover:bit and is the answer not in the manual?
Questions and answers