Advertisement
Quick Links
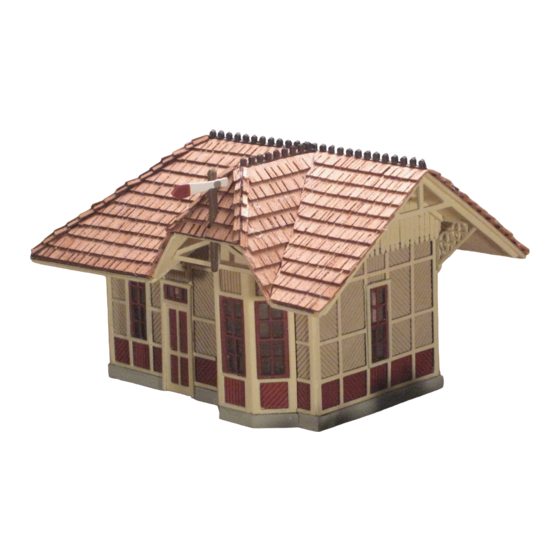
Flag stop was strongly influenced by, but
not an exact copy of, the Pottsville Branch
station of the Lehigh Valley Railroad. The
station consisted of one large room with
one corner partitioned off by a rail creating
a six by eight foot area. The building was
covered on the outside by diagonal
sheathing with adjacent panels at a ninety
degree angle to each other. This unusual
feature is depicted on the model creating a
very interesting and detailed structure.
Ornate roof braces and gable trim add to
the uniqueness of the model. The original
structure had galvanized ridge cresting
which is also reproduced on the model.
The ornate detail of Flag stop make it a
beautiful addition to any layout large or
small.
www.heartlandrailway.com
It is strongly recommended the entire instruction
sheet be read before starting assembly of the
model. The walls are three courses thick and the
interior course is 1/32" plywood which is tab and
slot construction.
windows are peel and stick material. Laser cut
pieces are held in place by tiny tabs on the parts
sheet. Use a razor knife to cut the pieces front
and back before pushing them off the sheet. Use
a pointed razor knife to remove the paper backing
from the peel and stick windows to expose the
sticky backing.
assemble the model are a razor knife, white
carpenters glue, a pair of tweezers, and some
sandpaper.
gluing. Part warping will be discussed in detail in
sections of the instructions. Do not remove any
of the numbered parts from the parts sheet until
you are ready to use them. When referring to the
model, the side with the bay window will be
considered the front, the side with the gable will
be called the right side, the side opposite the bay
window the back,and the hip roof side opposite
the gable the left side.
We hope you enjoy our model, it should be a
great and unusual addition to your layout.
Page 1
The lower sashes of the
The basic tools needed to
All parts should be test fit before
Advertisement

Summary of Contents for Heartland Railway Flag Stop
- Page 1 Part warping will be discussed in detail in The ornate detail of Flag stop make it a sections of the instructions. Do not remove any beautiful addition to any layout large or of the numbered parts from the parts sheet until small.
- Page 2 www.heartlandrailway.com Remove the floor, ceiling, and ceiling braces from the 1/16" material parts sheet. The ceiling has the two slots in it, the floor has no slots and the bump out for the bay window. The slots in the ceiling go toward the left side.
- Page 3 www.heartlandrailway.com The bay window sections are shown in the front drawing but they installed this time. Remember vertical sections over and under the windows and doors and the scribe lines on adjacent pieces are always at ninety degrees from each other.
- Page 4 www.heartlandrailway.com The base or bottom border is designed to stick out slightly farther than the 1/32" scribed material and the 1/64" frame material combined. If the base material hangs below the bottom of the building sand it off even with the bottom. 48 49 45 46 50 51 52...
- Page 5 www.heartlandrailway.com The outside frames should already be 1/32" spacer in gable Outside window frames removed from the parts sheet. The lower sashes and window glazing need to be installed before the side frames can be glued to the building. There are two different ways the lower sashes can be installed.
- Page 6 www.heartlandrailway.com Remove the ornate gable piece with the top border attached from the 1/64" parts sheet. DO NOT cut the individual boards from the parts sheet. Remove the solid 1/64" gable end from the parts sheet and glue it to the ornate piece lining up the area where the piece will meet the rafters. After the glue dries run a razor knife along the rafter side of the ornate piece freeing it from the border.
- Page 7 After the glue dries cut the joist from the surrounding boarder with a sharp razor knife. Turn the platform over and glue the flag stop to the center of the platform. 9. Install the cedar roof shingles by first installing the starter strip along the bottom edge of the roof.
- Page 8 www.heartlandrailway.com 1/32" Plywood 1D. Floor joist material 2D. Left wall 3D. Back wall 4D.. Right side wall 5D. Front wall 6D. Right side eve braces 7D. Right side rake trim 8D. Left side eve trim 9D. Right side gable spacer 10D.
Need help?
Do you have a question about the Flag Stop and is the answer not in the manual?
Questions and answers