Advertisement
Quick Links
Advertisement

Related Manuals for DIY BACKYARD PLANNING Gazebo with Hip Roof

Summary of Contents for DIY BACKYARD PLANNING Gazebo with Hip Roof
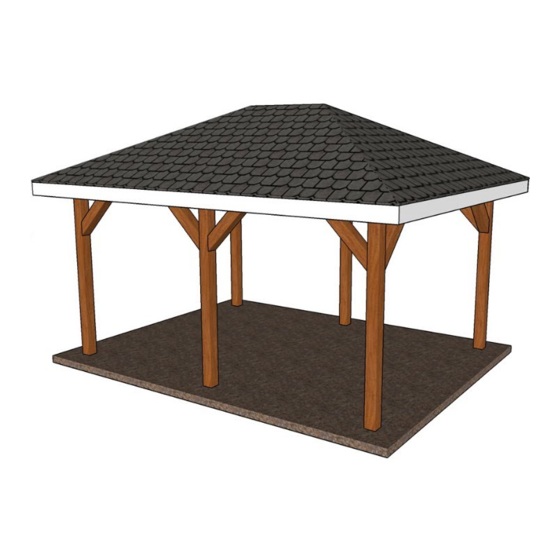
- Page 1 www.diybackyardplanning.com...
- Page 2 Page 1 of 18 14' x 14' Gazebo with Hip Roof Raw Materials Needed ITEM NO. PART NUMBER DESCRIPTION QTY. DESCRIPTION QTY. 10ft 6 x 6 6 x 6 Lumber x 120" Long 4 pcs 6 x 6 x 10ft Long Front Stringer 2 x 10 Lumber x 168"...
- Page 3 Step 2 - Miter Leg Braces Step 2 - Miter Leg Braces Step 2 - Miter Leg Braces Step 2 - Miter Leg Braces Page 2 of 18 Page 2 of 18 Page 2 of 18 Page 2 of 18 Item No.
- Page 4 Step 3 - Assemble Gazebo Ends Step 3 - Assemble Gazebo Ends Step 3 - Assemble Gazebo Ends Step 3 - Assemble Gazebo Ends Page 3 of 18 Page 3 of 18 Page 3 of 18 Page 3 of 18 Item No.
- Page 5 Step 4 - Assemble Gazebo Base Step 4 - Assemble Gazebo Base Step 4 - Assemble Gazebo Base Step 4 - Assemble Gazebo Base Page 4 of 18 Page 4 of 18 Page 4 of 18 Page 4 of 18 Stand up the 2 Gazebo Ends (Item # 1A) that you assembled Item No.
- Page 6 Step 5 - Cut Rafters Step 5 - Cut Rafters Step 5 - Cut Rafters Step 5 - Cut Rafters Page 5 of 18 Page 5 of 18 Page 5 of 18 Page 5 of 18 Item No. Material: 2 x 8 x 148-7/16" Long Using four 14ft 2 x 6's cut Rafter 001 (Item # 5) and Rafter 002 (Item # 6) Qty.: as shown below.
- Page 7 Step 6 - Assemble Rafter Step 6 - Assemble Rafter Step 6 - Assemble Rafter Step 6 - Assemble Rafter Page 6 of 18 Page 6 of 18 Page 6 of 18 Page 6 of 18 Item No. Material: Rafter Sub-Assembly Lay out the 2 - 148-7/16"...
- Page 8 Step 7 - Install 1st Rafter Step 7 - Install 1st Rafter Step 7 - Install 1st Rafter Step 7 - Install 1st Rafter Page 7 of 18 Page 7 of 18 Page 7 of 18 Page 7 of 18 Attach rafter sub-assembly (Item # 5A) to the gazebo base as shown below using 2 screws on each side of the board at each corner.
- Page 9 Step 8 - Install 2nd Rafters Step 8 - Install 2nd Rafters Step 8 - Install 2nd Rafters Step 8 - Install 2nd Rafters Page 8 of 18 Page 8 of 18 Page 8 of 18 Page 8 of 18 Attach the next 2 rafters (Item # 6) to the gazebo base as shown below using 2 screws on each side of the board at each corner screwed in at an angle the same way you...
- Page 10 Step 9 - Cut Remaining Rafters Step 9 - Cut Remaining Rafters Step 9 - Cut Remaining Rafters Step 9 - Cut Remaining Rafters Page 9 of 18 Page 9 of 18 Page 9 of 18 Page 9 of 18 Cut the four 113-7/16"...
- Page 11 Step 9 cont. - Cut Remaining Rafters Step 9 cont. - Cut Remaining Rafters Step 9 cont. - Cut Remaining Rafters Step 9 cont. - Cut Remaining Rafters Page 10 of 18 Page 10 of 18 Page 10 of 18 Page 10 of 18 Cut four of the 8ft 2 x 8's into four 85-7/16"...
- Page 12 Step 9 cont. - Cut Remaining Rafters Step 9 cont. - Cut Remaining Rafters Step 9 cont. - Cut Remaining Rafters Step 9 cont. - Cut Remaining Rafters Page 11 of 18 Page 11 of 18 Page 11 of 18 Page 11 of 18 Item No.
- Page 13 Step 10 - Install 3rd Rafters Step 10 - Install 3rd Rafters Step 10 - Install 3rd Rafters Step 10 - Install 3rd Rafters Page 12 of 18 Page 12 of 18 Page 12 of 18 Page 12 of 18 Install the center rafters (Item # 7) in the center of each side and the remaining rafters (Items # 8, 9, 10, 11, 12, &...
- Page 14 Step 11 - Install Eave Boards Step 11 - Install Eave Boards Step 11 - Install Eave Boards Step 11 - Install Eave Boards Page 13 of 18 Page 13 of 18 Page 13 of 18 Page 13 of 18 Attach the Eave Boards (Item # 14) to the gazebo base as shown below using 2 screws into each rafter.
- Page 15 Step 12 - Cut Roof Sheeting Step 12 - Cut Roof Sheeting Step 12 - Cut Roof Sheeting Step 12 - Cut Roof Sheeting Page 14 of 18 Page 14 of 18 Page 14 of 18 Page 14 of 18 Item No.
- Page 16 Step 12 cont. - How to cut sheets Step 12 cont. - How to cut sheets Step 12 cont. - How to cut sheets Step 12 cont. - How to cut sheets Page 15 of 18 Page 15 of 18 Page 15 of 18 Page 15 of 18 96"...
- Page 17 Step 13 - Attach Roof Sheeting Step 13 - Attach Roof Sheeting Step 13 - Attach Roof Sheeting Step 13 - Attach Roof Sheeting Page 16 of 18 Page 16 of 18 Page 16 of 18 Page 16 of 18 Attach plywood sheeting to the rafters as shown below using deck screws.
- Page 18 Step 14- Install Drip Edge & Underlayment Step 14- Install Drip Edge & Underlayment Step 14- Install Drip Edge & Underlayment Step 14- Install Drip Edge & Underlayment Page 17 of 18 Page 17 of 18 Page 17 of 18 Page 17 of 18 Roll out roofing underlayment onto roof as shown below.
- Page 19 Step 15 - Install Shingles Step 15 - Install Shingles Step 15 - Install Shingles Step 15 - Install Shingles Page 18 of 18 Page 18 of 18 Page 18 of 18 Page 18 of 18 Cover the roof with desired shingles being sure to follow shingle manufacturers instructions.
- Page 20 Item # 5 & 6 Birds Mouth Template Item # 5 & 6 Birds Mouth Template Item # 5 & 6 Birds Mouth Template Item # 5 & 6 Birds Mouth Template Actual Size Actual Size Actual Size Actual Size Cut notch shown and Cut notch shown and Cut notch shown and...
- Page 21 I I I I t t t t e e e e m m m m # # # # 5 5 5 5 & & & & 6 6 6 6 A A A A n n n n g g g g l l l l e e e e T T T T e e e e m m m m p p p p l l l l a a a a t t t t e e e e A A A A c c c c t t t t u u u u a a a a l l l l S S S S i i i i z z z z e e e e C C C C u u u u t t t t a a a a n n n n g g g g l l l l e e e e s s s s h h h h o o o o w w w w n n n n a a a a n n n n d d d d u u u u s s s s e e e e t t t t o o o o m m m m a a a a r r r r k k k k o o o o u u u u t t t t r r r r a a a a f f f f t t t t e e e e r r r r s s s s...
- Page 22 Item # 7-13 Birds Mouth Template Item # 7-13 Birds Mouth Template Item # 7-13 Birds Mouth Template Item # 7-13 Birds Mouth Template Actual Size Actual Size Actual Size Actual Size Cut notch shown and Cut notch shown and Cut notch shown and Cut notch shown and use to mark out rafters...
- Page 23 Items # 7,8,9,10,&11 Template Items # 7,8,9,10,&11 Template Items # 7,8,9,10,&11 Template Items # 7,8,9,10,&11 Template Actual Size Actual Size Actual Size Actual Size Use to cut bird's mouth Use to cut bird's mouth Use to cut bird's mouth Use to cut bird's mouth Attachment 004...
-
Page 24: Top View
Top View Top View Top View Top View Front View Front View Front View Front View Item # 7 Template Item # 7 Template Item # 7 Template Item # 7 Template Actual Size Actual Size Actual Size Actual Size Cut angle shown and Cut angle shown and Cut angle shown and... - Page 25 Front View Front View Front View Front View Top View Top View Top View Top View Items # 8, 10, &12 Items # 8, 10, &12 Items # 8, 10, &12 Items # 8, 10, &12 Actual Size Actual Size Actual Size Actual Size Cut angle shown and...
- Page 26 Front View Front View Front View Front View Top View Top View Top View Top View Items # 9, 11, & 13 Items # 9, 11, & 13 Items # 9, 11, & 13 Items # 9, 11, & 13 Actual Size Actual Size Actual Size...
- Page 27 Front View Front View Front View Front View Top View Top View Top View Top View Item # 14 Item # 14 Item # 14 Item # 14 Actual Size Actual Size Actual Size Actual Size Cut angle shown and Cut angle shown and Cut angle shown and Cut angle shown and...
-
Page 28: Terms And Conditions
Terms & Conditions Copyright and Limitations of Use All plans are copyright protected by DIY Backyard Planning (DIYBP).They are not to be resold, published or copied unless agreed in writing from DIYBP. Warranty No warranty or guarantee is offered or entered into by using our plans. - Page 29 Plans provided by DIYBP are for building an actual structure. A suitable level site and proper support and ground work is the owners responsibility. It is the owner’s responsibility to apply for all required permits and to build in accordance with all required code standards.
Need help?
Do you have a question about the Gazebo with Hip Roof and is the answer not in the manual?
Questions and answers