
Summary of Contents for Sun Mountain Stove Works Whitney
- Page 1 OWNER'S GUIDE Sun Mountain Stove Works Inc. Wood Pellet Stoves Models Covered: Whitney™...
- Page 2 Any reprinting or reuse of the depictions and/or procedures contained within, whether whole or in part, is expressly prohibited. Whitney™ is a trademark of Sun Mountain Stove Works Inc.
-
Page 3: Table Of Contents
Owner's Guide - Sun Mountain Stoves Table of Contents Owner's Guide - Sun Mountain Stoves About This Manual SAFETY AND EPA COMPLIANCE Specifications Tamper Warning Smoke and Carbon Monoxide Detectors Using the Stove Important Safety Instructions Use The Correct Fuel Ensure Proper Ventilation Starting the Stove Shutting Down the Stove... - Page 4 Owner's Guide - Sun Mountain Stoves - ii -...
-
Page 5: Owner's Guide - Sun Mountain Stoves
Owner's Guide - Sun Mountain Stoves Owner's Guide - Sun Mountain Stoves About This Manual This manual describes the operation and maintenance of the Sun Mountain family of gravity fed wood pellet heaters, or "pellet stoves". Sun Mountain pellet stoves meet United States Environmental Protection Agency emission limits for wood-burning appliances sold after May 15, 2020. -
Page 6: Safety And Epa Compliance
Owner's Guide - Sun Mountain Stoves Models Covered Whitney SAFETY AND EPA COMPLIANCE This stove has been tested at OMNI Test Lab in accordance with ASTM 1509 Your pellet stove has been approved for installation in the USA and Canada. It may also be installed in a manufactured or mobile home (for USA only). -
Page 7: Specifications
Owner's Guide - Sun Mountain Stoves U.S. Environmental Protection Agency Certified to comply with 2020 particulate emissions standards. Tested & Listed by Sun Mountain Stove Works Inc. sunmountainstoves.com Portland Oregon USA Omni safety report #: 0569PS001S EPA report #: 0569PS001E This wood heater needs periodic inspection and repair for proper operation. -
Page 8: Tamper Warning
Owner's Guide - Sun Mountain Stoves Tamper Warning Sun Mountain pellet stoves have a manufacturer-set minimum and maximum burn rate that must not be altered. It is against federal regulations to alter this setting or otherwise operate this wood heater in a manner inconsistent with operating instructions in this manual. -
Page 9: Using The Stove
Owner's Guide - Sun Mountain Stoves Using the Stove It is highly recommended that the initial burn of your new stove be done outdoors. The paint used to coat your stove a high temperature paint that is dry upon arrival but has a final cure that happens during the initial burn. This cure will last 20-30 minutes and will produce fumes and some smoke. -
Page 10: Use The Correct Fuel
Owner's Guide - Sun Mountain Stoves NEVER place flammable items on or near the stove. NEVER block the fresh air intake ports – this will seriously affect the per- formance of the stove. Use The Correct Fuel The stove burns pelletized wood fuel only. Burning fuels other than wood pelletized fuel is not permitted. -
Page 11: Starting The Stove
Owner's Guide - Sun Mountain Stoves Starting the Stove DO NOT USE CHEMICALS OR FLUIDS TO START THE FIRE. Use a hand-held propane torch to ignite your stove. A high quality torch with a squeeze trigger ignition system works best. Before starting the stove, inspect the primary burn chamber, secondary burn plate unit and ashtray for soot build up and cleanliness. - Page 12 Owner's Guide - Sun Mountain Stoves Close the Draft Slide Close the Draft Slide vent on the bottom tube before lighting the stove. Fill the Hopper With Wood Pellets FULLY CLOSE THE SLIDE GATE ON BOTTOM OF HOPPER BEFORE FILLING IT WITH WOOD PELLETS.
- Page 13 Owner's Guide - Sun Mountain Stoves To avoid damaging the slide, always tap the slide straight in. Tapping it from above or from below may bend the slide out of shape, which could prevent it from working properly. Once filled, close the Hopper lid. Note that wood pellets may be added to Hopper while the stove is in operation.
- Page 14 Owner's Guide - Sun Mountain Stoves Pre Heat the Stove Before lighting the wood pellets, pre-heat the stove, to start an upward air draft. THIS STEP IS CRITICAL FOR A CLEAN START-UP. 1. Fully close the Draft Slide on the bottom tube. 2.
- Page 15 Owner's Guide - Sun Mountain Stoves Open the Slide Gate Slide the Slide Gate at the bottom of the Hopper OUT to allow the pellets to drop from the Hopper onto the Grates. Ensure that the "Open" line on the Slide Gate is visible - this indicates that the slide is fully opened.
- Page 16 Owner's Guide - Sun Mountain Stoves Ignite the Wood Pellets Keep aiming the flame at the Grates (primary burn basket) at the top rear of the tray for another minute or two to ignite the pellets. Close the Service Door After a visual inspection by opening the Draft Slide briefly to verify the pellets are burning, close the Service Door and latch it shut.
-
Page 17: Shutting Down The Stove
Owner's Guide - Sun Mountain Stoves DANGER! When in operation, the surfaces of this stove get extremely hot. To avoid burns, never touch any surface of the stove when it is running, or for at least two hours after it has been shut off. -
Page 18: Emptying The Ashtray
Owner's Guide - Sun Mountain Stoves DANGER! When in operation, the surfaces of this stove get extremely hot. To avoid burns, never touch any surface of the stove when it is running, or for at least two hours after it has been shut off. -
Page 19: Clearing The Heat Exchanger
Owner's Guide - Sun Mountain Stoves Clearing the Secondary Burn Plate CLEARING YOUR SECONDARY CHAMBER IS REQUIRED WHILE BURNING HARDWOOD PELLETS. To empty the Ashtray: Surfaces will be hot. 1. Remove the Ashtray, dispose of any ashes, and reinstall Ashtray. 2. -
Page 20: Notes On Running The Stove
Owner's Guide - Sun Mountain Stoves Notes on Running the Stove If smoke becomes present during ignition, it is likely due to the pellets starting to burn before the draft is established. You will need to establish a better draft before proceeding to lightening the pellets. -
Page 21: Maintenance And Cleaning
Owner's Guide - Sun Mountain Stoves Ensure that the "Closed" mark on the slide is visible - this indicates that the slide is fully closed. Note that it may be necessary to "tap" the slide to get it fully closed. The slide has a sharp front edge that can cut through wood pellets that are in the way of it closing. - Page 22 Owner's Guide - Sun Mountain Stoves NEVER OPERATE STOVE WITH MISSING OR BURNED OUT VEINS Creosote – Formation and Need for Removal When wood is burned slowly, it produces tar and other organic vapors, which com- bine with expelled moisture to form creosote. The creosote vapors condense in the relatively cool chimney flue of a slow-burning fire.
-
Page 23: Installation
Owner's Guide - Sun Mountain Stoves Installation Overview Sun Mountain stoves should only be installed by professional, certified chimney installer or licensed contractor. See "Important Safety Notes" on page 22. Note Sun Mountain stoves are only to be installed according to all local safety codes and regulations, to ensure a safe and effective installation. - Page 24 Owner's Guide - Sun Mountain Stoves Chimney Installation Chimney installation is an important factor on how well the stove will perform. - 20 -...
- Page 25 Owner's Guide - Sun Mountain Stoves This stove must be connected to either one of the following: A chimney complying with the requirements for Type HT chimneys in the Standard for Chimneys, Factory-Built, Residential Type and Building Heating Appliance, UL 103 A code-approved masonry chimney with a flue liner.
-
Page 26: Important Safety Notes
Owner's Guide - Sun Mountain Stoves Where passage through a wall or partition of combustible construction is desired, the installation must conform to CAN/CSA-B365, US-L vent install- ation code for solid fuel burning appliances and equipment. The type of exhaust vent required for residential installation or mobile home installation (US only) is a listed type “L”... - Page 27 Owner's Guide - Sun Mountain Stoves Chimney Connectors Use a standard 4" pellet (L-vent) pipe chimney connector. DO NOT CONNECT THIS STOVE TO CHIMNEY FLUE SERVING ANOTHER APPLIANCE. DO NOT CONNECT TO OR USE IN CONJUNCTION WITH ANY AIR DISTRIBUTION DUCT WORK UNLESS SPECIFICALLY APPROVED FOR SUCH INSTALLATION.
-
Page 28: Clearance To Combustibles
Owner's Guide - Sun Mountain Stoves Fresh Air Source Residential construction requires a fresh air source within 24” of the stove. Follow all state and local codes for outside air with a solid fuel appliance. For mobile homes, use a vent with a rigid or flex pipe connected to the stove, and an outside screen vent cap, the stove must be secured to the floor, and grounded with a number 10 gauge wire. - Page 29 Owner's Guide - Sun Mountain Stoves Follow all state and local codes for outside air with a solid fuel appliance. Floor Protector A non-flammable pad must be installed that meets manufactured floor protector requirements, and provides at least Type 1 Ember Protection. US Floor Protection Requirements indicate that the floor protector must extend at least: 16"...
-
Page 30: Corner Installation (All Models)
Owner's Guide - Sun Mountain Stoves Floor Anchoring It is required that all Sun Mountain stoves are anchored to the floor in any install- ation, to prevent accidental tipping over of the stove. To secure and level the stove to the floor, install 1/4” lag bolts up through the floor into the leg-levelling holes. - Page 31 Owner's Guide - Sun Mountain Stoves Top View - 27 -...
-
Page 32: Parallel Installation (All Models)
Owner's Guide - Sun Mountain Stoves Parallel Installation (all Models) Side View - 28 -... - Page 33 Owner's Guide - Sun Mountain Stoves Top View - 29 -...
-
Page 34: Mobile Home Installation
Owner's Guide - Sun Mountain Stoves Mobile Home Installation DO NOT INSTALL IN A SLEEPING ROOM This stove is Mobile home approved in the U.S. but not in Canada. Mobile home installation should be done in accordance with the Manufactured Home and Safety Standard (HUD), CFR 3280, Part 24. -
Page 35: Replacement Parts
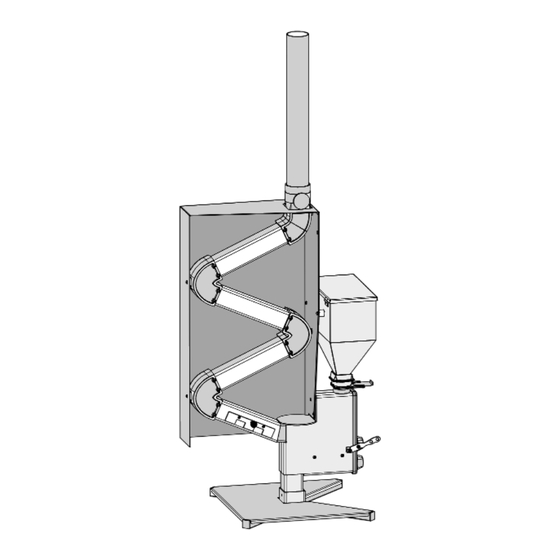
Owner's Guide - Sun Mountain Stoves Replacement Parts Refer to the following diagrams and Parts Lists to identify replacement parts for your stove: - 31 -... - Page 36 Owner's Guide - Sun Mountain Stoves Repair Parts Part # Description 2098 STACK, EXTENSION 1066 BURN CHAMBER,PRI,ASSEMBLY 1088 SLIDE BOX,WLDMT 1174 DOOR,ALUMINUM,CAST 1192 GUAGE,TEMPERATURE 1193 ASH TRAY,FORM 1201 BURN CHAMBER,SEC,ASSEMBLY 1204 GATE,SHUT OFF 1211 PLATE,HANDLE,DOOR,PROFILE 1224 CAP,PLASTIC, 1.5X1.5" 2003 HOPPER,PELLET STOVE,40LBS SHOULDER SCREW, 3/8"...
- Page 37 Owner's Guide - Sun Mountain Stoves Repair Parts Part # Description 1204 GATE,SHUT OFF 2003 HOPPER,PELLET STOVE,40LBS 2012 TRANSITION,CAST 2085 HOPPER, LID ASSY 1222 SPACER - 33 -...
- Page 38 Owner's Guide - Sun Mountain Stoves Repair Parts Part # Qty Description 1236 BASKET, BURN, WLDMT 2013 VEINS, BURN, PF - 34 -...
- Page 39 Owner's Guide - Sun Mountain Stoves Repair Parts Part # Description 1066 BURN CHAMBER,PRI,ASSEMBLY 1193 ASH TRAY,FORM 1201 BURN CHAMBER,SEC,ASSEMBLY 1088 SLIDE BOX, WLDMT - 35 -...
- Page 40 Owner's Guide - Sun Mountain Stoves Parts List Repair Parts Part # Description 1036 TUBE,DRAFT,MID 1042 ELBOW,ALUMINUM,TOP,CAST 1212 PLATE,VENT,SLIDE,PF 1214 HANDLE,SPRING,SLIDER 1215 ELBOW,ALUMINUM,SIDE,CAST 2025 TUBE,DRAFT,TOP 2037 STOVE,PELLET,WELDMENT 2072 BOLT, 5/16"-18, 3/4" LONG, SS - 36 -...
- Page 41 Owner's Guide - Sun Mountain Stoves Repair Parts - Gasket Kits Key Part # Description Kit Includes QTY 1: 2078-595 GASKET, ADHESIVE-BACKED, 1/4 X 1/8 X 37-3/16" 2100 GASKET KIT, DOOR QTY 1: 2078-054 GASKET, ADHESIVE- BACKED, 1/4 X 1/8 X 3-3/8" QTY 7: 2078-206 GASKET, 2101 GASKET KIT, ELBOW ADHESIVE-BACKED, 1/4 X 1/8 X 12-7/8"...
- Page 42 Owner's Guide - Sun Mountain Stoves - 38 -...
-
Page 43: Limited Warranty
Owner's Guide - Sun Mountain Stoves Limited Warranty Whitney pellet stove The operation of this heater in a manner inconsistent with the owner’s manual will void your warranty and is also against federal regulations. Sun Mountain Stoves Works Inc warrants to the original purchaser its products against pre-... - Page 44 WARRANTOR The warrantor of record is Sun Mountain Stove Works inc. 1863 Pioneer Pkwy E. STE 202 Springfield, OR 97477 Website: http://sunmountainstoves.com/...
- Page 46 REV: C 3/29/2022...
Need help?
Do you have a question about the Whitney and is the answer not in the manual?
Questions and answers