Table of Contents

Related Manuals for G-CYCLE L10 PRO

Summary of Contents for G-CYCLE L10 PRO
- Page 1 Electric Scooter User Manual L10 PRO For FAQs and more information, please visit: www.g-cycle.com support@g-cycle.com The manufacturer reserves the right to make changes to the product, release firmware updates, and update this manual at any time.
- Page 2 1 Safety instruction 1.1 The electric scooter is a recreational transporter. Before mastering riding skills, you need to practice, G-CYCLE is not responsible for any injuries or damages caused by a rider's inexperience or failure to follow the instructions in this document.
- Page 3 Only use the manufacture supplied charger. Do not use a charger from any other di erent product models. 1.13 Use only G-CYCLE-approved parts and accessories. Do not modify your electric scooter. Modifications to your electric scooter could interfere with the operation of the electric scooter could result in serious injury and/or damage, and could void the Limited Warranty.
- Page 4 Accessories M4 Hex wrench M5 Screw x 3 (one extra) Battery Charger Handle...
-
Page 5: Product Overview
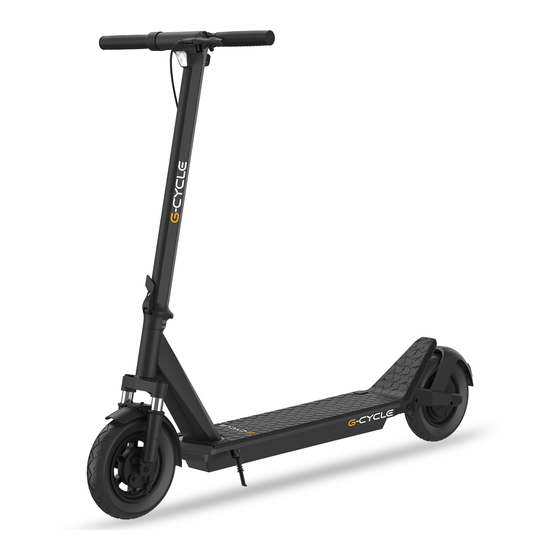
3 Product overview Product diagram Display Right handle bar Throttle Left handle bar Power button Brake Hook handlebar Stem Folding latch Front fender Deck hook hole Front fork Rear light Front wheel Fender decoration Rear Wheel/Motor Kickstand Charging port Deck... - Page 6 4 Assemble Your Scooter Tool you need: M4 Hex wrench (included in the package) 1. Straighten the stem and lift the stem upright. 2. Press the folding latch 3. Insert the handlebar into the stem , then insert two screws as the figure shows to lock the stem and tight them in order to secure the handlebar on the stem .
-
Page 7: Setting Overview
5 Setting Overview Display Front and rear light Current speed Speed unit Battery level Multi-function Description about the Power Button. 1. Turn on/o the scooter. Keep pressing the power button for two seconds to turn it on/o . 2. Turn on/o the lights. -
Page 8: How To Get Started
6 How to Get Started 6.1 Wear an approved helmet and other protective gear to 6.2 Power on the scooter and check the battery level indicator. minimize any possible injury. Charge the scooter if the battery level is low. 6.3 Stand on the deck with one foot and push o with another 6.4 Put another foot on the deck to keep both feet stable. - Page 9 6.5 Slow down by releasing the throttle , squeezing the brake 6.6 To turn left or right. Shift your body weight and turn the to trigger mechanical braking in order to make a sharp brake. handle slightly. WARNING: When braking rapidly you risk serious injury due to loss of traction and falls. Maintain a moderate speed and look out for potential hazards.
- Page 10 NOTE: 7.1 The battery must be fully charged before use. Only when the battery is fully charged can its use e ect be guaranteed. After fully charging the electric scooter, you should immediately unplug the power supply. Remember not to charge overnight. Overcharge or undercharge will consume the battery life.
-
Page 11: Specification
Make sure that the electric scooter is turned o , hold the stem , hold down the red button, open the folding latch . There is a hook hole in the deck Put the hook into the deck hook hole . -
Page 12: Error Code
Nominal Voltage Max. Charging Voltage Charging Temperature 32-140°F (0-60ºC) Battery Nominal Capacity 450Wh Over-heating, short circuit, over-current and Battery Management System over-charge protection Number Of Batteries Motor Max Power 600W Input Voltage 220V Charger Output Voltage Output Current 3A Fast Charging Features Brake Light LED rear light... -
Page 13: Maintenance
Representative samples of this product meet UL 2272. The battery complies with UN/D0T 38.3. NOTE G-CYCLE is not responsible for any changes or modifications not expressly approved by G-CYCLE. Such modifications could void the user's authority to operate the equipment. For model: L10 Pro... - Page 14 13 12-Month Warranty The North America customer could enjoy up to 12 months limited warranty according to the North America law. For all return shipping, please keep your original product box which can be used for return shipping. The warranty does not include damage from return shipping in insu cient packaging.
Need help?
Do you have a question about the L10 PRO and is the answer not in the manual?
Questions and answers
MY ELECTRIC ESCOOTER IS DAMAGE WHERE THE CHARGER GOES IN I WAS TRYING TO TIGHTEN IT BECAUSE IT WAS LOSE AND IT SPARK ON ME AND IT WONT TURN ON
If your G-CYCLE L10 PRO electric scooter won't turn on after sparking while tightening the charger port, follow these steps:
1. Check the Battery – Ensure the battery is not damaged or depleted.
2. Inspect the Charger Connection – Verify that the charger plug and charging port are properly connected and not damaged.
3. Check the Speed Regulating Throttle and Motor's Hall Switch – A short circuit may have occurred, especially if the scooter was exposed to moisture.
4. Inspect for Short Circuits – If the throttle or motor hall switch short-circuited, further damage to the controller may occur.
5. Replace Damaged Components – If the throttle or motor hall switch is faulty, replacement may be necessary.
If the issue persists, consult a professional technician or contact G-CYCLE support.
This answer is automatically generated