
Summary of Contents for easyCryo America Cryo ICE COMPRESSION FIRST S1
- Page 1 America Cryo ICE COMPRESSION Instruction Manual S1 / FIRST S1 / MALETTE S1 / MOOVE S2 / TWIN AMERICA CRYO LLC 26841 HOT SPRINGS PL CALABASAS CA 91301 561 602 0112 contact@mericacryo.com Page 1 of 27...
-
Page 2: Table Of Contents
TABLE OF CONTENT DESCRIPTION OF THE SYSTEM.………………………………………………………………………………………………………… TECHNICAL FEATURES....…………………………………………………………………………………………………… PRECAUTIONS – WARNINGS......... ………………………………….………………………………………. INDICATIONS ………………………………………………………………………………………………………………………………….. CONTRAINDICATIONS ……………………………………………………………………………………………………………………. INSTRUCTIONS FOR USE – GETTING STARTED..………………………………………………………………………….. INTERFACE OF THE PROGRAMMABLE CONTROL MODULE..…………………………………………………………. PROGRAMMING TREATMENTS.... ………………………………………………………………..………………………… MAINTENANCE OF THE DEVICE...…………………………………………………………………………………………………… TROUBLESHOOTING..………………………………………………………………………………………………………………. QUICK SET-UP....…………………………………………………………………………………………………………………. QUICK SET-UP..... -
Page 3: Description Of The System
DESCRIPTION OF THE SYSTEM The ICE COMPRESSION system is made up of the following elements: 1. The programmable control module, 2. The water/air pipe connections to the splints, 3. An AC adapter, 4. A user manual. The ICE COMPRESSION device is available in 3 different versions: 1 output version: ICE COMPRESSION S1 / FIRST 1 output version: ICE COMPRESSION S1 / MALETTE... - Page 4 LIST OF ICE COMPRESSION SPLINT COVERS: NAME SIZE REFERENCE ICE COMPRESSION ARM SPLINT COVER ICLegM-S Large ICE COMPRESSION LEFT SHOULDER SPLINT ICShoulderLL-S Medium COVER ICE COMPRESSION RIGHT SHOULDER SPLINT ICShoulderRL-S Medium COVER ICE COMPRESSION LEFT HIP SPLINT COVER ICHipL-S Large ICE COMPRESSION RIGHT HIP SPLINT COVER ICHipR-S Large...
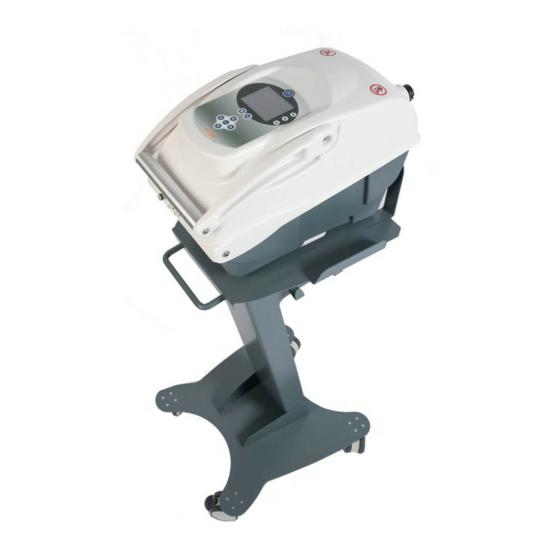
- Page 5 Photo 1: front view of the device Photo 2: rear view and inside view of the device Page 5 of 27...
-
Page 6: Technical Features
TECHNICAL FEATURES DIMENSIONS 327 H x 478 l x 405 L S1 / First ET S2 / Twin, 290 H x 240 l x 390 L S1 / Moove 320 H x 282 l x 390 L S1 / Malette WEIGHT WHEN EMPTY 5 kg for S1 / First and 6 Kg for S2 / DUO 2.5 kg for S1 / Moove and 5 kg for S1 / Malette... - Page 7 Do not sit Do not spray with water Warning Serial number Warning: refer to the instruction manual Manufacturer Reference Date of manufacture Ensure that the splint is correctly positioned and that the surface is in contact with the patient's limb. If a crease forms, it may slow down the flow of water and damage the water pump. If in doubt, we recommend that you first check the splint and then the extension.
- Page 8 Only use compression therapy with the ICE COMPRESSION system under the supervision of a licensed healthcare professional in the following patients: Patients with an open lesion in the affected area (the lesion should be covered with a dressing ▪ before using the ICE COMPRESSION system). Patients with an unstable (untreated) acute fracture in the affected area.
- Page 9 To avoid damage to the product, do not pick the control module up by the compartment ▪ closing system. Only transport the control module using the handle provided. To avoid potentially damaging the product, do not use splints from other manufacturers. ▪...
-
Page 10: Indications
INDICATIONS The ICE COMPRESSION system combines two types of treatment: compression therapy and cryotherapy. It has been designed to treat post-surgical and accute injuries to reduce edema, swelling and pain, when cold and compression are indicated. It is designed for use by healthcare professionals in a hospital or outpatient clinic setting, and in sports training environments. -
Page 11: Instructions For Use - Getting Started
INSTRUCTIONS FOR USE - GETTING STARTED In order to get the ICE COMPRESSION system up and running, you need to ensure that you have the following elements: The programmable control module containing one or two containers filled with water ▪ (depending on the number of circuits used) and ice up to the fill line. - Page 12 Water inlet and outlet hoses Filler cap Temperature probe 4. Unscrew the filler cap and fill the tank with a minimum of 1 liter of water and with ice. It is also possible to fill the tray with just water up to 1200ml and to place it in the fridge for several hours before the start of the treatment.
- Page 13 10. After a few seconds, the Home screen will appear. Treatment Manual Settings "Treatment" key: 10 PRE-SET and 10 FREE CHOICE TREATMENTS By pressing this key, you can select between several pre-set treatment programs. For the parameters of the pres-set treatments and to find out how to set them, refer to the chapter on "Programming treatments".
-
Page 14: Interface Of The Programmable Control Module
11. We recommend that you select the treatment using the protocol sheet or page 15 of the manual. The green part of the screen is related to the air circuit, the blue part to the water circuit, the treatment time is at the top and the splint model is displayed in the middle of the screen. 12. - Page 15 The meanings of the programmable Control Module Keys: On/off: this button is used to start or stop the control module of the relevant channel. Stop: this button is used to stop a treatment program Start/pause: this button us used to launch a treatment program or to pause it. Enter: this button is used to validate an entry and move on to the next entry.
-
Page 16: Programming Treatments
PROGRAMMING TREATMENTS PRE-SET PROGRAMS The ICE COMPRESSION system comes with 10 pre-set treatment programs. These programs are described below. Program n° 1 : Edema, inflammation Total treatment time: 1800 seconds (30 minutes) ▪ Splint/ default: Knee ▪ Type of pressure: static ▪... - Page 17 Program n° 4: Ankle or wrist Total treatment time: 1200 seconds (20 minutes) ▪ Splint/ default: Ankle ▪ Type of pressure: dynamic ▪ Maximum pressure value: 35mmHg ▪ Minimum pressure value: 10mmHg ▪ Application time of the minimum pressure: 30 seconds ▪...
- Page 18 ▪ Temperature: 8°C (Goal) Number of cycles: 30 ▪ Program n° 8: Sprains Total treatment time: 1500 seconds (30 minutes) ▪ Splint/ default: ankle ▪ STATIC phase ▪ o Duration of the phase: 15 minutes o Pressure value: 50mmHg o Water circulation time: 30 seconds o Water renewal time: 30 seconds DYNAMIC phase ▪...
- Page 19 o Water renewal time: 30 seconds o Temperature: 8°C o Duration of the phase: 7200 seconds (2 hours) o Number of cycles: 160 CREATING A TREATMENT PROGRAM The system offers the possibility of creating a specific treatment program. For this, you can: Either use the "Manual"...
-
Page 20: Maintenance Of The Device
MAINTENANCE OF THE DEVICE Don't forget to purge at the end of a treatment so that the water does not stagnate in the splints. ▪ If a splint has not been purged and is not used, a deposit can build up and it will sit on the splint ▪... -
Page 21: Troubleshooting
TROUBLESHOOTING List of the program error messages: Splint probe disconnected, switch to manual mode (automatic mode cannot be activated if the splint probe is disconnected). Water container probe disconnected: automatic temperature control can no longer be activated if the tray cable is disconnected or the temperature probe is not working. - Page 22 3. If the test with another splint is conclusive, it means that the splint which was not inflating is pierced or that the entry to the splint is blocked. You should stop using this splint. Leakage issues: If you notive a leak in the pouch of a splint, do not use this splint. ▪...
-
Page 23: Quick Set-Up
QUICK STARTUP Press the "On" button Click on treatment to start the device Choose the desired program with the arrows then click "select" Select the desired splint then click "Valid" Filling of the splint Wait for the splint to be filled with water then click on "valid"... -
Page 24: Quick Set-Up
USE OF AUTOMATIC MODE 1.Click on the Start button to turn the 2. Click on manual device on 4. Click on Manual to select the desired water flow mode 3.Select the desired splint then click "Validate" 6. Click on the temperature sign 5. -
Page 25: Warranty General Terms And Conditions
GENERAL CONDITIONS OF THE WARRANTY The ICE COMPRESSION system is guaranteed against any manufacturing defects or material defects under the conditions set our below. We guarantee our hardware for a period of 2 years to the first user, starting from the manufacturer's invoice date. - Page 26 WARRANTY VOUCHER SURNAME First name: NAME OF FACILITY ADDRESS TOWN ZIP CODE COUNTRY SERIAL NUMBER DATE OF PURCHASE STAMP Warranty voucher to be completed and returned by mail to: AMERICA CRYO 26841 Hot Springs Pl Calabasas CA 91301 Page 26 of 27...
- Page 27 AMERICA CRYO LLC 26841 HOT SPRINGS PL CALABASAS CA 91301 561 602 0112 contact@americacryo.com 0459 Page 27 of 27...
Need help?
Do you have a question about the America Cryo ICE COMPRESSION FIRST S1 and is the answer not in the manual?
Questions and answers