Table of Contents
Advertisement
Quick Links
Advertisement
Table of Contents

Related Manuals for OXFORD CRYOSYSTEMS AD51

Summary of Contents for OXFORD CRYOSYSTEMS AD51
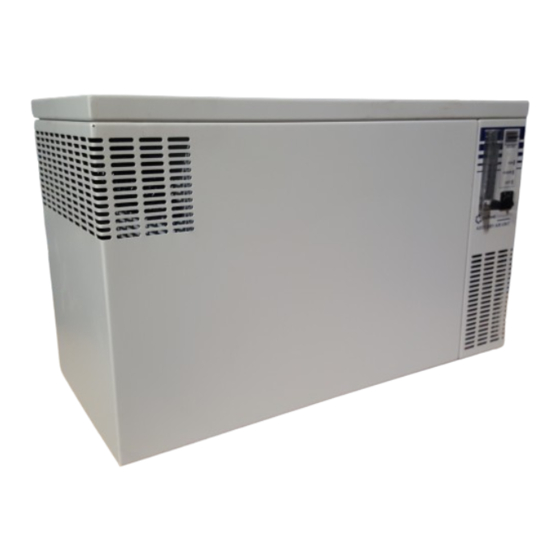
- Page 1 OXFORD CRYOSYSTEMS AD51 Dry Air Unit Operation & Instruction Guide...
- Page 2 Operation & Instruction Guide 1.3 Oxford Cryosystems Ltd 3 Blenheim Office Park Lower Road Long Hanborough Oxford OX29 8LN United Kingdom Phone +44 1993 883488 • Fax +44 1993 883988 Email: Support@Oxcryo.com © 2012 Oxford Cryosystems Ltd. All Rights Reserved. Page 1...
-
Page 3: Table Of Contents
AD51 Dry Air Unit Instruction Manual v1.3 TABLE OF CONTENTS TABLE OF CONTENTS ..................... 2 SPECIFICATION ........................ 3 INTRODUCTION ........................ 4 ....................4 UIETER UNNING ............... 4 EDUCED AND MPROVED AINTENANCE BEFORE STARTING ......................4 MODE OF OPERATION ..................... 4 USING THE AD51 ...................... -
Page 4: Specification
AD51 Dry Air Unit Instruction Manual v1.3 SPECIFICATION Up to 25 litres / minute at less than -60°C dewpoint RY AIR Width: 660mm Depth: 300mm Height: 420mm (incl. feet) IMENSIONS 41.5 kg EIGHT Specified at time of purchase: OWER 220-240V ac, 50 Hz, 5A... -
Page 5: Introduction
AD51 Dry Air Unit Instruction Manual v1.3 INTRODUCTION The AD51 is a development of the AD41 Dry Air Unit that has seen a total service life of millions of hours. The new benefits are: UIETER UNNING A brand-new quiet compressor has been fitted to almost eliminate any of the operating noise level from the unit. -
Page 6: Using The Ad51
Fig 1 - AD51 Flow Scheme USING THE AD51 If the AD51 has not been used for some time it is advisable to run the unit overnight to establish the correct moisture gradient within the drying columns. This should be done before connecting any moisture-sensitive equipment to the DRY AIR output. -
Page 7: Maintenance And Trouble Shooting
RECAUTIONS If you have not used the AD51 for some time it may be necessary to run the unit overnight to dry down the columns. OUTINE MAINTENANCE The AD51 is designed to run for more than 15,000 hours before needing any maintenance. -
Page 8: Faults
(see Fig 4 (M)) - press the red button to reset. FACTORY OVERHAUL/SERVICE After extended running you may consider it desirable for the AD51 to have a complete factory service and full recommissioning procedure. Please contact your agent or Oxford Cryosystems to discuss this type of service if required. -
Page 9: List Of Appendices
AD51 Dry Air Unit Instruction Manual v1.3 LIST OF APPENDICES General Circuit Diagram PPENDIX Control Board Circuit Diagram PPENDIX Compressor Delivery Filter Replacement PPENDIX Page 8... -
Page 10: Appendix 1 - General Circuit Diagram
AD51 Dry Air Unit Instruction Manual v1.3 APPENDIX 1 - GENERAL CIRCUIT DIAGRAM Page 9... -
Page 11: Appendix 2 - Control Board Circuit Diagram
AD51 Dry Air Unit Instruction Manual v1.3 APPENDIX 2 - CONTROL BOARD CIRCUIT DIAGRAM Page 10... -
Page 12: Appendix 3 - Compressor Delivery Filter Replacement
APPENDIX 3 - COMPRESSOR DELIVERY FILTER REPLACEMENT 1. Switch off the AD51 and disconnect the electrical power. 2. Remove the AD51 top cover by lifting the four white plastic plugs and unscrewing the four M5 socket caphead screws with the 4mmA/F hexagon balldriver provided.
Need help?
Do you have a question about the AD51 and is the answer not in the manual?
Questions and answers