
Summary of Contents for NOBLE & NOBLE Nobilis Sonum 98
- Page 1 YOU, YOUR MUSIC AND THE NOBLE & NOBLE SPEAKERS The world’s first seven-sided speakers The obvious choice of a new generation, the streaming generation They will change the way you will listen to music and experience films...
- Page 2 User Manual for the Noble & Noble speakers Thank you for having purchased the Noble & Noble speakers. Now that you have unboxed the speakers it is time to get the maximum out of them, right? Right! But how? By carefully reading this User Manual fully. In case you wish to view this User Manual on a screen please scan the QR code or Copy and Paste this link into the search bar:...
-
Page 3: Table Of Contents
Table of contents Subject Page Accessories you will need to get the speakers playing …………….….. How to loosen the transport screw ………………………………………… How to get the speakers playing or the connections …………….……. The source selection …………………………………………………………… The features …………………………………………………………………….. The Remote Control …………………………………………………………… The speakers’... -
Page 4: Accessories You Will Need To Get The Speakers Playing
Accessories you will need to get the speakers playing Inside one of the speaker cardboard boxes you will find these necessary accessories: Quantity Item User Manual. Please read it fully and carefully before connecting your speakers. White gloves for a better grip to take the speakers out of the packaging. -
Page 5: How To Loosen The Transport Screw
How to loosen the transport screw Before you go to the chapter “How to get the speakers playing or the connections” please make sure that you have loosened the transport screw, located at the top on the back side of the speaker, by turning it ± two times fully to the left in order that the 7th side becomes loose and perfectly aligned with the rest of the speaker. -
Page 6: How To Get The Speakers Playing Or The Connections
How to get the speakers playing or the connections The speakers must always be connected to a grounded / earthed outlet. IMPORTANT: Always make sure that the speakers are connected to a grounded / earthed power outlet. Always make sure that a 75 Ohm S/PDIF cable is connected between the left and the right speaker. - Page 7 Using a digital input e.g. a Music Streamer or Server: In this example the first speaker (default will be the left channel) will be connected to the second speaker using an S/PDIF connection. The first speaker will only process the left channel signal. The second speaker (default will be the right channel) will be connected to the first speaker through an S/PDIF cable.
-
Page 8: The Source Selection
The source selection Source select Option 1: Automatic source select automatically locks on to the first available source. The input scanner scans in the following order and cycles: XLR | RCA | S/PDIF | AES | Optical | Future Option During the scan cycle the output will be muted (LED blinking). -
Page 9: The Features
The features Signal detect / Auto power off The speakers feature an automatic signal detection function. It will scan the input for an active signal and turn on the amplifiers when a signal is detected. When no signal is detected for 15 minutes, the speakers will switch to a standby or low-power mode (explained below). - Page 10 ❶ Balanced analogue = XLR: Digital channel selection: The digital signal carries both left and Balanced analogue input and through right signal. When a digital source is output. Please refer to Technical selected, the current channel setting can Specifications chapter for more be displayed by holding the select button information.
-
Page 11: The Remote Control
The Remote Control Package contains: Installation: Remote Control Take the battery cap off Battery CR2032 3V Place a CR2032 battery with the “+” Manual Remote Control as in the picture Put the battery cap back on Control Buttons Functions Control Buttons... -
Page 12: The Speakers Localization: Positioning And Leveling
The speakers localization: Positioning and Leveling One person Two persons Model Letter Spacing in meters Spacing in inches Nobilis Sonum 98 0.50 – 1.50 20 - 60 2.50 – 3.50 100 - 140 2.50 – 4.50 100 - 180 Model... - Page 13 Positioning It is recommended that your Noble & Noble speakers are unboxed, installed and adjusted by an authorized Noble & Noble dealer. To get the best from your Noble & Noble speakers, it is important that they are positioned and leveled correctly. This part is about the positioning. The leveling part will follow next.
- Page 14 If the speakers are placed at the optimal distance apart they will produce a strong center image and a wide sound-stage. A musical selection with a singer and sparse accompaniment is ideal for setting the speakers spacing and ensuring a strong center image.
- Page 15 5. Once the speakers are level please put the spike into the 7th side. 6A. DO NOT screw or unscrew / tighten or loosen the flange nut next to the spike. 6B. DO NOT take out / push or pull the 7th side itself. The 7th side is fixed inside the bottom plate and needs to stay that way.
- Page 16 Leveling It is recommended that the Noble & Noble speakers are unboxed, installed and adjusted by an authorized Noble & Noble dealer. To get the best from your Noble & Noble speakers, it is important that they are positioned and leveled correctly. The positioning part has been taken care of. Now, it is time to do the leveling part.
- Page 17 Leveling tool / Bubble level for iPhone Open the Measure app, (mine is in my Utilities folder). Tap on Level at the bottom of your display. Now find the surface you'd like to check for level and place your iPhone on it; you can hold your phone in portrait or landscape mode.
-
Page 18: The Running-In Process
The running-in process Right out of the box, during the first few days, the speakers may sound different from the final result aka the result you are looking for. There is no need to worry; this merely means that the speakers need running-in. To get the best from your Noble &... -
Page 19: How To Clean The Speakers
How to clean the speakers To clean the speakers it is recommended that you use a lint-free clean, soft, damp cloth. Only dampen it with water. Never use abrasive or harsh cleansers e.g. products containing sodium carbonate. This may damage the speakers beyond repair. -
Page 20: The Technicalities
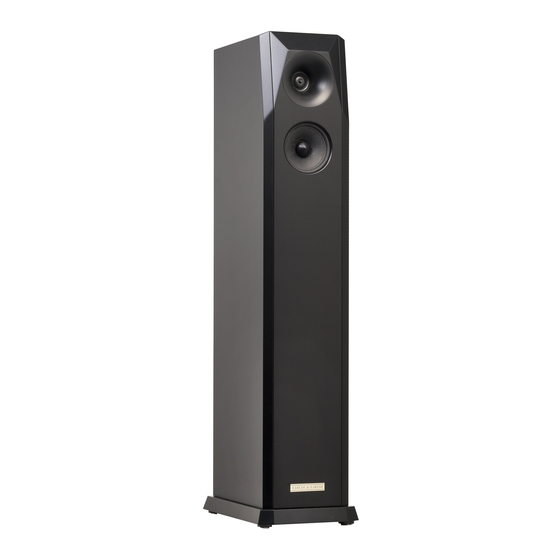
The technicalities Only Noble & Noble sounds like Noble & Noble. Okay, it’s time to blow our own trumpet, if only to explain why the Noble & Noble speakers are the best for the job which is giving you, the music lover, countless hours of musical listening pleasures. - Page 21 Specifications Model: Nobilis Sonum 98 Standard colour and Infinite black with a finish: matte finish Dimensions: 98 x 18 x 29 cm or 39 x 7 x 11 inches Weight: 22.8 Kg Units: 2 x Midwoofer 1 x Tweeter Connections:...
-
Page 22: Troubleshooting
Troubleshooting No power: Check the power outlet. - The (external) fuse at the power inlet on the rear of the speakers might be blown. No Sound: A protection might be triggered. - Is the module overheated? Try cycling the mains power. Check the volume level of your source and/or speakers with the remote. -
Page 23: Disclaimer
Disclaimer Noble & Noble makes this manual and the contained information available on “as is” basis. All warranties and representations of any kind with regard to said information is disclaimed, including the implied warranties of merchantability and fitness for a particular use.