
Summary of Contents for LOCKLY GUARD INGRESS
- Page 1 WWW.LOCKLYPRO.COM FOR COMMERCIAL USE & PROFESSIONAL INSTALLATION PGI302/PGI303 INGRESS INGRESS VISION CARD USER MANUAL SMART ACCESS CONTROL...
-
Page 2: Table Of Contents
Table of Contents Section 1 - Product Highlights Unlocking /Locking with App 26 Product Features Safe Mode Section 2 - Product Overview Disabling Safe Mode Product Overview Rain Mode Wiring Diagram Welcome Mode Installation Diagram Understanding Your New Lock Section 5- Video Doorbell Pair Lock with the Lockly Pro Video Doorbell Rebooting Your Lock... -
Page 3: Product Features
1.1 Product Features Video Monitoring and Recording (PGI303) Full HD video camera streaming directly to your smartphone in real-time, gives a head to toe 130° view angle of who's at your front door. Video recordings are stored locally with no monthly fees. Patented Hack-Proof PIN Genie Keypad Digits are randomly displayed on the keypad ensuring access codes to be undetectable to intruders after repeated use. -
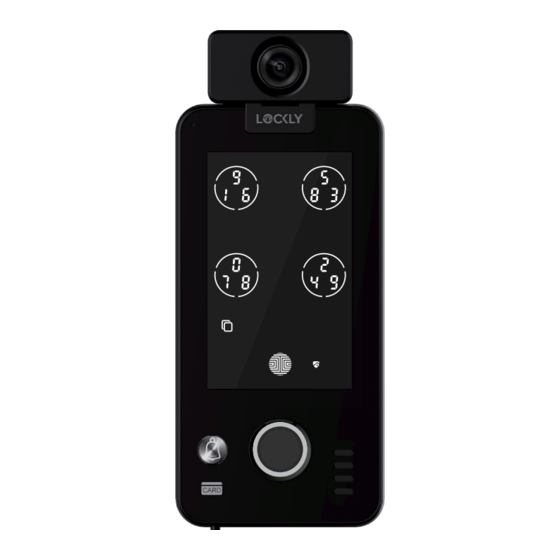
Page 4: Section 2 - Product Overview
2.1 Product Overview - PGI302 Touchscreen Keypad Screen Lock Icon Cable/Wire RFID Card Reader Outlet Fingerprint CARD Anti-Theft Alarm LED Indicator Doorbell 1 2 3 4 5 6 7 8 Wiring Reset Button Program Button To ensure the device works properly, PUSH Lock Control Port please make sure the wires are... - Page 5 2.1 Product Overview - PGI303 Full HD video Camera Touchscreen Keypad Screen Lock Icon Cable/Wire RFID Card Reader Outlet Fingerprint Anti-Theft Speaker Port Alarm CARD LED Indicator Doorbell 1 2 3 4 5 6 7 8 Wiring Reset Button Program Button To ensure the device works properly, PUSH Lock Control Port...
-
Page 6: Wiring Diagram
Lock A Note: The NC port is used to detect the opening and closing status of the door. Only the Lockly Guard Electromagnetic Lock supports this function. If you use a third-party Electromagnetic Lock other than the Lockly Guard Electromagnetic Lock, you do not need to connect this NC cable. -
Page 7: Installation Diagram
2.3 Installation Diagram 2.3.1 Wired Installation Access Control Power Supply Power Supply DC 12V PUSH- PUSH Power Supply Electromagnetic Lock NO OR NC Access Control Electromagnetic Lock LOCK NC Exit Button BUTTON-SW GND1 2.3.2 Wireless Installation Wireless Transceiver Power Supply Power Supply +12V PUSH GND... -
Page 8: Understanding Your New Lock
For any questions you can always visit Locklypro.com/support for assistance. Don’t forget that in order for Lockly Guard to work with full features, it is required to pair it with the LocklyPro App available for both iOS and Android smart ™... -
Page 9: Pair Lock With The Lockly Pro
4. Turn on your Bluetooth through your phone settings and select start connecting. 5. Choose the lock you wish to pair (e.g. Lockly Guard Ingress) and select Yes. Continue to follow on-screen instruction to complete pairing and set-up. IMPORTANT: When the lock is not pairing with the app, press the program bottom, the screen will display and you will hear a beep for 1s. -
Page 10: Rebooting Your Lock
To reboot, find the reboot button located on the bottom of the exterior side of Lockly Guard Ingress lock. You will need something small such as a paperclip, to press the reboot button. Insert the paperclip and press down firmly and let go. -
Page 11: Programming Mode
3.1 Programming Mode Program Button To enter Programming Mode, press the program button at the bottom of Lockly Guard Ingress. And you will see the shield logo and hear a short beep. Enter "Activation code" then tap to enter Programming Mode. -
Page 12: Configuring Access Codes
NOTICE The Default Access Code is Your new Lockly Guard Ingress Access Code can be any combination of 6 to 8 digits. Once a new Access Code is entered, the Default Access Code of 123456 would be deleted. A maximum of 100 sets of Access Codes can be stored for use at any given time. - Page 13 While in Programming Mode, select “1PG” to add an Access Code. If you are not in Programming Mode, please see Section 3.1 to enter Programming Mode. After pressing “1PG” then press “1AD” and select "Pd" to add an Access Code. Enter your new 6 - 8 digit Access Code and press when you are finished.
-
Page 14: Deleting An Access Code
Once you have selected the Access Code you want to delete, Lockly Guard Ingress will ask you to confirm deletion by showing you the Access Code you are deleting, in this example, 1 3 5 7 9 0. -
Page 15: Checking The Access Codes
3.4 Deleting an Access Code (Continued) There are no Acces Codes set. There are two incidents where your Access Code There is only one Access Code saved in The factory default Access the smart lock. At least one code must Code cannot be deleted. -
Page 16: Adding A Fingerprint
3.6 Adding a Fingerprint We are using an advanced biometric sensor, providing the most secure fingerprint authentication. For security reasons, Lockly Guard will only accept fingerprint patterns that consist of cross intersection points. Patterns with no cross intersection points will not be acceptable. - Page 17 3.6 Adding a Fingerprint (Continued) The fingerprint sensor equipped in your smart lock is loaded with powerful fingerprint algorithms to extract only metadata from fingers, even in poor conditions. Placing your finger on the sensor correctly helps consistency in fingerprint recognition. The following directions and tips will guide you on how to scan an optimal fingerprint image.
- Page 18 3.6 Adding a Fingerprint (Continued) Your Lockly can register up to ninety-nine (99) fingerprints. Please read the following sections if you want to add or delete fingerprints. We recommend using your app to add fingerprints, however, the following section can show you without using the app.
-
Page 19: Fingerprint Scanning Tips & Troubleshoot
3.6 Adding a Fingerprint (Continued) Note: For reference, please keep a record of your fingerprint registration number to distinguish whom it was registered to. Scan your finger by lightly placing your designated finger on the sensor until you hear a beep. Lift your finger and repeat the process slowly until the digit “6”... -
Page 20: Deleting Fingerprint
3.8 Deleting Fingerprint While in Programming Mode, select “2DE” to delete a Fingerprint. If you are not in Programming Mode, please see Section 3.1 to enter Programming Mode. After pressing “1PG” then press “2DE”, select “FP” to delete a fingerprint. Your registered fingerprint numbers will be displayed on the screen. -
Page 21: Adding Rfid
3.9 Adding RFID While in Programming Mode, select “1AD” to add an RFID card. If you are not in Programming Mode, please see Section 3.1 to enter Programming Mode. After pressing “1PG” , then press “1AD” select “Id” to add an RFID card. 2. -
Page 22: Deleting Rfid
3.10 Deleting RFID While in Programming Mode, select “2DE” to delete an RFID card. If you are not in Programming Mode, please see Section 3.1 to enter Programming Mode. After pressing “1PG” , then press “2DE” select “Id” to delete an RFID card. Your registered RFID card will be You will then see a confirmation displayed on the screen. -
Page 23: Adding A Wireless Device
Select “AD” to add a wireless device, and the “PR” icon will flash. At this time, please enter the Lockly Guard LINK+ (PGH222), the Wireless Transceiver (PGA300RF) or the Wireless Chime (PGA381) into the pairing mode. When you hear a long beep and the green light indicator is ON, the wireless device pairing is successful. -
Page 24: Deleting A Wireless Device
When the wireless device is deleted, the number of the wireless device will not be displayed. NOTE: If you're pairing a Wi-Fi Hub to your Lockly Guard, it can be done through the app. Likewise, the Wi-FI Hub can only be deleted in the app. -
Page 25: Pairing Via Bluetooth
3.13 Pairing via Bluetooth In order to setup the Lockly Guard Ingress to another smart phone, you will need to enter the programming mode. While in Programming Mode, select “3BL” to pair a new smart phone. If you are not in Programming Mode, please see Section 3.1 to enter Programming Mode. -
Page 26: Unlocking With Access Codes
NOTICE “Safe Mode”. (See Section 4.5) Lock your Lockly Guard by pressing the OK Button or by brushing your hand across the screen anytime when the door is closed. The smart lock will also auto-lock after unlocking based on your set auto-lock settings. -
Page 27: Unlocking With Fingerprint
RFID card closer to the panel. You can push down the handle and open the door after it chimed. Lockly Guard Ingress can support up to 1000 RFID cards. Additional RFID cards can be ordered through our customer hotline: +1 (855) 562-5599 or by email: prosales@Lockly.com. -
Page 28: Unlocking /Locking With App
4.4 Locking/Unlocking with App You must have the LocklyPro App iOS or Android app installed in order to lock and unlock with smartphone and to access video doorbell feature. Please download the app by visiting the link below or search “Lockly” from the correct app store. -
Page 29: Safe Mode
4.5 Safe Mode - Overview Lockly Guard will enter Safe Mode when three (3) consecutive wrong Access Codes are entered within 5 minutes. A 15 second video will be recorded once the lock entered into Safe Mode. When in Safe Mode, the lock status icon will start to flash. -
Page 30: Disabling Safe Mode
4.6 Disabling Safe Mode There are three (3) ways to disable Safe Mode. Option 1 - Entering Correct Access Code Activate the keypad by pressing and holding for 3 seconds. Enter the correct Access Code twice (2) when the keypad is available, pressing after every time the Access Code is entered. - Page 31 4.8 Tamper Switch The tamper switch is setup at the back of the Lockly Guard Ingress. It is triggered when there is a forceful movement or usual displacement of the device. When the tamper switch is triggered, the light indicator and shield logo on the screen flashes.
-
Page 32: Video Doorbell
Enhanced Alert Notification Ingress Vision has an enhanced alert notification feature. When someone rings your doorbell and you were unable to answer, you will receive a 2nd alert notification. We suggest you keep this feature ON if you expect to be in areas with unreliable internet connection and you do not wish to miss any important visitors. - Page 33 5.1 Video Doorbell - PGI303(Continued) Ingress Vision enables you to attend to your door when you are not at home. While using the app, you can use the icons below to view, initiate conversations and unlock door. Live View You can open the...
- Page 34 - Video recordings can be customized through the LocklyPro App settings*. - Ensure the TF card is properly inserted on Vision Connect to save the recordings . Ingress Vision TF card with regular use can store up to 1-year worth of video recordings. SECTION 5.1...
-
Page 35: Offline Access Code
6.1 Offline Access Code (OAC) The Offline Access Code (OAC) is a unique feature of our smart lock. It allows you to grant access to guests remotely without guests needing to download the app. To use the OAC feature, make sure you download the LocklyPro App for iOS or Android first, and sync your smart lock to your mobile device. -
Page 36: Ebadge
6.2 eBadge An eBadge is a unique code that can be issued to another user giving them door access for a specific reoccurring time frame or a valid period of time. It requires them to download the free LocklyPro App and access can only be gained through the app (not the fingerprint reader). -
Page 37: Sub-Admin Access
Sub-Admin Access can be created to grant access for others to be able to control your lock and grant access to others via Bluetooth when within range of your Lockly Guard Ingress. The sub-admin permission can be setup through the LocklyPro App or Lockly\OS then add a new user. -
Page 38: Multiple Units And Multi-Tier
6.4 Multi Units and Tiered Verifications Lockly Guard Ingress can be programmed to manage a single unit or multiple units with sub-admin management access. Example of Single Unit (Office Employee access management) Enter the employee number > Confirm > enter the password (PIN Genie Keypad) >... -
Page 39: Important Notes
Troubleshooting Please visit Locklypro.com/support for troubleshooting and the most frequently asked questions and answers. 8.1 Cleaning Making sure your Lockly Guard is clean is best practice to ensure optimal product use. Follow the DOs and DON’Ts below. DON’T • Rinse the touchscreen with warm •Don’t use abrasives, high alkaline... -
Page 40: Safety Precautions
9.1 Safety Precautions Please read all instructions carefully. Remind all Lockly Guard users of the safety precautions. Read the following instructions for your own safety Do not attempt to disassemble the smart lock by yourself. It can cause product damage, void warranty, and cause injuries. - Page 41 FCC Radiation Exposure Statement Lockly Guard Ingress and Ingress Vision complies with FCC radiation exposure limits set forth for an uncontrolled environment. It should be installed and operated with minimum distance 20cm between the radiator & your body.
- Page 42 We’re here to help! help@Lockly.com https://Locklypro.com/help UMPGL302FC20220609...
- Page 43 Google, Android and Google Play are trademarks of Google LLC. For digital versions and instructional videos, please visit the following link: http://Locklypro.com/support To ensure you have access to the most updated and newly added features of your Lockly Guard, please visit: www.Locklypro.com/302 www.Locklypro.com/303...
Need help?
Do you have a question about the INGRESS and is the answer not in the manual?
Questions and answers