Table of Contents
Advertisement
Quick Links
Bottle Top Dispenser
User Manual
Product Code
550.001.305
550.001.310
550.001.325
550.001.350
Please read the User Manual carefully before use, and follow all operating
and safety instructions!
Technical specifications and outline are subject to change without prior notice.
Version 1.1
Description
1 to 5mL
2 to 10mL
2.5 to 25mL
10 to 50ml
1
Advertisement
Table of Contents

Summary of Contents for LabCo 550.001.305
- Page 1 Bottle Top Dispenser User Manual Product Code Description 550.001.305 1 to 5mL 550.001.310 2 to 10mL 550.001.325 2.5 to 25mL 550.001.350 10 to 50ml Please read the User Manual carefully before use, and follow all operating and safety instructions! Technical specifications and outline are subject to change without prior notice.
-
Page 2: Table Of Contents
Contents Introduction Warranty Delivery Safety Instructions Components Operating Exclusions Operating Limitations Preparing instrument for use Mounting instrument on bottle Priming the instrument Cleaning Autoclaving 10. Checking the Volume 11. Trouble Shooting 12. Technical Data 13. Return for Repair... -
Page 3: Introduction
Introduction Welcome to the Bottle top dispenser User Manual. Users should read this manual carefully, follow the instructions and procedures, and beware of all the cautions when using this instrument. Warranty This instrument is warranted for a period of 12 months from the date of invoice. All warranties are null and void if the product has been misused, modified or repaired by unauthorised personnel, if the defects are caused by negligence (instruction manual, maintenance) or by normal wear and tear. -
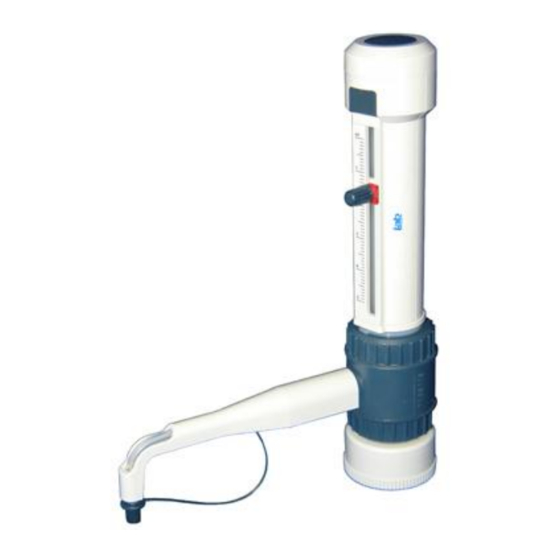
Page 4: Components
Components Piston seat Volume adjustment knob Scale pointer Cylinder sleeve Piston Glass cylinder Seal Discharge valve Discharge tube sleeve Discharge tube Closure cap Filling seal Filling valve Filling tube Air vent cap Valve block Application and Design This instrument is designed for dispensing liquids, observing the following limits: ... -
Page 5: Operating Exclusions
Operating Exclusions Never use this instrument for Liquids attacking FEP, PFA, PTFE or Hastelloy. Liquids attacking borosilicate glass (e.g., hydrofluoric acid) Liquids which are decomposed catalytically by Hastelloy (e.g., H Explosive liquids. Suspensions as solid particles may clog or damage the instrument. Operating Limitations Concentrated hydrochloric acid and concentrated nitric acid, chlorinated and fluorinated hydrocarbons or liquids which form deposits may make the piston difficult to move or may... -
Page 6: Preparing Instrument For Use
Preparing instrument for use Attention! The adapters supplied with the instrument are made of polypropylene (PP), and can only be used for media which does not attack PP. Warning! Wear protective clothing, eye protection and gloves. Follow all Safety Instructions and observe the Operating Exclusions and Limitations. - Page 7 Connecting the discharge tube Warning! Do not use any other type of discharge tube. Never use damaged or deformed discharge tubes. Firmly tighten the discharge valve. Push the discharge tube as far as possible into the discharge valve. Figure 2 Connecting the filling tube Figure 3 Cut off the bottom of the filling tube diagonally.
-
Page 8: Mounting Instrument On Bottle
Mounting instrument on bottle The instrument can be screwed directly onto a GL 45 screw thread. For other bottles, use the accompanying adapters. Attention! The adapters supplied with the instrument are made of polypropylene (PP), and can only be applied to media which do not attack PP. Priming the instrument Attention! For small bottles use a bottle stand to prevent tipping over. - Page 9 Figure 5 Hold an appropriate collecting vessel under the discharge tube opening. Gently pull the piston up, then press it down rapidly. Repeat this procedure until most of the air bubbles in the glass cylinder and discharge tube have been removed. Note: Before using the instrument for the first time, ensure it is rinsed carefully or discard first few samples dispensed.
- Page 10 Warning! Follow all Safety Instructions and observe the Operating Exclusions and Limitations. The discharge tube must always point away from the user or any other person. Never press down the piston when the closure cap is pushed on. Reagent may drop off the discharge tube and closure cap Setting the volume Figure 7...
-
Page 11: Cleaning
Cleaning The instrument must be cleaned in the following situations to assure correct operation: if the piston becomes difficult to move after dispensing liquids which form deposits before changing the reagent prior to long term storage ... -
Page 12: Autoclaving
Cleaning/replacing the filling valve Follow all cleaning instructions. Remove the filling tube. Unscrew the filling valve using the mounting tool. Remove the valve with its sealing washer. Make sure the sealing washer does not remain in the valve block. Rinse the filling valve in the cleaning solution, and clean with soft brush. Should valve ball stick, push into filling opening of valve with pointed instrument, and release valve ball. -
Page 13: Checking The Volume
Preparation prior to the autoclaving Figure15 Figure 14 Unscrew filling valve (13) and discharge valve (8). Replace built-in PTFE-rings (12) with the supplied elastic O-rings. Screw in the filling valve (13) and discharge valve (8) and tighten them firmly using the mounting tool. -
Page 14: Trouble Shooting
Calculations (for the nominal volume) ∑ = results of weightings Mean value ̅ n = number of weightings Mean volume ̅ ̅ Z = correction factor (e. g. 1.0029 μl/mg at 20 °C, 1013 hPa) Accuracy Standard deviation ̅ ∑ ̅... -
Page 15: Technical Data
Seal not inserted, Double check that seal (12) is in place, knurled locking nuts and that the knurled locking nuts at the not firmly connected discharge tube are firmly seated and Air not expelled finger tight. from the instrument Priming the instrument. Filling tube not Push the filling tube on firmly.
Need help?
Do you have a question about the 550.001.305 and is the answer not in the manual?
Questions and answers