Advertisement
Quick Links
Advertisement

Summary of Contents for Hoomeda Life Long Love Pc2011
- Page 1 Life Long Love...
- Page 2 Testing on LED function Tips for assembling Be sure to test the LED lights before making the lighting, 1.Picures shown on the package may be slightly different from the actual product. note that the LED white wire to the negative, gray wire 2.All the materials are taken in the operation step, put the remaining materials back into the original pocket to the positive reference to the following figure until the installation is completed.(Avoid material loss during installation)
- Page 3 Contents Thumbnail of material list (reference only) Name Materials Package Bag A-A08,A09(all printing and template paper are shown on Printing paper A08 and A09 paper, total 5pieces of A3 and 2pieces of A4) chair G bag+ printing paper Page 3 table G bag+T bag+U bag+V bag Page 3...
- Page 4 G01 ( 2pieces ) G02 ( 2pieces ) G03 ( 4pieces ) Refer to the steps above A09-01 to make 2pieces All books are made the same way. A09-01 A09-01 A09-01 A09-01 A09-01 A09-01 chair1 chair 2 G05 ( 2pieces ) ( 2pieces )...
- Page 5 ( 2pieces ) ( 2pieces ) ( 2pieces ) U02 ( 2个) ( 2pieces ) A06-07 All wood blocks on A04, A05, A06-07 A06 need to be sanded down A06-05 A06-06 ( 2pieces ) to remove protrusion A06-07 A06-05 A06-02 A06-01 A06-07 U02 ( 2个)...
- Page 6 A09-09 A09-13 A09-10 A09-10 Flip H08 to the other sides A09-12 A09-11 A09-11 A09-11 Make 3pieces. A09-11 ( 2pieces ) ( 2pieces ) ( 4pieces ) ( 2pieces ) A09-02 A09-11 ( 2pieces) ( 3pieces) ( 2pieces) ( 2pieces) A09-11 A08-21 Make two.
- Page 7 7.6cm make two pieces. incense pot table incense A09-27 A05-25 ( 2pieces ) ( 2pieces ) A05-25 ( 2pieces ) A09-27 bath bucket bath bucket ( 2pieces ) ( 2pieces) ( 2pieces ) ( 2pieces) ( 2pieces ) J10 Please cut out T08 according T08-01 to the template paper before making.
- Page 8 makeup dressing case dressing table table makeup case J14 ( 2pieces) J16 ( 2pieces) ( 2pieces) J19 ( 2pieces) A09-11 Front fabrication A06-10 ( 2pieces) K09 ( 2pieces ) ( 2pieces) ( 2pieces) ( pillow) ( 2pieces ) ( mattress) ( mosquito net)...
- Page 9 master room T04( mosquito net) ( 4pieces) ( 2pieces ) A09-28 ( 2pieces) A09-28 Cross V16 with T12. Tie V16 to K11. Tie another V16 to the K11. Cross V17 with T12. Tie V17 to K11. A06-04 A06-01 A06-02 ( 2pieces ) A06-03 ( 3pieces )...
- Page 10 A09-15 A06-04 A09-18 A09-18 A06-03 A06-03 A06-04 A09-18 A09-23 A06-03 A09-21 A09-25 A09-24 A09-26 T07-1 T07-1 T07-2 T07-2 A09-24 A09-26 Use T07-2 to make a circle Flip the image above to Make two. Use one here and leave Flip L04 to the other sides. the other sides.
- Page 11 A09-20 A09-20 Refer to the steps above to make 2pieces. T07-7 long knife T07-6 T07-8 T07-8 Refer to above steps to Use T07-8 to circle L14 sides. Flip L14 to the other sides. make 2pieces. pike long knife T07-9 pike T07-9 T07-10 fall...
- Page 12 A09-35 A09-32 A09-35 A04-17 A04-17 Fold A09-35 along the black links. A09-29 A04-17 A04-18 A04-18 A04-18 Fold A09-29 along the black links. A09-36 A09-36 Flip the image above to the other sides. A09-37 ( 2pieces ) ( 2pieces ) ( 2pieces ) A09-39 A09-37 A09-38...
- Page 13 Plan view N03 ( 2pieces ) ( 2pieces ) ( 2pieces ) ( 2pieces ) N12 ( 4pieces ) N13( 4pieces ) ( 2pieces ) ( 2pieces ) A09-41 A09-42 A09-43 ( 2pieces) ( 4pieces) ( 4pieces) A09-42 A09-43 make 4pieces. formerly made A09-41 make 2pieces...
- Page 14 T05 wine jar T05 wine jar A04-11 6.5cm T05 wine jar Untie one T09 into two. T05 wine jar wine jar wine jar A09-44 Make six. Use one here and leave the other five for later. A04-06 A04-14 P13 ( 2pieces ) ( 4pieces )...
- Page 15 Flip the image above to the other sides Please pay attention to distinguish the ordinary light wire W01 and the extension light wire W02, and do not use them incorrectly R01( 4pieces ) R03 ( 2pieces ) R04 ( 4pieces ) R09( 2pieces )...
- Page 16 A09-55 A09-55 A09-55 Fold over A09-55 white dotted links Paste the wiring of W01 as shown. A09-54 A09-54 A09-54 light No.5 Fold over A09-55 white links A09-51 A09-51 A09-51 make 2pieces A09-51 A09-53 light No.6 A09-52 A09-52 A09-52 S04( 2pieces ) watchtower roof watchtower roof ( 2pieces )...
- Page 17 Refer to the previous steps to Paste W01 into make another watchtower No.2 Refer to the previous steps to Paste the light line as Paste the lamp line as shown watchtower No.1 make another in the figures shown in the figures A09-56 ( 6pieces )...
- Page 18 steps No.4 steps No.4 steps No.4 make 2pieces. T06 rice bags T06 rice bags ( 14pieces) ( 17pieces) basket hook 1 No.1 T06 rice bags T06 rice bags A09-45 T06 rice bags hook 2 basket Seal both sides of the red Before making, please cut out T06 Fold in half.
- Page 19 Q01 ( 4pieces ) ( 2pieces ) A04-01 A04-04 A04-08 A04-09 ( 2pieces ) ( 2pieces) ( 2pieces ) ( 2pieces ) ( 4pieces ) ( 2pieces ) A09-126 ( 4pieces ) T01 lighthouse ( 2pieces) A08-12 A09-66 ( 2pieces ) ( 2pieces )...
- Page 20 A04-10 A09-123 A09-121 A09-125 A04-15 A04-09 A04-09 A09-121 A09-122 A09-125 A09-120 A09-124 A08-10 city gate city gate front fabrication front fabrication A09-119 A09-118 A09-118 A09-119 Flip the image above to the other sides. lighthouse 1 lighthouse 2 lighthouse 2 lighthouse 1 lighthouse 1...
- Page 21 1.4cm make 2pieces A09-126 A09-126 A09-126 A04-08 A09-66 paste second Thread of W02 into A04-08. Centralize the light wires here war drum Centralize the light wires here A05-02 A05-03 plan view A09-71 A01 back view A05-06 A05-10 A05-08 A09-73 A09-73 A05-11 A05-12 Fold four sides to the middle...
- Page 22 A09-88 A09-89 A09-91 A09-90 A09-92 A09-86 A09-87 The red line is the part of the printed The red line is the part of the printed The red line is the part of the printed The red line is the part of the printed The red line is the part of the printed The red line is the part of the printed paper that needs to be pasted.
- Page 23 Please pay attention to the upper and lower sides of light wire when pasting 3.5cm light 0.3cm No.1 0.3cm wine jar*5 rice back bag*4 view Paste the wiring of the lamp as shown in the Please pay attention to the upper and figure and put the lamp wire into the A02 lower sides of when pasting...
- Page 24 A08-19 A08-15 A08-14 A08-20 A08-18 A08-17 A08-16 chair 1 chair 2 sofa table steps No.1 light No.6 A03 back view 6.2cm 0.3cm light 0.3cm hearth 0.9cm No.6 10.3cm light 1.4cm 3.9cm light No.2 light No.2 No.1 2.9cm Place the lamp wire of No.6 2.2cm light into the small hole of A03 3.2cm...
- Page 25 A09-104 Note A07 stripe direction A07 secondary roof A07 secondary roof Please cut out A07 according to the template paper. secondary roof secondary A07 secondary roof, roof opposite side of roof 0.3cm light wire light Steps No.3 wire light No.4 2.6cm 0.3cm 0.3cm...
- Page 26 A07 athroom roof A07 athroom roof 0.3cm A07 athroom A07 a hroom roof roof 0.3cm 2.9cm light No.2 light No.2 light No.2 A07 Back side of Paste the wiring as shown in the figure and put bathroom roof the lamp wire of No.2 lamp into the hole B01 light No.2 3.3cm dressing...
- Page 27 A05-22 A05-23 Note A07 stripe direction A05-24 A05-22 A09-109 A05-22 A09-109 A07 master A07 master A05-24 A09-110 A05-23 bedroom roof bedroom roof A09-110 Please cut out A07 according to the Flip the image above to the other sides template paper. A07 master bedroom roof A07 master...
- Page 28 watchtower Length of T13 is 10cm No.2 watchtower No.1 A09-68 bulletin board 11.5cm steps No.2 well 16cm light No.5 bridal sedan watchtower No.2 Paste the wiring of No.5 light watchtower as shown in the figures No.1 Steps No.2 5号灯 well Paste on A01 as shown steamed...
- Page 29 How to assemble the battery holder Statement: the lamp wires cannot be inserted into the output socket. – – Can use 2*AAA batteries – – Please notice the place of anode and cathode when pit in the batteries – – Rechargeable batteries are not blunt electricity –...
- Page 30 Installation of dust cover dust cover (Upgrade version accessories need to be purchased separat ely) Ripped one side of kraft paper, leaving one side of kraft paper Take out the plexiglass and tear off the scale:1:12 scale:1:12 scale:1:12 kraft paper with text on each piece of Z04 plexiglass(transparent) Z05 plexiglass(transparent) Z06 plexiglass(transparent)
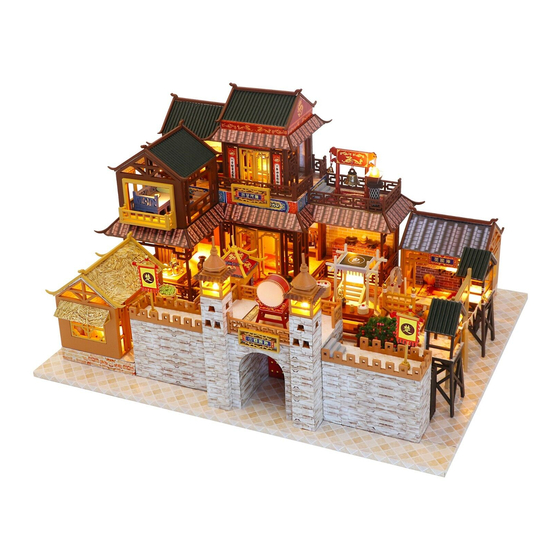
- Page 31 Detail Appreciation With dust cover at night...
- Page 32 T h e i n s t r u c t i o n m a n u a l s h o u l d b e k e e p , a f t e r a s s e m b l e d T h e i n s t r u c t i o n m a n u a l s h o u l d b e k e e p , a f t e r a s s e m b l e d...
Need help?
Do you have a question about the Life Long Love Pc2011 and is the answer not in the manual?
Questions and answers