Table of Contents
Advertisement
Quick Links
Advertisement
Table of Contents

Related Manuals for 2nd Sight BioScience InstaCaliper

Summary of Contents for 2nd Sight BioScience InstaCaliper
- Page 1 InstaCaliper™ Electronic Caliper System for Commercial Nurseries User Manual...
- Page 2 Sight BioScience 823 N Crestline St Spokane, WA 99202 509-381-2112 info@2ndsightbio.com www.2ndsightbio.com Part Number: IC00001 Released: Jul 2018 Information in this document is subject to change without notice ©2018 2 Sight BioScience No part of this document may be reproduced or transmitted in any form or by any means without written permission from 2 Sight BioScience...
-
Page 3: Table Of Contents
ALIPER RHC & RHC M ........................8 SSEMBLING THE OUNT RUGGEDIZED HANDHELD COMPUTER ..................... 10 RHC ............................10 PERATING THE CUSTOMER PORTAL .......................... 11 INSTACALIPER APPLICATION ......................12 ........................12 OWNLOADING THE NSTA ALIPER ............................ 12 PENING THE PPLICATION ..............................13 YNCING CONFIG SCREEN .......................... -
Page 4: General Information
For your safety, it is critical that you carefully read and follow all warnings and cautions in this manual. The InstaCaliper must only be used in the manner in which it is intended. Any other use of the Insta-Caliper may cause damage to the device and harm to the user. -
Page 5: System Requirements
System Requirements Caliper Head • Dimensions: 8.3” x 6.0” x 1.3” in (210 x 152 x 32 mm) • Weight: 0.6 lbs. (0.27 kg) • Power: 5V DC, 125 mA • Operating Temperature: 32°F to 110° F / 0°C to 43°C •... -
Page 6: Terms And Definitions
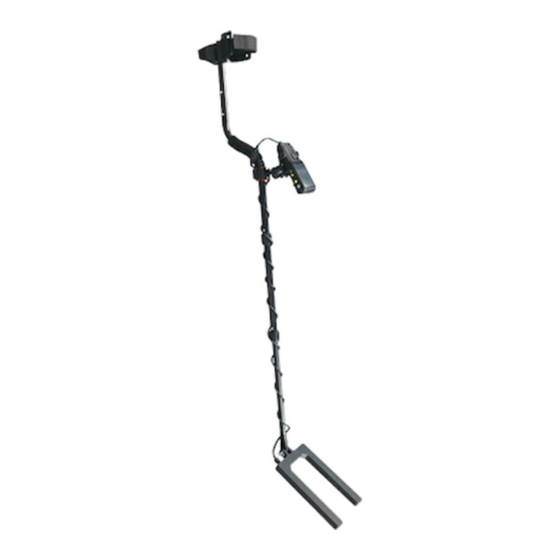
Arm Support Caliper Head Caliper Head U-Shaped part that uses sensors to calculate diameter of an object Secure website where the customer manages InstaCaliper settings and Customer Portal data. Access the Customer Portal by clicking: http://portal.2ndsightbio.com User-created category of information that can contain any number of List Items. - Page 7 Figure 2...
-
Page 8: Installation
NSTALLATION Unpacking and Inspection Note: Save the original box and packaging material. Shipping the InstaCaliper in a different box or with different packaging material may damage the machine and void the warranty. To repackage, follow inverse order of unpacking. Unpack the boxes and examine their contents. If anything is missing or damaged, contact your Sight sales representative. -
Page 9: Assembling The Caliper Head
Assembling the Caliper Head Step 1 Pull the Shaft Pole to the desired length. Step 2 Push in the locking latches on bottom of shaft. Step 3 Use a 4mm hex wrench to attach the Caliper Head to the bottom Shaft Pole using the provided bolt and nut. -
Page 10: Assembling The Rhc & Rhc Mount
Assembling the RHC & RHC Mount Step 1 Attach the RHC Mount to the top of the Shaft Pole. Step 2 Peel the adhesive cover off the RHC Battery Mount piece. Step 3 Adhere the Battery Mount piece to the battery on the back of the RHC. Ensure the ribs are positioned vertically. - Page 11 Step 5 Slide the Battery Mount until it clicks and locks into place. Caution: Pinch point. Keep fingers clear when sliding the Battery Mount into place. Step 6 Starting from the bottom of the Shaft Pole, where the micro USB cord is attached to the Caliper Head, wrap the micro USB cord around the pole.
-
Page 12: Ruggedized Handheld Computer
For further instructions on operating the RHC itself, refer to the RHC-E430 User Manual. In the RHC manual, you can learn how to charge the device, download the InstaCaliper app, connect to Wi-Fi, and set and change the date and time. -
Page 13: Customer Portal
The Customer Portal is the control center for the InstaCaliper and other 2 Sight products. To learn how to use the Customer Portal with the InstaCaliper, refer to the Customer Portal User Manual. You will retrieve measurement data collected on the RHC via your Portal account. -
Page 14: Instacaliper Application
ALIPER PPLICATION Downloading the InstaCaliper App You will need to install and run the InstaCaliper app in order to measure and record diameters. Refer to the “Downloading 2 Sight Apps” section of the RHC User Manual for instructions on how to setup a Google Play account and download the InstaCaliper app from the Google Play Store. -
Page 15: Syncing Data
Syncing Data Syncing the RHC transfers information from your Customer Portal account to the RHC, and pushes data collected on the RHC to the Customer Portal. Once you have created Tasks and Lists on your Customer Portal account, you will need to Sync this information to the RHC before you can begin measuring. -
Page 16: Config Screen
ONFIG CREEN Lists your Customer ID and Customer Secret that links the RHC to your Customer Portal account, the MAC address of the RHC, and the offset, calculated by 2nd Sight and provided in the shipping box. Customer ID and Secret links the RHC to your Customer Portal account. -
Page 17: Offsets
Offsets A number determined by 2 Sight to ensure accuracy of measurements. Select “Config” from the main screen. Step 1 Step 2 View your Customer ID, Customer Secret, and MAC address on this page. Check that under “Offset”, the unit is in “mm”. Tap “in” Step 3 to change to “mm”. - Page 18 Step 4 Press the numbers in the box to open the number pad. Step 5 Enter the offset displayed on the InstaCaliper 100 Calibration half-sheet included in your InstaCaliper shipping box. Then press ‘Ok”. Contact 2 Sight BioScience if you are unable to find this sheet.
-
Page 19: Circumference
Circumference Enabling circumference displays and saves measurements in circumference rather than diameter. Select “Config” from the main screen. Step 1 Step 2 Check the Circumference box. -
Page 20: Round Data
Round Data Available in “Inch”, Round Data displays decimal value, to the nearest fraction. Decimal Fraction Select “Config” from the main screen. Step 1 Step 2 Check the Round Data box. -
Page 21: Private Mode
Private Mode In private mode, data is saved to the RHC in CSV format in lieu of being uploaded to the Customer Portal. The CSV file is created each time the app is synced. Warning: Data saved in Private Mode is not transferred to the Customer Portal. Enable Private Mode Step 1 Press the Config button. -
Page 22: Retrieving Csv Data
Retrieving CSV Data Step 1 Press the Sync button and exit the InstaCaliper app. Note: The CSV file is created when the Sync button has been pressed. Step 2 Press the app drawer button. Step 3 Select the File Manager. - Page 23 Step 4 Select the SD card. Step 5 Open the InstaCaliper folder. Step 6 Select the desired Day Log(s) and chose a method to send.
-
Page 24: Audio Notifications
Audio Notifications Enabling audio notifications allows the user to hear the measurement (or color if color mode is enabled). Select “Config” from the main screen. Step 1 Step 2 Check the Circumference box. -
Page 25: Color Notifications
Color Notifications Enabling color notifications allows the user to see the measurement range with a color indicator. Add Color Range... - Page 26 Select “Config” from the main screen. Step 1 Step 2 Enable the Color Notification check box..
- Page 27 Press Add. Step 4 Select a range and a color. Then save to continue. Step 5 The color range will be added to the list. Remember to add the “Color” List to your Note: InstaCaliper Task on the Customer Portal.
-
Page 28: Delete Color Range
Delete Color Range Select “Config” from the main screen. Step 1 Step 2 Press Delete to display the check boxes. Step 3 Select the color ranges to remove. - Page 29 Step 4 Press Delete to remove.
-
Page 30: Measurement Screen
EASUREMENT CREEN Measurement Diameter/Color Range indicator bars Unit Display (mm on inch) Number (count) of Measurements this session. Task Lists Reject most Return to main recent menu. measurement. -
Page 31: Changing The Task
Changing the Task If you’ve created multiple measuring Tasks, you will switch between Task names on the measure screen of the InstaCaliper app. Step 1 Press Measure Press the “Information” box. Step 2 Step 3 Press the current task name and select the desired... -
Page 32: Changing List Information
Changing List Information You may need to change List information as you measure. Remember, each measuring Task can have up to five Lists of information with any number of List Items. Step 1 Press Measure Press the “Information” box. Step 2 Step 3 Press the current list name. - Page 33 Step 4 Scroll through the list and select the desired List Item. Step 5 Press inside the Search Box to more easily find and select List Items. List Items filter automatically once you begin typing.
-
Page 34: Measurement Screen
Measurement Screen Step 1 Select the Measure button. Step 2 Select the desired Task and List Items before taking the measurement. Step 3 Take the measurement, refer to the section “Calipering: Taking Measurements” for further instruction. Step 4 The measurement is saved, unless explicitly rejected. -
Page 35: Changing The Unit Of Measure
Changing the Unit of Measure You may need to change the unit of measure displayed on the InstaCaliper app. The unit is displayed in either inches (inch) or millimeters (mm). Select “Measure” from the main screen. Step 1 Tap the “MM” to toggle to “INCH”. -
Page 36: Calipering
ALIPERING Taking Measurements Step 1 Attach the Arm Support to your forearm. Hold the device so that the Caliper Head is parallel to the ground. Parallel Step 2 Slide the Caliper Head around the trunk at a constant speed until it touches the back of the Caliper Head. - Page 37 Step 4 The RHC says the measurement when it registers and displays the diameter in the circle. Note: Pressing Reject only deletes the last measurement taken by the Caliper Head.
-
Page 38: Manually Enter A Measurement
Manually Enter a Measurement In some cases, you may need to enter a measurement manually on the InstaCaliper application. For example, you may have a trunk too large for the Caliper Head. This feature allows you to store all measurements electronically with the rest of your InstaCaliper data. - Page 39 Press “OK” to save and add the measurement. Step 8 Step 9 The manually-entered measurement is saved.
Need help?
Do you have a question about the InstaCaliper and is the answer not in the manual?
Questions and answers