Table of Contents
Advertisement
Quick Links
Techno PRO Electric scooter
USER MANUAL
The related products, power cord and plug pictures and descriptions in this article are for reference only
Packing List
1
Open the package and check to see if the following items are included.
The schematic diagram used in the product information is only for reference. The actual situation of the product may be
different from that of the product. The actual situation of the product in the packing box shall prevail.
Electric scooter
Diagram
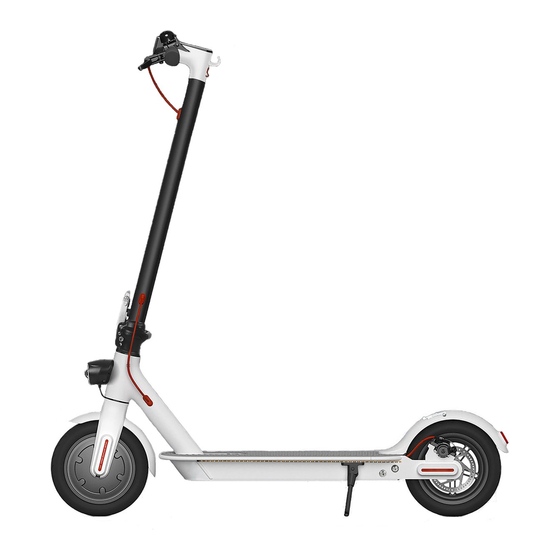
2
Bell
Headlight
Dashboard & Power Bu on
Brake Lever
Electronic Thro le
Handlebar
Hook
Stem
Quick Release Lever
Folding Mechanism
Front Shock Absorber
Front Fork
Hub Motor
Ba ery Cabin
Kickstand
1
USER MANUAL
Ba ery Charger
Flathead Screw
Headlight
Modes
Speedometer
Display the current speed of the Scooter
Three modes available. "L" for Energy saving mode(smooth
acceleration, suitable for beginners), "S" for Sport mode
(powerful, only recommended for skilled riders),"L" "S" off
stands for standard mode
Bluetooth
Ba ery Level
The icon indicates that the Scooter
The ba ery power is indicated by 5 bars, each
has been successfully connected to the mobile device.
representing approximately 20% of a full ba ery.
Lock
Cruise control
Use the APP to lock the scooter.
Use the APP to start cruise at fixed speed
Charge Port
Power Bu on
Press the bu on to turn the Electric Scooter on;
Buckle
and press and hold the bu on for 3 seconds to turn The Electric Scooter off.
When the Electric Scooter is on, press the bu on to turn the headlight on/off
Double-click the bu on to switch the riding mode
Rear Fender
Brake Light
Disc brake
Rear Shock Absorber
Please take good care of this user manual (keep it as a backup).
Please read the instructions before installing and using the product.
Assembling Your Electric Scooter
3
APP
Quality
Unfold the stem and fasten it.
Certification
Then unfold the kickstand to
support the Electric Scooter.
Learning to Ride
Tool kit
4
1.
Wear an approved helmet
and other protective gear to
minimize any possible injury.
4.
Put your other foot on the
footrest to keep both feet
stable. Press the thro le on
the right hand to speed up
when you are balanced.
Confirm the power supply
Install handle with the
interface. Please align the
included hex wrench.
indicator arrows and make
a connection.
2.
Long press to turn on the
3.
Stand on the footrest with
power supply,Power on the
one foot and push off with
scooter and check the
another foot to start gliding.
indicator lamp power level.
Charge the scooter if the
ba ery level is low.
5.
6.
Slow down by releasing the
To turn, shi your body
throtle; and brake by
weight and turn the handle
squeezing the brake lever.
slightly.
Turn to page 3
Insert the brake cable into the
brake handle. Turn the
aluminium fixators so that the
brake cable does not fall out .
2
Advertisement
Table of Contents

Related Manuals for TECHNOZOM Techno PRO

Summary of Contents for TECHNOZOM Techno PRO
- Page 1 Please take good care of this user manual (keep it as a backup). Techno PRO Electric scooter Please read the instructions before installing and using the product. USER MANUAL Assembling Your Electric Scooter The related products, power cord and plug pictures and descriptions in this article are for reference only Packing List Open the package and check to see if the following items are included.
- Page 2 Electronics inside the ba ery record the charge-discharge condition of the ba ery; Restriction of Hazardous Substances Directive (RoHS) Technozom products sold in the European Union, meet the requirements of Directive 2011/65/EU on the restriction of the use of certain WARNING hazardous substances in electrical and electronic equipment (“RoHS recast”...
Need help?
Do you have a question about the Techno PRO and is the answer not in the manual?
Questions and answers