Advertisement
Quick Links
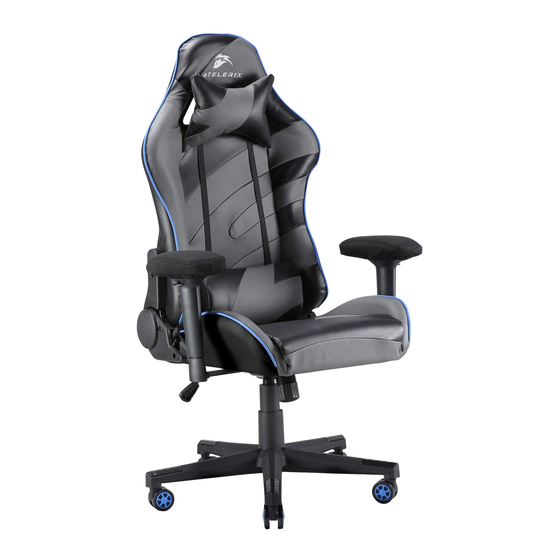
CHAIR/SILLA/CHAISE
2101 Gaither Road, Suite 125, Rockville, MD 20850
ATX1001
VENTRIS EQUINOX
BLACK/GRAY/BLUE
NEGRO / GRIS / AZUL
NOIR / GRIS / BLEU
ATX1002
VENTRIS PULSE
GREEN/WHITE/BLACK
VERDE/BLANCO/NEGRO
VERT/BLANC/NOIR
ATX1003
VENTRIS NOIR
BLACK
NEGRO
NOIR
www.atelerix.gg
143-2103
Advertisement

Summary of Contents for ATELERIX ATX1001
- Page 1 CHAIR/SILLA/CHAISE ATX1001 VENTRIS EQUINOX BLACK/GRAY/BLUE NEGRO / GRIS / AZUL NOIR / GRIS / BLEU ATX1002 VENTRIS PULSE GREEN/WHITE/BLACK VERDE/BLANCO/NEGRO VERT/BLANC/NOIR ATX1003 VENTRIS NOIR BLACK NEGRO NOIR 2101 Gaither Road, Suite 125, Rockville, MD 20850 www.atelerix.gg 143-2103...
- Page 2 Supprimez tout le contenu de la boîte et veiller à ce qu’il n’y a pas de pièces manquantes. Veuillez nous contacter (voir la page de garantie) s’il en manque quelques choses. ATX1001 PARTS LIST / LISTA DE PARTES / LISTES DES PIÈCES Chair Backrest...
- Page 3 Siège de la chaise Accoudoirs 4D Piston hydraulique Couvercle de piston Lx1 Rx1 Black Black Black Black Black R-0-ATX1003-01-143 R-0-ATX1003-02-143 R-0-ATX1001-03-143 R-0-ATX1001-04-143 R-0-ATX1001-05-143 Casters Tilt Mechanism Wheelbase M8 Bolts Phillip Screws Mecanismo de inclinación Base para ruedas Ruedas giratorias Pernos M8 Tornillos Phillip Mécanisme d'inclinaison...
- Page 4 Check under the seat and remove (12) (12) the 8 screws preinstalled in the seat with the Allen wrench. Note: (12) The screws are pre-installed to ensure that the thread and screws t together and provide a strong grip. Veri que debajo del asiento y retire los 8 tornillos preinstalados en el asiento con la llave Allen.
- Page 5 Attach the backrest of the chair to the seat by aligning the brackets and using the Allen key to tighten all 4 screws. Fije el respaldo de la silla al asiento alineando los soportes y utilizando la llave Allen para apretar los 4 tornillos. Fixez le dossier de la chaise au siège en alignant les supports et en utilisant la clé...
- Page 6 Insert the hydraulic piston into the opening of the tilt mechanism. Inserte el pistón hidráulico en la abertura del mecanismo de inclinación. Insérer le piston hydraulique dans l'ouverture du mécanisme d'inclinaison. Attach the lumbar support pillow to the chair. Coloque la almohada de soporte lumbar en la silla. Attachez le coussin de soutien lombaire à...
- Page 7 Coloque la almohada de apoyo para la cabeza en la silla. Attachez le coussin de soutien de la tête à la chaise. (14) Congratulations on your newly assembled Atelerix Chair. Felicitaciones por su nueva silla Atelerix ensamblada. Félicitations pour votre nouveau fauteuil Atelerix.
- Page 8 Move Armrest Backwards and Forwards. Mover el apoyabrazos hacia atrás y hacia adelante. Déplacer l'accoudoir vers l'arrière et l'avant. Proper Way to Move Armrest Backwards and Forwards Once the armrest button is pressed in, push the armrest forward or pull back until the armrest feels comfortable.
- Page 9 Adjust the height of the armrest and the angle of the armrest. Ajuste la altura del y el ángulo del reposabrazos. Ajustez la hauteur de l'accoudoir et son angle. Angle Height Ángulo Altura Angle Hauteur Adjust the angle of the chair backrest. / Ajuste el ángulo del respaldo de la silla. Régler l'angle du dossier de la chaise.
- Page 10 Adjust the position of the lumbar support pillow. Ajuste la posición de la almohada de soporte lumbar. Ajustez la position de la coussin de soutien lombaire. SAFETY INFORMATION INFORMACIÓN DE SEGURIDAD / INFORMATION POUR LA SÉCURITÉ The recommended weight load for this chair is 260lb (118kg). The chair should only be used normally and in a non-abusive manner.
-
Page 11: Limited Warranty
LIMITED WARRANTY Atelerix (the “Company”) warrants the Product to be free from defects in workmanship and materials under normal use and conditions FOR A PERIOD OF 1 YEAR FROM THE DATE OF ORIGINAL PURCHASE in the United States and Canada. -
Page 12: Garantía Limitada
GARANTIE LIMITÉE Atelerix (la "Compañía") garantiza que el Producto está libre de defectos Atelerix (la «Société») garantit que le produit est exempt de vices de de mano de obra y materiales en condiciones de uso y uso normales POR fabrication et de matériaux dans des conditions normales d'utilisation et les UN PERÍODO DE 1 AÑO DESDE LA FECHA DE COMPRA ORIGINAL en...
Need help?
Do you have a question about the ATX1001 and is the answer not in the manual?
Questions and answers