
Related Manuals for Erommy XWG-092


Summary of Contents for Erommy XWG-092
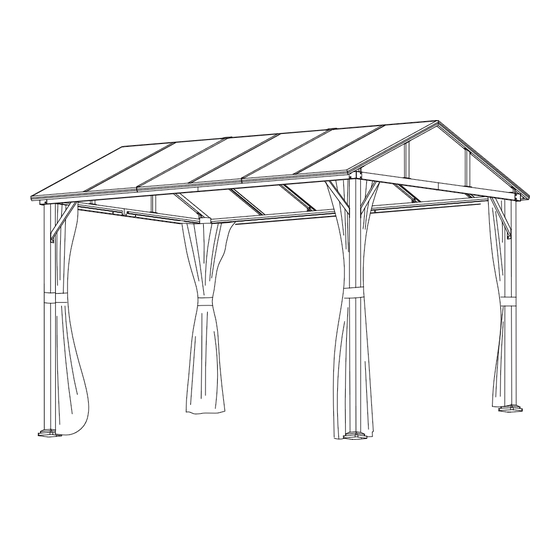
- Page 1 XWG-092 INSTRUCTIONMANUAL 10 FT x13 FT Gazebo The gazebo comes with 3 boxes. Sometimes they may be delivered on different day, please wait 2-3 more days or contact us for help.
- Page 2 Note: The gazebo needs to be installed in cooperation with five people. The following tools are not included and needed for assembly: Pistol Drill Tape Measure Hammer Screw Driver Ladder 5 people Warning 1. A 5 person assembly is required for this gazebo. 2.
-
Page 4: Hardware List
Right bevel Right/left supporting Middle supporting Left bevel supporting tube supporting tube tube of roof side tube of roof side 4 PCS 2 PCS 4 PCS 4 PCS Short tube for Standing supporting tube Mosquito net Sidewall Mosquito Net 4 PCS 4 PCS 1 PC 1 PC... - Page 5 Hook Stake Wrench Allen Key 1 PC 2 PCS 2 PCS 8 PCS Parts List (Box C) PC board 12 PCS...
- Page 6 <1> STEP 2 STEP 1 M6x15 x 16...
- Page 7 <2> STEP 1 STEP 2 Attention: Pls assemble B1 and B2 with L one by one. M6x15 x 20...
- Page 8 <3> STEP 1 STEP 2 Attention: Pls assemble C1 and C2 with L one by one. M6x15 x 20...
- Page 9 <4> STEP 4 STEP 3 STEP 1 STEP 2 Attention: 1.At least 3 people required for this step. 2. Install as shown in the pictures, if you want to flat intallation, pls raise the pillar A to avoid the damage to Q1 and Q2. M6x45 M6x35 M6x15...
- Page 10 <5> STEP 2 STEP 1 M6x15 -10-...
- Page 11 <6> STEP 1 STEP 2 STEP 3 Attention: Pls fix all the screws first,do not lock off,after assemblling is fully completed, lock all at once finally. M6x15 x 20 -11-...
- Page 12 <7> STEP 1 STEP 2 STEP 3 STEP4 M6x35 M6x15 -12-...
- Page 13 <8> STEP 1 STEP 2 M6x15 x 20 -13-...
- Page 14 STEP 1 <9> STEP 4 Attention: 1. Pls assemble the pannels on one side of the gazebo first. STEP 5 2.Pls join the O and G1, G3, G2 with AA first. 3. Pls make sure all the pannels are corresponded, avoid the damage to the parts.
- Page 15 <10> STEP 1 STEP 4 Attention: 1. Pls join the O and G1, G3, G2 with AA first. 2. Pls make sure all the pannels are corresponded, avoid the damage to the parts. STEP 5 STEP 2 STEP 3 M6x15 x 16 -15-...
- Page 16 <11> Z1 / Z2 velcro Attention: 1.Pls paste the Y3 on the corresponded C1, C2, D1, D2 when aeesemble this step. These parts have pre-adhesive tape. 2.Pls dis-assemble all the curtains and nettings when heavy rain, where the connect of the O and G1, G3, G2 may have small leakage.
- Page 17 <12> -17-...
Need help?
Do you have a question about the XWG-092 and is the answer not in the manual?
Questions and answers
What is the phone number to reach customer service at EROMMY?