Table of Contents
Advertisement
Advertisement
Table of Contents

Related Manuals for EMtronics EMDAF9LD


Summary of Contents for EMtronics EMDAF9LD
- Page 1 EMDAF9LD 9L Double Air Fryer User Manual...
-
Page 2: Table Of Contents
Contents Introduction ........................3 General Description ......................3 Digtal Panel Function ..................... 3 Important ........................4 Automatic Switch-Off ....................5 Before First Use ......................5 Preparing for Use ......................5 Using the Appliance ....................... 6 Match cook ........................6 Smart Finish........................7 Pre-Heat/Manual ...................... -
Page 3: Introduction
Introduction Thank you for buying this top quality air fryer. You will now be able to cook a wide assortment of food in a healthier manner – with little or no oil! The air fryer uses hot air, in combination with high-speed air circulation, and a top grill to prepare your dishes quickly and easily. -
Page 4: Important
Important Read this user manual carefully, before you use the appliance, and keep it safely for future reference. Danger • Never immerse the housing, which contains electrical components and the heating elements, in water nor rinse it under the tap. •... -
Page 5: Automatic Switch-Off
• Immediately unplug the appliance if you see dark smoke coming out of the appliance. Wait for the smoke emission to stop before you remove the frying tray from the appliance. Caution • Place the appliance on a horizontal, level and stable surface. •... -
Page 6: Using The Appliance
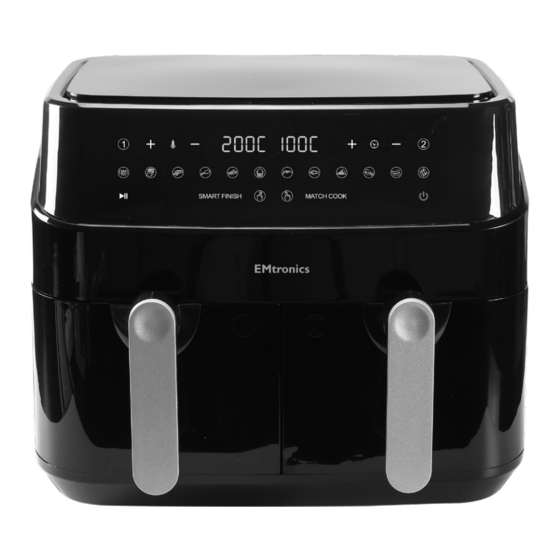
Using the Appliance 1. Power on When plugging the unit into a wall outlet there will be a beep sound and the power button will illuminate RED. Now press the power button and the unit control panel will light up ready for use. -
Page 7: Smart Finish
Smart Finish If you are intending to use both zones (both trays) to cook with different cooking times (usually if cooking different food types in each side). Smart Finish will automatically delay the start of the shortest cycle so that both zones finish at the same time. -
Page 8: Cooking Time Table
Cooking Time Table Apart from the preset menu, you also can use this air fryer to make other food by setting the time and temperature. This table below helps you to select the basic settings for the ingredients you want to prepare. Note: Keep in mind that these settings are only for reference. -
Page 9: Operation Tips
Caution: Do not touch the frying tray during and about 30mins after use, as it gets very hot. Only hold the pan by the handle. Operation Tips 1. Put the mains plug in an earthed wall socket. 2. Put the frying tray in the right position. Choose function from menu and press START/PAUSE to start cooking. -
Page 10: Reheating Foods
Reheating Foods Simply set temperature to 180°C for up to 10 minutes. COOKING GUIDE Note: these settings are a guide. As ingredients differ in size shape and brand, you may need to adjust cooking times and temperatures. AMOUNT Time TEMPERATURE FOOD CHICKEN Breast, bone in... - Page 11 Pork Chops, bone- 6.5oz ,1’’ thick 10 min 180°C less Rack of lamb 1.5 lbs to 2 lbs 22 min 190°C Tenderloins 1 lb 15 min 170°C FISH AND SEAFOOD Calamari 8 oz 4 min 200°C Fish Fillet 8 oz ,1’’ thick 10 min 200°C Salmon...
-
Page 12: Making Home-Made Fries
Peppers 1’’ chunks 15 min 200°C Potatoes 1.5 lbs, small baby 15 min 200°C Potatoes French Fries 25 min 200°C Potatoes 1’’ cubes 12 min 200°C Potatoes Whole 40 min 200°C Squash ½’’ chunks 12 min 200°C Sweet Potato Whole 35 min 190°C Tomatoes... -
Page 13: Cleaning
Cleaning Clean the appliance after every use. The frying tray, Crisper rack and the inside of the appliance have a non-stick coating. Do not use metal kitchen utensils or abrasive cleaning materials to clean them, as this may damage the non-stick coating. 1. -
Page 14: Troubleshooting
Troubleshooting Problem Possible cause Solution The appliance is not Put the mains plug in an plugged into the mains. earthed wall socket. The air fryer does not work Turn the timer knob to the You have not set the required preparation time to timer. - Page 15 Do not fill the basket beyond There is too much food the maximum amount indicat- in the basket. ed in the table on the earlier Cannot slide the pan page. into the appliance properly. The basket is not Push the basket down into the placed in the pan cor- pan until you hear a click.
-
Page 16: Technical Data
1400-1600 W Protection class 1 (This appliance must be earthed) Model EMDAF9LD Disposal • Disposal of your old product. Your product is designed and manufactured with high quality materials and components, which can be recycled and reused • Please make yourself aware of the local collection system for electrical and electronic products.
Need help?
Do you have a question about the EMDAF9LD and is the answer not in the manual?
Questions and answers