Advertisement
GROUP
CYCLING CONSOLE
INSTRUCTION MANUAL
WARRANTY
This is to certify that the Group Cycling Monitor is
warranted by to be free of all defects in materials and
workmanship. This warranty does not apply to any defect
caused by negligence, misuse, accident, alteration,
improper maintenance, or an "act of God." The Group
Cycling Monitor carries a one-year warranty on the
monitor
and transmitter. Batteries are not
warranted.
3260 _ver.A(1)
1
When calling, please be prepared to provide the
customer service representative with the following
information: Your name, the serial number of the
inoperable monitor, and the date(s) of purchase. If
warranty replacement parts are shipped, you may be
required to return the defective part. We reserve the right
to make changes and improvements in our products
without incurring any obligation to similar products
previously purchased. In order to maintain your product
warranty and to ensure the safe and efficient operation of
your monitor, only authorized replacement parts can be
used.
PLEASE NOTE:
1. The Group Cycling Monitor system are designed as
sealed units and not meant to be opened other than for
the sole purpose of installing batteries. Any opened
units will void the warranty.
2. To clean the Group Cycling Monitor use a clean damp
cloth. Use of any caustic cleaning solutions will void the
warranty.
3. The group Cycling Monitor system is NOT waterproof,
only water resistant. Any excessive exposure to
water will void the warranty.
2
Advertisement
Table of Contents

Summary of Contents for Direction Technology Velometer DT-3260
- Page 1 When calling, please be prepared to provide the GROUP CYCLING CONSOLE customer service representative with the following information: Your name, the serial number of the inoperable monitor, and the date(s) of purchase. If warranty replacement parts are shipped, you may be required to return the defective part.
-
Page 2: Table Of Contents
TABLE OF CONTENTS Warranty___________________________________1 IMPORTANT SAFETY INSTRUCTIONS WARNING BEFORE BEGINNING THIS OR ANY OTHER Safety instructions ___________________________4 Installation _________________________________5 EXERCISE PROGRAM, CONSULT A PHYSICIAN. Console ___________________________6 THE PHYSICIAN CAN HELP YOU BETTER Transmitter _________________________6 DETERMINE WHAT ACTIVITIES OR PROGRAMS ARE Display Window _____________________________8 MOST SUITED FOR YOU. -
Page 3: Installation
Group Cycling Console Battery Installation: Now press and hold the blue button on the 1. Remove the battery cover from the back of the transmitter for 3 seconds and release. The console display should show ID 0. NOTE: You must press computer. -
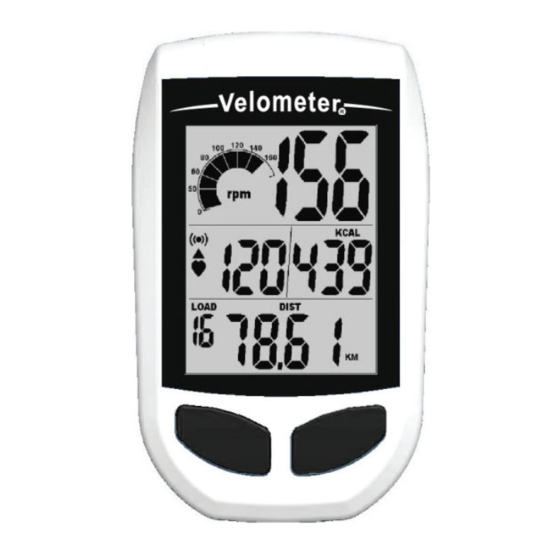
Page 4: Display Window
DISPLAY WINDOW TIME Time is measured in min:sec There is a time of day clock and a workout timer clock. The workout time will count up or count down during pedaling. If pedaling stops, the time will stop counting after 3sec. 1 –... -
Page 5: Quick Start Program
DISTANCE MODE SELECT Press the left hand key to select the SPEED, DIST, TIME Distance is the measurement of the virtual distance or CLOCK at the bottom of the display. traveled on the bike. This distance is based on the user riding a bike with tires that are the same size as the group bike’s flywheel. - Page 6 2. Press the left hand key to switch to the hour setting, RESET/HEART RATE ALARM SELECT use the right hand key to change hours. 1. Press the right hand key to activate the heart rate 3. Press the left hand key again to switch to minutes and alarm.
- Page 7 HEART RATE TARGET ZONES 2. Press the left hand key to set the measuring value for Press the left hand key until ‘SPEED’ is displayed then weight (Lb or Kg), press the right hand key to select. hold the right hand key for 3 seconds. The TIME will be flashing;...
-
Page 8: Troubleshooting
TROUBLESHOOTING CAUTION EXTERNAL INTERFERENCE MAY BE CAUSED BY No Display on Console OTHER ELECTRONIC DEVICES, SUCH AS: 1. Hold down any key to bring the console to “Quick Start” NEARBY TELEVISIONS, STEREO EQUIPMENT, mode. SPEAKERS, ELECTRICAL WIRE CABLING, ETC. IF 2.
Need help?
Do you have a question about the Velometer DT-3260 and is the answer not in the manual?
Questions and answers