Advertisement
Quick Links
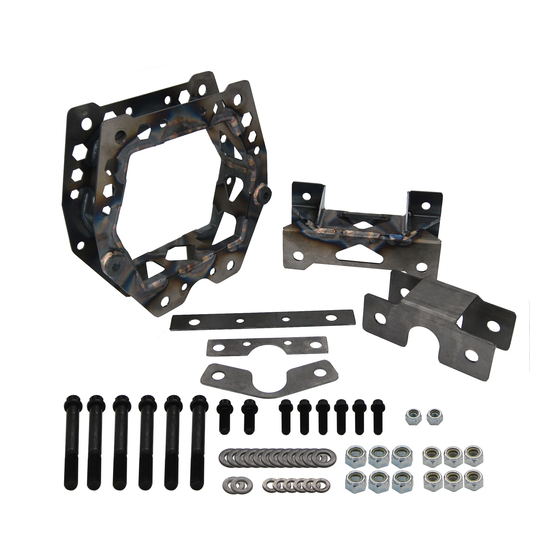
Your package should come with the following:
(6) 4130 Gusset Kit Pieces
M12
(6) M12-1.75 x 90MM 12-POINT FLANGE BOLT
(12) M12 DIN 125A FLAT WASHER
(6) M12-1.75 NYLON INSERT LOCKNUT
M10
(2) M10-1.5 X 25MM 12-POINT FLANGE BOLT
(2) M10 DIN 125A FLAT WASHER
(2) M10-1.5 NYLON INSERT LOCKNUT
M8
(6) M8-1.25 X 25MM 12-POINT FLANGE BOLT
(6) M8 DIN 125A FLAT WASHER
(6) M8-1.25 NYLON INSERT LOCKNUT
Tools/Hardware Needed:
T20
•
T30
•
Jack
•
10mm socket
•
10mm wrench
•
12mm socket
•
12mm wrench
•
ASSEMBLY/INSTALL INSTRUCTIONS
Can-Am X3 Bulkhead Gusset Kit
PART #: C-110S, C-110S-RAW
18mm socket
•
18mm wrench
•
21mm wrench
•
5/16" drill bit
•
Drill
•
Ratchet/Impact
•
Advertisement

Summary of Contents for TATUM UTV C-110S
- Page 1 ASSEMBLY/INSTALL INSTRUCTIONS Can-Am X3 Bulkhead Gusset Kit PART #: C-110S, C-110S-RAW Your package should come with the following: (6) 4130 Gusset Kit Pieces (6) M12-1.75 x 90MM 12-POINT FLANGE BOLT (12) M12 DIN 125A FLAT WASHER (6) M12-1.75 NYLON INSERT LOCKNUT (2) M10-1.5 X 25MM 12-POINT FLANGE BOLT...
- Page 2 12. Remove the 10mm hardware at the front of the chassis and remove the upper and lower plates behind the bulkhead/chassis. 13. Now, we will move onto assembling the Tatum UTV gusset kit onto the car. 14. First, start by installing FIGURE A onto the front of the car with the welded-on bung side facing the car.
- Page 3 Congratulations! You have successfully completed your Tatum UTV upgrade! We cannot wait to see your build on Instagram & Facebook. Follow and tag us @TatumUTV. If you have any questions or concerns with your order, please email sales@tatumutv.com.