Table of Contents
Advertisement
Quick Links
Advertisement
Table of Contents

Related Manuals for ByronStatics AM66

Summary of Contents for ByronStatics AM66
- Page 2 Getting to know your Retro FM/AM Radio...
-
Page 3: Your Retro Fm/Am Radio
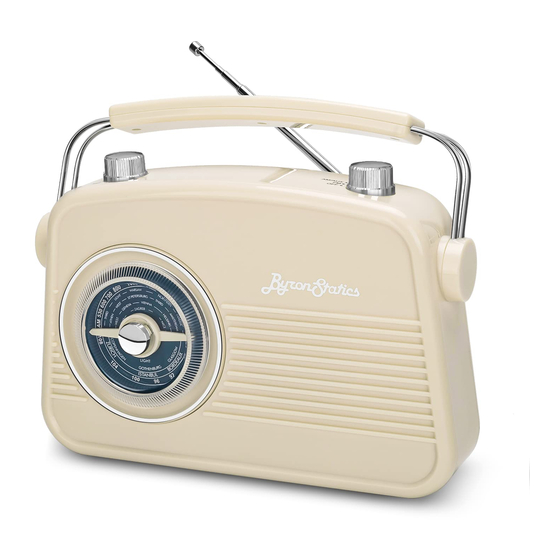
Getting to know your Retro FM/AM Radio You’ll be up and running in no time Ready? Let’s begin... Please read these instructions carefully. They contain important information which will help you get the best from your product and ensure safe and correct installation and operation. - Page 4 Getting to know your Retro FM/AM Radio You’ll be up and running in no time Fig 2. 5. OFF/FM/AM rotary 1. Battery compartment, insert 4 x 1.5V control AA-size (LR6) batteries (not supplied) 6. Speaker 2. Carry handle 7. Telescopic aerial 3.
-
Page 5: Inserting The Batteries (Optional)
Getting to know your Retro FM/AM Radio You’ll be up and running in no time Connection 1. Connect the mains power lead into the socket on the back of the Radio and fully extend the radio aerial in a vertical position to obtain the maximum signal strength. 2. -
Page 6: Switch Off
Getting to know your Retro FM/AM Radio You’ll be up and running in no time Switch off Turn the OFF/FM/AM rotary on the top of the radio to ‘OFF’ . To completely switch off the Radio, switch off the mains power at the wall socket. Change the mode Turn the OFF/FM/AM rotary on the top of the radio to ‘FM’... - Page 7 This page is left intentionally blank...
- Page 8 Using your Retro FM/AM Radio...
-
Page 9: Using Your Retro Fm/Am Radio
Using your Retro FM/AM Radio Let’s get started Telescopic aerial Please make sure that the aerial on the back of the Radio is fully extended before you attempt to tune to an FM station. This will ensure that the maximum signal strength is available when the Radio is tuning to a station. -
Page 10: Am Radio Mode
Using your Retro FM/AM Radio Let’s get started AM Radio mode Check that your Radio is in AM radio mode. If you are not already in AM mode, turn the OFF/FM/AM rotary on the top of the radio to ‘AM’ . Tuning to an AM station In AM mode: Use the rotary tuning dial on the front of the radio to tune to your favourite AM station. - Page 11 Using your Retro FM/AM Radio Let’s get started Use the earphone Connect the stereo In-Ears to the Phones (8) output socket onto the appliance. Notes: Ensure that the 3.5mm jack of the headphone is completely inserted into the headphone socket to accomplish optimal audio quality. Never wear headphones while driving a car, riding a bike or during any activity that requires awareness of the surroundings.
- Page 12 This page is left intentionally blank...
-
Page 13: Other Information
Other information... -
Page 14: Helpful Technical Information
Other information Helpful technical information Specification Power source: Input AC 0V~/ Batteries: 4 x 1.5V AA size (LR6) (Optional, not supplied) Frequency range: FM: MHz to 108 MHz kHz to 1 20 kHz Other information...