Advertisement
Quick Links
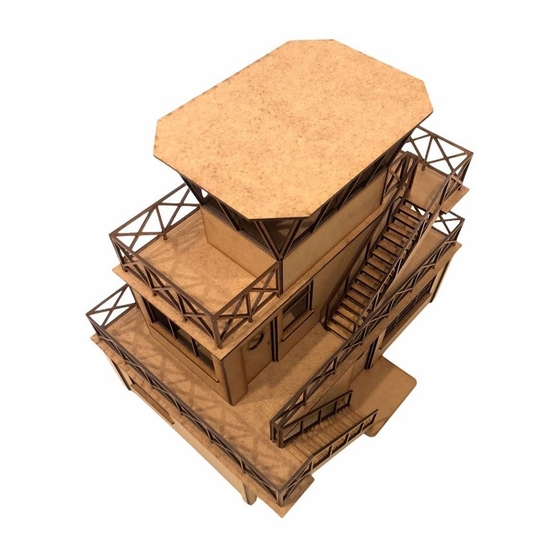
How to assemble the Race Headquarters
We will begin by building the inner walls and then add then work our
way upwards. We leave the stairs and hand rails until last as these
are the most delicate parts. We recommend super glue as this is
quick and makes a strong model.
To begin locate the lower floor. This has "MAGNETIC RACING"
etched on it. Place this on the workbench with the text facing
upwards. Now locate the two inner walls. These are identical to each
other. Apply some small drops of super glue on the lower edge and
push them into the slots. Use another square part of the kit to get
them perfectly vertical. Hold each in place until the glue holds them.
Next we add on the front inner wall. This can be recognized as it has
a large double width door and two windows with small windows. It is
important especially with large pieces in the to do a trial fit without
glue. The parts are generally very accurate, but depending on how
they are assembled may need a little gentle sanding to make them
easy to assemble. Once you are happy, apply small drops of super
glue on the mating faces and press the part home. Make sure it is
fully pressed down into the lower piece and against the wall edges.
Advertisement

Summary of Contents for Magnetic Racing 013
- Page 1 We recommend super glue as this is quick and makes a strong model. To begin locate the lower floor. This has "MAGNETIC RACING" etched on it. Place this on the workbench with the text facing upwards.
- Page 2 Next we add on the rear inner wall. This has a single window and a single width door. Note the window is on the left in the image below. We have offset the slots, so it should be impossible to assemble this incorrectly.
- Page 3 Add on the two end walls. Make sure the windows are positioned as shown. They should only fit one way. Apply glue and press the corners together until the glue dries.
- Page 4 We now glue on the next floor to the underside. Before gluing, double check that all the holes are free of laser cut debris. Pay particular attention to the small square holes around the edge. If you don't do this they may be difficult to remove once you have glued on the part. There are etched lines on this part which align perfectly to the edges of the other floor.
- Page 5 Next glue on an end wall. Note the position of the door. Apply glue and push the part down into the floor. Hold the corner together as the glue dries...
- Page 6 Add the second end wall in a similar manner. *IMPORTANT* This part has a narrower width lug at one end. Make sure that this is placed to the left end as shown in the image below.
- Page 7 Follow this with the rear wall as shown.
- Page 8 Now glue in in two doors. All the single doors in the kit are the same so choose any two. There is etching on the doors to help as a guide to get them correctly placed in the door aperture. Apply glue sparingly as you do not want it to squeeze out so it shows on the door face.
- Page 9 We now begin to add the outer walls. Start with the ends. Apply glue and press it home. Note that the etched lines are on the outside of the model and the edges are flush with the inner walls at each end. In a similar manner add on the other end wall.
- Page 10 Now add the back outer wall. This forms a neat corner with the end walls. Now on goes the front outer wall. Pay attention here to get the double door gaps nicely even. the kit is very accurate so this should be straightforward.
- Page 11 We next turn our attention to the upper floor. Begin with the end walls. These have no etched detail on them. Align the corners and check the door gaps are neatly aligned. Add the other end wall in a similar manner.
- Page 12 Now on goes the front wall. Follow this with the rear wall.
- Page 13 Turn the model around and make sure it is on a flat surface. Add the front plinth. This is the one without holes. Check it fits easily before applying glue and then press home. Make sure it lies flat on the build surface so is square to the wall.
- Page 14 Add on the double door with the etched detail outermost. We insert the door from below the model and locate it using the etched lines. By attaching the plinth first we are able to push the door down and against it to position it correctly. Apply glue sparingly as we do not want it to seep onto the front of the doors.
- Page 15 Now add on the two door pillars. There are some similar looking parts in the kit, but the parts you want are 7mm wide x 64.5mm tall. Glue these either side of the door. There are no etched marks to help you, but align the inner edges with the door aperture.Apply a little glue on the lower edge and ensure it pushes down on the plinth.
- Page 16 Next add on the top door canopy. Once more apply glue on the top of the door pillars and along the rear edge. Ensure it is positioned horizontally as it dries. Turn the model around and add on the rear plinth. Note the position of the holes.
- Page 17 Once again place some thin paper under the model when you glue it on. This way you can rip off the paper easily and scrape off any residue after drying instead of gluing it to your bench! It is important here to get everything square so take your time here.
- Page 18 We now glue on the second floor roof. Note this is the last time we have access to the inside of the second floor, so if you are detailing the inside or adding window glass (not supplied) do it now. It is in theory possible to have this roof removable, but this makes the model rather fragile.
- Page 19 Next comes the upper roof. Check the part for debris, particularly in the small square holes. Push out any scrap wood with a craft knife.As the part has etched lines on the underside, assembly is best accomplished by inverting the model. Place the separate part on the bench and lower the main model onto it.
- Page 20 Turn the model the correct way up and add on the upper inner wall. This is the one with the door and it has lugs on the lower edge. Glue it in place and ensure it is upright. use another square part in the kit as a right angle.
- Page 21 Add on the end wall. in the centre piece. There are two identical pieces in the kit. Use either. Orientate the part with the etching on top and so it aligns with the etched detail. Glue it in place checking that all the edges match.
- Page 22 Add on the end outer wall . this is again a rectangular un etched part. Finish the outer walls by adding on the other end. ensure the edges are flush and that there is an even stepped recess either side of the door.
- Page 23 Add on the final door to the inside wall face. once again use the etched lines to help position it correctly. The roof support comes next. Apply glue and push both ends fully into the slots provided.
- Page 24 There is an end roof support and this goes on next. Position it centrally on the cross beam and make sure the underside is flush as shown. Hold the parts together until the glue dries. Add on the wall gusset to by the side of the door. push it fully home into the lower slot and check the rear edge forms a neat corner inside.
- Page 25 Now add on the sloping window. There are two identical panels in the kit so use either. These glue up against the angled roof support. The lower edge sits neatly in the lower lip. Position the ends flush as shown. In a similar manner add on the rear window.
- Page 26 Add on the end window in a similar manner. We are trying to form an equal square surface in each corner. If we get this equal it makes fitting the corner windows much easier. There is another small window to add next to the door. This is supported by the gusset we added earlier.
- Page 27 We glue in the corner windows. There are 3 identical panels in the kit. The lower point sits on the square surface we previously formed in the corners. The top edges are flush with the other windows. These parts are fragile, even when glued. It is a good idea to run a small bead of stronger glue on the inside corners of these parts.
- Page 28 Next add on the inner roof panel. We can leave this unglued if you want occasional access to the inside of the model. Do a trial fit first without glue and if necessary sand the lugs or slots a little to get it to fit nicely.
- Page 29 We have the upper roof to attach now and once again this has etched lines underneath to help you. It sometimes helps to invert the model to make this easier. We now add the window sills to the model. there are nine of these of various lengths.
- Page 30 There are some wider (7mm) pieces that glue onto each lower corner. There are 8 in the kit. Begin with the 4 end pieces. glues these on using the etched lines as a guide. The outer edges are flush with the corner of the front and rear wall. Follow this with the remaining 4 pieces for the front and rear wall.
- Page 31 We now begin construction of the rear stairs. Firstly we need to attach the stair support to the inside of the hand rail. There are 4 of these to complete. Two have an upper hand rail attached as shown. Note the position of the chamfered corner and where it is positioned relative to the upper hand rail.
- Page 33 Now add on the inner stair rails. We mentioned earlier that it is possible to have access to the second floor interior and you can do this by not applying glue to the bottom ends of the upper stair rails. We do not recommend this as it makes the upper stairs rather weak, but the choice is yours.
- Page 34 outwards on both rails. Do a dry assembly first and check everything goes together. Ensure that the rail is glued vertical. also push it back against the sides of the floor so it sits into the corner. Add on the two outer rails. This time the stair support faces inwards. Due to the stack up of part tolerances, you may need to sand this part a little on the vertical edge as shown The part should sit onto the floor easily.
- Page 35 Now we need to add in the stair treads. there are 32. 16 on the lower and 16 on the upper stairs. Cut these from the sprue along the marked lines. We have provided a few extra to help you. These can be tricky to fit, but a tip is to start at the top and work down.
- Page 36 All of the hand rails look similar, but are all unique. First glue on the rear hand rail. This has 7 panels. Once again note that the end leg does not go into a hole, but sits next to it as shown. apply glue sparingly on the legs, but don't forget to apply glue on the end that meets the spacer we added previously.
- Page 37 Turn the model around and add on the front rail in a similar manner. And then the end rail. Apply glue on both vertical ends and pinch the corners together until the glue dries.
- Page 38 We now turn our attention to the upper floor. Add in another spacer as shown A small single panel hand rail goes in next.
- Page 39 Add on the 4 panel end rail. Followed by the 6 panel front rail.
- Page 40 Add the other end rail. build. The last part is the small 2 panel rail as shown.
- Page 41 Congratulations you have completed the Race Control Tower. We hoped you enjoyed the build. We would love to see photos of you completed builds, particularly if you have painted them or modified them in any way.
Need help?
Do you have a question about the 013 and is the answer not in the manual?
Questions and answers