Advertisement
Table of Contents
- 1 Table of Contents
- 2 Box Contents
- 3 Monitor Features
- 4 Camera Features
- 5 Monitor Charging Method
- 6 Camera Power Supply Method
- 7 Camera Installation Methods
- 8 Add Camera to the Baby Monitor
- 9 Display Mode of Screen
- 10 Monitor Menu Settings & Icons Description
- 11 Warning Explain
- 12 Certification
- 13 Declaration of Conformity
- Download this manual
Advertisement
Table of Contents

Summary of Contents for KAWA S6
- Page 1 USER MANUAL HD Video Wireless Baby Monitor Model: S6...
-
Page 2: Table Of Contents
Directory Box Contents Monitor Features Camera Features Monitor Charging Method Camera Power Supply Method Camera Installation Methods Add Camera to the Baby Monitor Display Mode of Screen Monitor Menu Settings & Icons Description Warning Explain Certification Declaration of Conformity... -
Page 3: Box Contents
Box Contents Baby Monitor Baby Camera Wall Mount (S6-M) (S6-C) Monitor Camera Monitor Micro-USB Adapter Adapter Power Cable (5V 2A) (5V 1A) (1500+200mm) Camera Micro-USB Manual Mounting Power Cable Screws Pack (2600+200mm) -
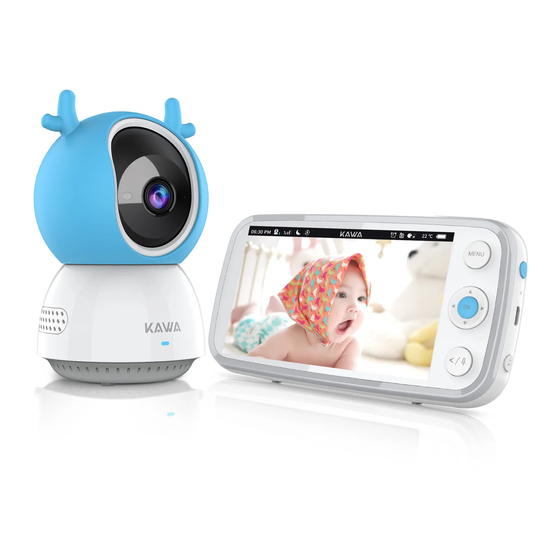
Page 4: Monitor Features
Monitor Features RESET... - Page 5 Volume -/+Keys Menu Button: 1) Short press the 【 Menu】 to pop up the menu. 2) Short press the 【 Menu】 to close the menu and return to the home page. OK Key: 1) Click the 【OK】 button to enter the Camera Setting in the disconnected interface.
-
Page 6: Camera Features
Camera Features Wide-Angle Lens Microphone Ambient Light Sensor Camera Power LED Status Indicator Camera Antenna Speaker Temperature Sensor Camera Pairing Button Camera Micro USB Port... -
Page 7: Monitor Charging Method
Monitor Charging Method Please fully charge the Monitor before use. Charging method: 1. Connect one end of the Micro USB (1.5m) cable to the Baby Monitor, and the other end to the power adapter (5 V 2A). 2. Plug the adapter into a power outlet. Camera Power Supply Method 1) Connect one end of the Micro USB (2.6m) cable to the camera, and the other end to the power adapter (5 V 1A). -
Page 8: Camera Installation Methods
Camera Installation Methods Install Camera( wall mount & corner mount) 1) Determine the installation position. 2) Put the upper wall bracket on the mounting position and mark the screw hole with a pencil. 3) Drill the hole Ø6.0 mm on the wall, then insert the expansion nail into the hole. - Page 9 Push forward Winding the USB cable step 3 Installation Method 2 : Adhesive tape The adhesive tape can be affixed to the left or right side. step 1 step 2 step 3 step 4...
-
Page 10: Add Camera To The Baby Monitor
Add Camera to the Baby Monitor Baby Monitor and Baby Camera are paired out of the box. Please refer to the following steps when adding additional Baby Cameras or after resetting a Baby Camera : Please make sure the Baby Monitor version matches the Baby Camera version. -
Page 11: Display Mode Of Screen
Display Mode of Screen When you add more than two Baby Cameras, you can manually and automatically switch screen, or you can display multiple screens at the same time. 1. Manual switching: Long press the 【OK 】 button, the screen will be switched to the next screen. - Page 12 Full Screen This mode allows you to see one camera in full-screen view. Multi-screen display Multi-screen mode allows to view up with 2-screen, 3-screen and 4-screen. And you can operate the camera which its screen around with blue lines, pan/tilt/zoom and "talk to baby ". The audio you hear on the monitor comes from this camera.
-
Page 13: Monitor Menu Settings & Icons Description
Monitor Menu Settings & Icons Description 1. Menu settings Press the 【MENU】 button on the Monitor to display the functional interface, as shown below: VOX Mode When you turn on the VOX mode, the screen will be turned on automatically if the noise is detected above your pre-set level. Alert Threshold 1-5 thresholds are optional. - Page 14 Sound Alert You can set the Baby Monitor to alert you when a specific noise level is detected. Note: Surrounding noise might set off false alarm. High Temp Alert When the temperature is higher than the value you set, the monitor will alert. Note: The high temperature alert you set must be higher than the low temperature alert you set.
- Page 15 Monitor white noise Help parent to sleep. Select your desired white noise. You can adjust the volume by pressing the "-/+" volume button.) Camera Lullaby Comfort baby. Select your desired lullaby song. You can adjust the volume by pressing the "-/+" volume button. Note: Alert is automatically disabled after enabling the lullaby function.
- Page 16 Camera Pairing Add Camera (Note: You can add up to 4 cameras per baby monitor.) Delete Camera Display Mode Full screen, two split-screen, three split-screen, quad split-screen and cycle cameras. Note: When multiple cameras are connected and set to "cycle cameras", the monitor will cycle through the list of connected baby monitors according to the pre-set interval.
- Page 17 Language Setting Set the monitor display language. Temperature Unit ℃ and ℉ are optional. Select the desired temperature unit. Anti-Screen Flicker If the baby monitor's screen is flickering, change to the other Anti-Screen Flicker mode. Default Settings Reset all options to their default setting. Version Information Display Monitor version number, Camera version number, Monitor SN number, Camera SN number.
- Page 18 Baby Monitor Baby Monitor It is cycling through the is charging has successfully Cameras screens, connected to Camera and currently cycling to Camera3 Night Vision Camera is Camera is playing Mode is enabled cycling lullabies a single lullaby The monitor is The monitor is playing Currently set time playing all white...
-
Page 19: Warning Explain
European Community. Hereby, KAWA ELECTRONICS COMPANY LIMITED declares that the radio equipment type Baby Monitors S6 is in compliance with Directive 2014/53/EU.The full text of the EU declaration of conformity is available at the following internet address: www.kawa-in.com... - Page 20 Transmit Output Power: 21 (+1/-2) dBm @ Maximum Power Setting Only can use the adapter as below: S6-M: Rated Input & Output: AC100V-240V, 50/60Hz, 200mA, DC5.0V, 2A. S6-C: Rated Input & Output: AC100V-240V, 50/60Hz, 200mA, DC5.0V, 1A. Manufacturer: KAWA ELECTRONICS COMPANY LIMITED Model Name: Baby Monitor S6 The plug could be disconnected from adapter.
- Page 21 This equipment generates uses and can radiate radio frequency energy and, if not installed and used in accordance with the instructions, may cause harmful interference to radio communications. However, there is no guarantee that interferencewill not occur in a particular installation. If this equipment does cause harmful interference to radio or television reception, which can be determined by turning the equipment off...
- Page 22 L’ exploitation est autorisée aux deux conditions suivantes : (1) L' appareil ne doit pas produire de brouillage; (2) L' appareil doit accepter tout brouillage radioélectrique subi, même si le brouillage est susceptible d' en compromettre le fonctionnement. FCC ID(S6-M): 2AZWZ-S6M FCC ID(S6-C ): 2AZWZ-S6C...
- Page 23 équipement est conforme aux limites d'exposition IC définies pour un environnement non contrôlé. Cet équipement doit être installé et utilisé avec une distance minimale de 20 cm entre le radiateur et la carrosserie. IC(S6-M): 27280-S6M IC(S6-C): 27280-S6C WARNING This product can expose you to...
-
Page 24: Declaration Of Conformity
The suitable ambient temperature for S6-M and accessories is -20°C to +45°C. The suitable ambient temperature for S6-C and accessories is -20°C to +40°C.When charging, please place the device in a well-ventilated...
Need help?
Do you have a question about the S6 and is the answer not in the manual?
Questions and answers