Advertisement
Quick Links
Owner's Manual & Safety Instructions
Manual del Usuario & Instrucciones de Seguridad
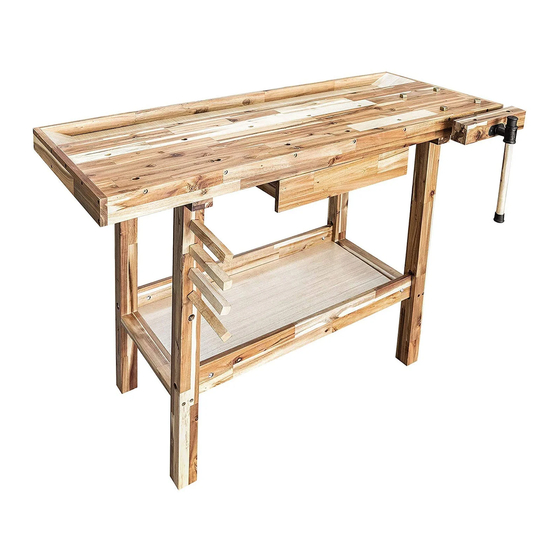
Hardwood Workbench
Banco de Madera Dura
WARNING
Read this material before using this product.
Failure to do so can result in serious injury.
SAVE THIS MANUAL.
Item No. /
Lea este material antes de utilizar este producto.
El no hacerlo puede resultar en lesiones graves.
GUARDE ESTE MANUAL.
Artículo
No.88-128-917
ADVERTENCIA
Advertisement

Summary of Contents for Olympia Tools 88-128-917
- Page 1 Manual del Usuario & Instrucciones de Seguridad Hardwood Workbench Banco de Madera Dura Item No. / Artículo No.88-128-917 WARNING ADVERTENCIA Read this material before using this product. Lea este material antes de utilizar este producto. Failure to do so can result in serious injury.
-
Page 2: Importante Información De Seguridad
IMPORTANT SAFETY INFORMATION IMPORTANTE INFORMACIÓN DE SEGURIDAD WARNING/ADVERTENCIA Read all safety warnings and instructions. Failure to follow the warnings and instruction may result in serious injury. Save all warnings and instructions for future reference. Lea todas las advertencias de seguridad y las instrucciones. El no seguir las advertencias e intrucciones puede resultar en lesiones graves. - Page 3 PARTS DIAGRAM/DIAGRAMA DE PIEZAS 1. Table Top (1) 2. Shelf (2) 3. Cross Brace (3) 2pcs 1. Tabla de la mesa (1) 1 pieza 2. Estante (2) 1 pieza 3. Refuerzo transversal (3) 2 piezas 5. Vise (5) 6. 60mm Screw (6) 6pcs (Spar parts 2pcs) 4.
-
Page 4: Instrucciones De Ensamblaje
ASSEMBLY INSTRUCTIONS INSTRUCCIONES DE ENSAMBLAJE Read the ENTIER IMPORTANT SAFETY INFORMATION section at the beginning of this document including all text under subheadings therein before set up or use of this product. Lea TODA la sección INFORMACIÓN IMPORTANTE DE SEGURIDAD al comienzo de este documento incluyendo toda la información debajo de los subtítulos antes de ensamblar o utilizar este producto. - Page 5 2. Insert Connection Nuts (8) into holes at end of Cross Braces (3). Make Sure that the slot on the Nuts align horizontally with the Bolts (7). This will allow the Bolts to be threaded into the Cross Braces. Screw bolt with washer to connection nut.
- Page 6 3. Once both legs have been fastened to the Cross Brace, slide the Shelf (2) above against the legs so that the far edge fits onto the groove on the Cross Brace. 3. Una vez que ambas patas estén aseguradas al refuerzo transversal, coloque el estante (2) encima contra las patas para que el borde extremo encaje en la ranura del refuerzo transversal.
- Page 7 5. Install the sliding 5. Instale el deslizador 13. Sliding (13) 2pcs 13. Deslizador (13) 2 piezas This one shows FRONT direction. Este muestra la dirección del frente. FRONT FRENTE Page/Página...
- Page 8 6. Assembly the drawer: Arrange all parts of the drawers like the below photo. Notice to the direction of the grooves 6. Ensamblar el cajón: Organice todas las partes de los cajones como en la foto de abajo. Aviso a la dirección de los surcos (17) Screw (12)
- Page 9 7. Attach part 4 to part 5, using 60mm tightening Screw (6). 7. Sujete la pieza 4 a la pieza 5, utilizando un tornillo de ajuste de 60mm (6). 6. 60mm Screw (6) 6pcs (Spar parts 2pcs) 6. Tornillo 60mm (6) 6 piezas (Repuestos 2 piezas) NOTE: Assembly Tools NOTA: Herramientas de ensamblaje...
- Page 10 8. After that, overturn the workbench, as following picture. 8. Luego, voltee el banco de trabajo como se ve en la foto. Made in Vietnam/Hecho en Vietnam Distributed By: Olympia Tools International Inc. 10295 Stateline Rd, Olive Branch, MS 38654 Tel: 626-336-4999 Fax: 626-336-4899 www.OlympiaTools.com...
Need help?
Do you have a question about the 88-128-917 and is the answer not in the manual?
Questions and answers