Table of Contents
Advertisement
Digital Wireless Weather Station
OPERATING INSTRUCTION
Base unit: UN0583
Wireless sensor: T056I
If you want to know about our features or support solutions, please let us know! We really
hope that owning an Unni Technology product is not only a practical experience, but also a
pleasure.
Please email us at: unni_technology@hotmail.com
Advertisement
Table of Contents

Subscribe to Our Youtube Channel
Related Manuals for unni UN0583


Summary of Contents for unni UN0583
- Page 1 Wireless sensor: T056I If you want to know about our features or support solutions, please let us know! We really hope that owning an Unni Technology product is not only a practical experience, but also a pleasure. Please email us at: unni_technology@hotmail.com...
-
Page 2: Table Of Contents
Catalogue Package included ......................3 Technical data........................3 Base unit........................3 Wireless sensor......................3 Switching adapter.......................3 Product functions......................4 Weather station ......................4 Wireless sensor......................4 Overview of weather station..................5 Operating elements and parts of the weather station and wireless sensor..... 6 How to set up........................7 Insert batteries...................... -
Page 3: Package Included
Package included: • UN0583 weather sta�on x 1 • T056I wireless sensor x 1 • 3 ba�eries - LR03 type (AAA) / 1.5 V (base unit) • 2 ba�eries - LR6 type (AA) / 1.5 V (wireless sensor) • Switching adapter for base unit •... -
Page 4: Product Functions
Note: With the continuous development and improvement of our products, the design and technology may be changed. Product functions Weather station • High-definition colour display • 12- or 24-hour display •Alarm with snooze function • Indoor temperature display in °C/°F •... -
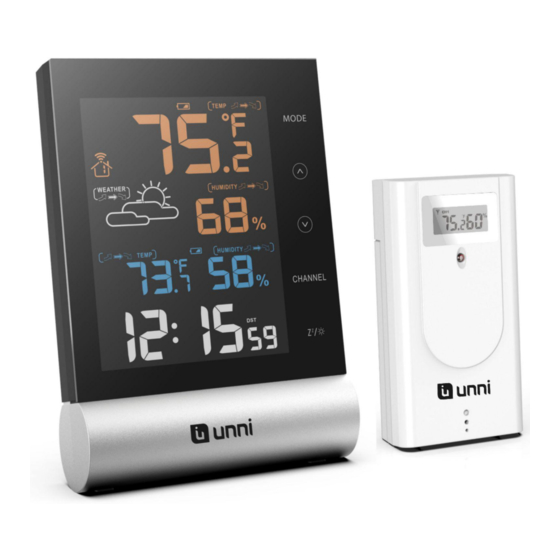
Page 5: Overview Of Weather Station
Overview of weather station 1. Alarm symbols 11. Maximum outdoor temperature 2. Current time 12. Outdoor temperature 3. Maximum indoor temperature 13. Low battery indicator for outdoor 4. Indoor temperature 14. Outdoor temperature trend 5. Indoor temperature trend 15. Outdoor humidity trend 6. -
Page 6: Operating Elements And Parts Of The Weather Station And Wireless Sensor
Operating elements and parts of the weather station and wireless sensor Operating buttons Button MODE * Display alarm time * Activate settings mode * Save changes to settings Button (Up) * Set values (increase) * Display stored MAX and MIN values Button (Down) * Set values (decrease) -
Page 7: How To Set Up
Current transmission channel Temperature display Humidity display Red pilot light Symbol for radio frequency connection between base unit and wireless sensor (display only appears when the transmission is occurring) Loop for hanging Sliding switch 1 2 3: Set sensor number (transmission channel) Battery compartment Note: If you are going to use the wireless sensor included in the package, there is no need to... -
Page 8: Setting The Weather Symbol
Setting the weather symbol When the weather station is connected to the adapter or batteries on the first time, it will enter the weather symbol setting. You can follow below steps. 1.You will see the weather symbol starts flashing, and the default is half sunny. It will automatically adjust to the correct symbol. -
Page 9: Setting The Basic Data
Setting the basic data • Press and hold the MODE button for 3 seconds till the DST OFF starts flashing, now you are in the basic settings. • To adjust the DST ON/OFF through button. • Then press the MODE button to confirm and jump to the next setting. Below are the setting orders: 1.DST ON/OFF 2.Year... -
Page 10: Setting The Alarm
Setting the alarm There is alarm on the weather station. You can set it through below steps. 1.Long press the MODE button till the time starts flashing. 2.Set the desired hour for the alarm with the button. 3.Press MODE button to store the setting and enter the minute setting. 4.Set the desired minute for the alarm with the button. -
Page 11: Backlight (Hi-Low-Off)
The default of DST is off. If it is on, the DST symbol will appear during the DST period and display above the "second". Backlight (HI-LOW-OFF) • When the base unit is plugged in, the backlight is adjustable: HI-LOW-OFF. • You can press the button to adjust backlight. -
Page 12: Daily Max/Min Data
Daily MAX/MIN data All MAX / MIN temperature/humidity records will reset automatically at 12:00 (midnight). From normal display, press and release the button to view: • MAX-- indoor and outdoor temperature/ humidity records. • MIN-- indoor and outdoor temperature/ humidity records. Note: Press the button to delete the highest and lowest temperature and humidity values since midnight. -
Page 13: How To Add Extra Sensors
How to add extra sensors The weather station comes with one wireless sensor. However, you can operate the weather station with up to three wireless sensors. Additional wireless sensors are available in our Amazon online shop. Note: 1. You need to set different channels for the sensor (1-3). You can set it through pull the stick on near the batteries. -
Page 14: Where The Sensor Should Be Placed
Where the sensor should be placed 1. Sensor can be hung/placed. 2. Better place it under the porch and eaves. 3. The maximum range of the sensor can reach 328ft in an open area. 4. Make sure that the sensor is vertical so that moisture can be drained correctly. Note:... -
Page 15: Safety
• Clean the battery contacts and also those of the device prior to battery installation. • Ensure the batteries are installed with correct polarity (+ and -). • Remove batteries from equipment when it is not used for an extended period of time. •... -
Page 16: Unpacking And Checking
Unpacking and checking 1. Remove the device from the packaging, remove all protective films and keep the packaging materials out of the reach of children. 2. Dispose of the materials separately according to type. 3. Check that all the items that should be included in the delivery are present and whether the weather station displays any damage. -
Page 17: Trouble Shooting
Warranty and support Unni Technology, Ltd. provides a 1-year limited time warranty (from date of purchase) on this product relating to manufacturing defects in materials & workmanship. Before returning a product, please contact our friendly customer support with questions:...
Need help?
Do you have a question about the UN0583 and is the answer not in the manual?
Questions and answers