Advertisement
Table of Contents
QUICK START GUIDE FOR USING THE
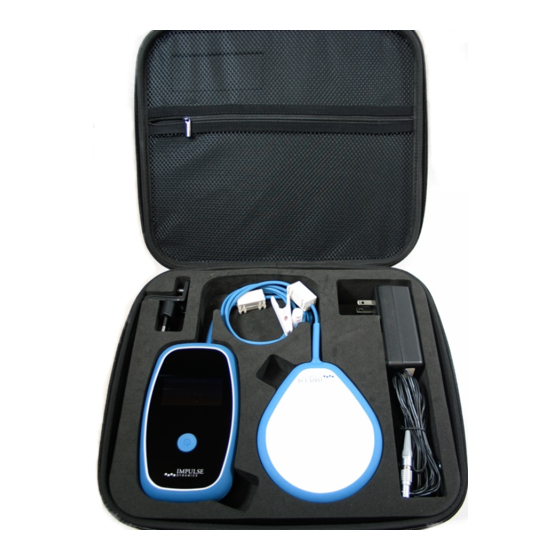
Vesta Charger System Components
Charging Wand
Cable Clip
E.U. Plug
Adapter
Vesta
Charger
Figure 1: Vesta Charger System Components
Vesta Charger (with attached charging wand and charging wand
•
cable clip) – used to charge your OPTIMIZER Smart Mini IPG.
AC Adapter – used to charge the internal battery of the Vesta
•
Charger.
E.U. / U.S. Plug Adapters – plug adapters for the AC Adapter,
•
allowing the AC Adapter to be connected to wall outlets in the E.U.
and the U.S.
Carrying Case – used to store and transport the Vesta Charger
•
System.
Impulse Dynamics (USA) Inc.
VESTA CHARGER
Carrying Case
Charging
Wand
1
AC Adapter with
attached U.S.
Plug Adapter
12-250-006-XX, Rev 00
Advertisement
Table of Contents

Summary of Contents for AIM HIGHer VESTA
- Page 1 Vesta Charger (with attached charging wand and charging wand • cable clip) – used to charge your OPTIMIZER Smart Mini IPG. AC Adapter – used to charge the internal battery of the Vesta • Charger. E.U. / U.S. Plug Adapters – plug adapters for the AC Adapter, •...
- Page 2 QUICK START GUIDE FOR USING THE VESTA CHARGER Connecting the AC Adapter to the Vesta Charger 1. Turn the Vesta Charger around so that the back of the charger is facing up. 2. Remove the protective cover flap from the power input connector located next to the base of the charging wand cable.
- Page 3 4. Line up the red dot on the DC output connector of the AC Adapter with the red line on the power input connector of the Vesta Charger (see Figure 3) and then insert the DC output connector into the power input connector.
- Page 4 Vesta Charger. 2. When the Charger Self-Charge Success screen is displayed on the Vesta Charger (see Figure 4), the Vesta Charger battery is fully charged, as indicated by the checkmark above the charge level indicator in the center of the screen.
- Page 5 2. Determine the location of your OPTIMIZER Smart Mini IPG (typically right upper chest area). Drape the wand cable around your neck and then place the flat side of the Vesta charging wand (the side with the four blue rubber screw covers) directly over your OPTIMIZER Smart Mini IPG implant site (over your clothes).
- Page 6 QUICK START GUIDE FOR USING THE VESTA CHARGER 4. The IPG Data Download screen will be displayed as the Vesta Charger downloads information from your OPTIMIZER Smart Mini IPG. See Figure 7. Figure 7: IPG Data Download Screen 5. When the data download has been successfully completed, the Vesta Charger will display the IPG Data Download Success screen accompanied by 3 short beeping tones.
- Page 7 OPTIMIZER Smart Mini IPG is being charged. 9. When the battery of your OPTIMIZER Smart Mini IPG is fully charged, the Vesta Charger will emit three short beeping tones and display the IPG Charging Successfully Completed screen, indicated by the flashing checkmark in the center of the screen (see Figure 10).
- Page 8 Call Doctor Code (preceded by a letter denoting the IPG model code) such as the one shown in Figure 12 is displayed by the Vesta Charger, followed by the Snooze Buzzer or Snooze Alert screen (see Figures 13 and 14), take note of the code displayed by your charger and then press the Power Button on the Vesta Charger to snooze the activated alert.
Need help?
Do you have a question about the VESTA and is the answer not in the manual?
Questions and answers