Table of Contents
Advertisement
Quick Links
basic precautions should always be followed,
1. Read all instructions.
2. Use heat press only for its intended use.
3. To reduce the risk of electric shock, do not immerse the heat press in water or
other liquids.
4. Never pull cord to disconnect from outlet, instead grasp plug and pull to
disconnect.
5. Do not allow cord to touch hot surfaces, allow heat press to cool completely before
storing.
6. Do not operate heat press with a damaged cord or if the equipment has been
dropped or damaged.To reduce the risk of electric shock, do not disassemble or
attempt to repair the heat press. Take it to a qualified service person for
examination and repair. Incorrect assembly or repair could increase the risk of fire,
electric shock, or injury to persons when the equipment is used.
7. This appliance is not intended for use by persons (including children) with reduced
physical, sensory or mental capabilities, or lack of experience and knowledge,
unless they have been given supervision or instruction concerning use of the
appliance by a person responsible for their safety.
8. Close supervision is necessary for any heat press being used by or near children.
Do not leave equipment unattended while connected.
9. Burns can occur when touching hot metal parts.
10. To reduce the likelihood of circuit overload, do not operate other high voltage
equipment on the same circuit.
11. If an extension cord is necessary, then a 20 amperage rated cord should be used.
Cords rated for less amperage may overheat. Care should be taken to arrange the
cord so that it cannot be pulled or tripped over.
Operation Manual
(GS-205B Plus)
Safety Instructions
When using your heat press,
including the following:
1
Advertisement
Table of Contents

Subscribe to Our Youtube Channel
Related Manuals for Galaxy Press GS-205B Plus


Summary of Contents for Galaxy Press GS-205B Plus
-
Page 1: Safety Instructions
Operation Manual (GS-205B Plus) Safety Instructions When using your heat press, basic precautions should always be followed, including the following: 1. Read all instructions. 2. Use heat press only for its intended use. 3. To reduce the risk of electric shock, do not immerse the heat press in water or other liquids. -
Page 2: Table Of Contents
Table Of Contents Safety Instructions………………………..1 Technical Parameters……………………3 Machine View……………………………..4 Control Panel Guide……………………...5 Operating Instructions……………………6-9 Connecting the System…………………………………………...…6 Turning the System On…………………………………….……..…6 Adjusting the Temperature……………………………………..…...7 Adjusting the Time………………………………………………..7 Adjusting the Pressure…………………………………………..…..7 Printing and Pressing…………………………………………..…..8 Switch Between F/C……………………………………………..…..8 ... -
Page 3: Technical Parameters
Technical Parameters Model: GS-205B Plus Heater Size: Max:L300mm*arc L:226mm Power(120volt) 300W,2.7A Power(240volt) 300W,1.4A Temperature Range: Max.200℃/392℉ Time Range: 0~999S Machine Size: 39.8×45.5×26.4cm Packing Size: 52.cm*47.5cm*32.5cm Packing Weight: 12Kg Net weight: 8.6Kg Certificate: CE,FCC Warranty: One year on whole machine except heaters... -
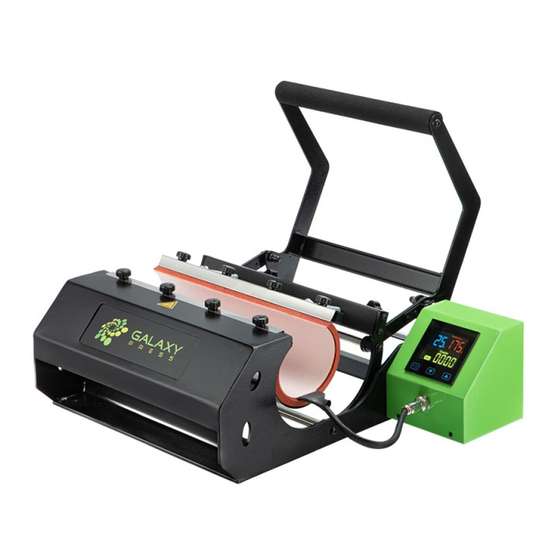
Page 4: Machine View
Machine View... -
Page 5: Control Panel Guide
Control Panel Guide... -
Page 6: Operating Instructions
Operation Instructions 1.Connecting the System 1.1 Connect the power cord into a 1.2 VOLTAGE properly grounded electrical outlet 120 Volt – The GS-205B requires a full 10 with a sufficient amperage rating. amp grounded circuit for 120 volt operation. 240 Volt –The GS-205B requires a full 7 amp grounded circuit for 240 volt operation. -
Page 7: Adjusting The Temperature
3.Adjusting the Temperature 3.1 Press the “set” button once time. “Temperature” lights will illuminate, press the “up” and “down” button to set target start temperature (see figure 3.1) 3.2 Press the “set” button second time. “Setting” lights will illuminate, press the “up”... -
Page 8: Printing And Pressing
6.Printing And Pressing Once your equipment has reached the designated start temperature: Position mug and application and proceed to press. This procedure will start the automatic timing process. Please note machine will heat up from start temperature to printing temperature ... -
Page 9: Temperature Clibration
8.Temperature Calibration 8.1 Press “set” button for 4 seconds to 8.2 Press “set” button to select “Pb” mode enter into second level menu.Display (See figure 8.2) as below.(see figure 8.1) 8.3 press “up” and “down” button to make 8.4 Press “set” button 4 seconds to quit. temperature calibration. -
Page 10: Exploded Views And Parts List
Exploded Views And Parts List Material No. Part Name(Chinese) Part Name(English) J.03.05.0908 底座-205B Plusx1 Machine base J.03.03.0038 脚垫 XDD1710-148x4 Rubber foot J.03.06.0117 半圆头螺栓-黑 M4-10 Ball headed bolt M4*10 J.03.04.0127 柱形门磁 M8 Magnet switch J.02.04.0145 航空插头 4 芯(插座) 4phase avaiation plug(Female) J.03.04.0148 Circuit board GSK-H08 控制板... - Page 11 J.03.04.0078 双排三位栅栏接线排 Terminal block J.03.05.0609 Base board of control box 控制盒底板-205B-钣金 J.02.04.0131 可控硅 DX146-10 Traic DX146-10 J.03.05.0610 Control box-205B 控制盒焊接-205B-钣金 J.03.04.0079 船型开关 RK1-01 On-off switch J.02.04.0141 Fuse assembled 玻璃保险管座装线-12 J.03.04.0077 IEC 插座 DB-14-1 Socket DB-14-1 J.03.05.0912 Holding shaft-205B plus 支架撑轴-205B plus J.03.03.0057 Washer 20x10x1.8 black 胶垫圈-20x10x1.8 黑...
- Page 12 J.03.05.0915 Short arm link 205B plus 连杆-205B plusx2 J.03.06.0092 塞打螺栓-黑 M6-8-12 Shoulder screw M6-8-12 J.03.03.0122 Washer 15x8x3.5 black 胶垫圈 15-8-3.5 黑 J.03.03.0140 Block washer-black 尼龙限位圈-黑 J.03.06.0117 半圆头螺栓-黑 M4-10 Ball headed bolt M4*10 J.03.06.0231 Pressure screw knob 五星把手-M10-D40 J.03.06.0275 Flat washer 6-10-1 平垫-6-10-1 J.03.06.0142 Shoulder screw M5-6*12...
-
Page 13: Electrical Schematic
Electrical Schematic...
Need help?
Do you have a question about the GS-205B Plus and is the answer not in the manual?
Questions and answers