
Subscribe to Our Youtube Channel
Related Manuals for VPD 2 in 1 Smart

Summary of Contents for VPD 2 in 1 Smart
- Page 1 BLOOD GLUCOSE MONITORING SYSTEM SYSTÉM MONITOROVANIA GLUKÓZY V KRVI USER’S GUIDE NÁVOD NA POUŽITIE...
- Page 2 Thank you for your purchasing the 2in1. SMART System. Please read this User’s Guide thoroughly before using to ensure correct operation. Please keep this User’s Guide in safe place for your future refer- ence.
- Page 3 The 2in1. SMART combined with a Smart Phone, can be used to measuring your blood glucose level whenever you need. The 2in1. SMART uses the operating system of your Smart Phone and is very easy and simple to operate. Automatic coding by the 2in1.
- Page 4 Features The 2in1. SMART system is easy and intuitive with smart phone. The small size with stylish design and easie operation is always with you wherever you go. The 2in1. SMART uses the power of smart phone. The 2in1. SMART is no need battery.
-
Page 5: Table Of Contents
Table of Contents Before Starting About 2in1. SMART System Name and Funtion Cautions Instaling the Application Obtaining Blood Drop About Alternate Site Testing Testing Your Blood Glucose Control solution testing Reviewing Results Troubleshooting Caring for System Performance Characteristics Specifications Warranty Technical support... -
Page 6: Before Starting
Before Starting Symbols Caution, see instructions for use Single use only Expiration date Serial number Lot number In Vitro Diagnostic medical device Manufacturer Authorised representative Symbol for temperature limitation Consult instructions for use Biological risks Contains sufficient for <n> tests Direct current Separate disposal from otherhousehold waste... - Page 7 Before Starting Indications for Use 2in1. SMART Blood Glucose Monitoring System is intended for the quantitative measurement of glucose (sugar) in fresh capillary whole blood samples drawn from the fingertips, forearm, upper arm, hand, thigh or calf as an aid in monitoring the effectiveness of diabetes management at home by patients with diabetes.
- Page 8 Before Starting changing rapidly). 2in1. SMART Blood Glucose Monitoring System is intended to be used by the Apple iPhone 3GS, iPhone 4, iPhone 4S, iPod touch 4th generation, iPad and iPad 2. Test Principle The 2in1. SMART System is based on detection of a small electrical current variation, which produced by the reaction of glucose in the blood...
-
Page 9: About 2In1. Smart System
About 2in1. SMART System 2in1. SMART System includes: 1. 2in1. SMART Meter 2. Carrying Case 3. Lancing Device 4. 2in1. Blood Glucose Test Strips 5. Lancets Document in your system include this USER’S GUIDE. If any items are missing, call your local distributor. Smart phone not included, and must be purchased separately. -
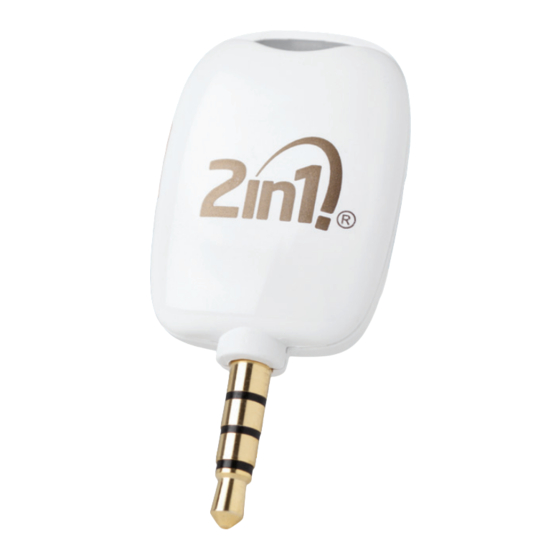
Page 10: Name And Funtion
Names and Functions 2in1. SMART meter Test Strip Port Insert the end of a 2in1. teststrip here. Power Indicator Turn on when the meter is ready to test. Phone Plug Insert into your smart phone ear phone jack. - Page 11 Names and Functions 2in1. Test Strips Sample Tip The fresh blood sample drawn into. Electrodes Insert the test strip into port until stop while facing up.
-
Page 12: Cautions
Cautions Cautions for System • The 2in1. SMART is intended for use outside the body (in vitro diagnostic use). • The 2in1. SMART is only use fresh capillary whole blood samples. • Do not use the 2in1. SMART system diagnosis, screening diabetes without the guidance of a healthcare professional or for the... - Page 13 Cautions • The 2in1. SMART meter must use with 2in1. Test Strip and 2in1. Control Solution. • The 2in1. SMART system contains small parts that may be dangerous if swallowed. • Check the packages when purchas- ing and before using the 2in1. SMART system.
- Page 14 Cautions Cautions for Test Strip • Store test strip in a cool, dry place between 2°C ~ 32°C (36°F ~ 90°F). • Keep away from direct sunlight and heat. • After taking a test strip out of the vial, close cap tightly and immediately. •...
- Page 15 Cautions • Use test strips within 3 months (90 days) after opening the vial cap. • By clean and dry hands, you may touch when taking out test strip and/or insert to port. • Do not bend, cut, or modify test strips.
- Page 16 Cautions • Avoid 2in1. SMART being exposed to high temperature, high humidity, rain and/or dust when using or storing. • When your 2in1. SMART has been exposed to extreme temperature, do not test until the 2in1. SMART reach to room temperature for 20 minutes at least.
-
Page 17: Instaling The Application
Installing the Application The 2in1. SMART system can work by the 2in1. SMART application. The 2in1. SMART application is free of download from the App Store. To download directly on your smart phone, tap on the App Store icon and select the Search tab at the bottom of the screen. -
Page 18: Obtaining Blood Drop
Obtaining Blood Drop STEP 1 Wash your hands carefully with warm water to increase the circulation of the blood into the fingers. Dry hands thoroughly until the finger to be pricked is completely dry. STEP 2 Unscrew the cap of the lancing device by turning it counter- clockwise while... - Page 19 Obtaining Blood Drop STEP 3 Insert a new sterile lancet into the lan- cet holder. STEP 4 Twist the cap of the lancet off.
- Page 20 Obtaining Blood Drop STEP 5 Put the cap of the lancing device back on and turn it clockwise. STEP 6 Hold the lancing device firmly and pull back the sliding barrel.Now the lancing device is cocked.
- Page 21 Obtaining Blood Drop STEP 7 Set the proper depth of penetration by rotating the cap of lancing device. 1-2 for soft or thin skin, 3 for average skin, 4-5 for thick or calloused skin. STEP 8 Place the lancing device on pricked site. Hold the lancing device firmly against the side of the finger, with the cap resting on the finger (The harder it is...
- Page 22 Obtaining Blood Drop CAUTION To reduce the infection possibilities: • Make sure to wash the puncture site with soap and water before sampling. • Do not share a lancet or a lancing device with others. • Always use a new lancet - lancets are for single use only.
-
Page 23: About Alternate Site Testing
About Alternate Site Testing The 2in1. SMART meter lets you obtain a blood sample from your Upper arm, Forearm, Hand, Thigh or Calf. Obtaining a drop of blood from these “alternate site” may be less painful than a fingertip sample. Following figure shows the areas where you can test with the 2in1. - Page 24 About Alternate Site Testing CAUTION Do not test on alternate sites: • When think your blood glucose level is changing rapidly, such as within two hours of exercise, a rapidacting insulin injection or insulin pump bolus or within two hours after a meal. •...
-
Page 25: Testing Your Blood Glucose
Testing Your Blood Glucose STEP 1 Execute the 2in1. SMART application on your smart phone by tapping icon. If there is no 2in1. SMART application, please install the application first. (See page 17) - Page 26 Testing Your Blood Glucose STEP 2 Plug the 2in1. SMART meter into your headphone jack. You may see a volume control dialogue box appears on screen. Make sure the headphone volume maximize for 2in1. SMART meter getting enough power. The white light of 2in1.
- Page 27 Testing Your Blood Glucose STEP 3 Insert the test strip while the electrode end facing up into the test strip port until stops gently. Do not push strongly.
- Page 28 Testing Your Blood Glucose STEP 4 “Apply Sample” tells the 2in1. SMART is ready to test. To marking as a control solution result, slide the bar at the bottom of the screen.
- Page 29 Testing Your Blood Glucose STEP 5 Touch the drop to test strip tip. Blood sample is drawn into test strip.
- Page 30 Testing Your Blood Glucose IMPORTANT The volume of blood sample must be at least 0.5 microliter (real size ” “).
- Page 31 Testing Your Blood Glucose STEP 6 The application shows counting prog- ress during 5 seconds. STEP 7 Your blood glucose test result is displayed, and stored into your smart phone.
- Page 32 Testing Your Blood Glucose CAUTION • When the test result is above 600 mg/dL (33.3 mmol/L), “HIGH” is displayed. • When the test result is lower than 10 mg/dL (0.5 mmol/L), “LOW” is displayed. STEP 8 You can add a note to a test result by selecting appropriate icon (pre meal, post meal, exercise, medication and stress) or typing your own comments.
- Page 33 Testing Your Blood Glucose CAUTION Used test strips and lancets may be considered as biohazardous wastes. Be sure to follow your local regulations for dispose properly. Unexpected results When the test result is lower than 50 mg/dL (2.8 mmol/L), or over than 250 mg/dL (13.8 mmol/L), or display “LOW”...
- Page 34 Testing Your Blood Glucose Range of expected results Blood glucose levels will vary depend- ing upon food intake, medication dos- ages, health condition, stress or exer- cise status. Consult your healthcare professional for the target value that is appropriate for you. Expected blood glucose levels for nonpregnant people without diabetes are:...
-
Page 35: Control Solution Testing
Contro Solution Testing 2in1. Control solution contains a known index of glucose, and is used for checking that 2in1. SMART and test strips are working properly or not. Control solution is optional. Do control solution test: • when doing practice the test process instead of using blood sample, •... - Page 36 Control Solution Testing STEP 1 Tap the 2in1 SMART icon on your smart phone to execute the application. If the 2in1. SMART application is not installed, install the application first (See page 17).
- Page 37 Control Solution Testing STEP 2 Plug the 2in1. SMART meter into your headphone jack. The volume control dialogue box is displayed. Make sure the headphone volume maximize for 2in1. SMART meter getting enough power. The white light of 2in1. SMART will turn on and “Insert Strip”...
- Page 38 Control Solution Testing STEP 3 Insert the test strip while electrode end facing up into the strip port until stop gently. Do not push the test strip strongly into the strip slot.
- Page 39 Control Solution Testing STEP 4 “Apply Sample” tells the 2in1. SMART is ready to test. Slide the button at the bottom of the screen, and the picture of control solution test is displayed.
- Page 40 Control Solution Testing STEP 5 Shake the control solution vial and remove the cap. Gently touch test strip tip to control solution drop. Hold until the counting progress starts.
- Page 41 Control Solution Testing STEP 6 The application shows counting prog- ress during 5 seconds. STEP 7 The control solution test result is dis- played on screen and stored into your smart phone automatically.
- Page 42 Control Solution Testing STEP 8 Compare the test result with the control solution range which is printed on test strip vial. A single control solution test within range shows that your meter and test strips are working properly. If the test result is not within this range, the 2in1.
- Page 43 Control Solution Testing Out of range results may be caused by: • when you are not comply the instruc- tions on this USER’S GUIDE • expired, contaminated or watered- down control solution, • expired or damaged test strip, • control solution test done out of temperature range 20°C to 25°C (68°F to 77°F), •...
-
Page 44: Reviewing Results
Reviewing Results The test results measured by 2in1. SMART system are stored in the smart phone. You can review your test results whether your 2in1. SMART meter is connected or not. STEP 1 When you execute the 2in1. SMART application by tapping the icon, the test results are displayed as a list. - Page 45 Reviewing Results STEP 2 By touching each of these results on a list shows a detailed information of result. IMPORTANT Message icon and Mail icon is to transfer the test results by SMS or E-mail. To secure the private information, using cellular data instead of Wi-Fi is recommended.
- Page 46 Reviewing Results STEP 3 When you rotate the smart phone to horizontally, the graph shows glucose test results at a horizontal axis which represents time and at a vertical axis which represents glucose level. The graph shows the glucose test results and trend by easy view.
-
Page 47: Troubleshooting
Troubleshooting Meter does not enter the test mode after inserting 2in1. SMART meter. Probable cause What to do 2in1. SMART is required Turn up the volume to to operate at maximum the maximum. volume. Contact your local Defective meter. distributor. Insert 2in1. - Page 48 Troubleshooting Meter does not enter the test mode after inserting 2in1. test strip. Probable cause What to do Insert the test strip Test strip is inserted with the printed side upside down, wrong up and the electrode end in, or incompletely end of the strip into inserted into the meter.
-
Page 49: Caring For System
Caring for System Storing your system Store your meter, strips and control solution in your carrying case after each use. Store each item in a cool, dry place below 32°C (90°F), but do not refrigerate. Keep all items away from direct sunlight and heat. - Page 50 Caring for System CAUTION • Do not use the strips or control solution after the expiration date on vial or the discard date(date first opened plus 3 months), or your results may be inaccurate. • Do not use test strips if the vial is damaged or left open in air.
- Page 51 Caring for System Cleaning your meter To clean up your meter, wipe the outside with a soft cloth dampened with water and mild detergent. Do not use alcohol or any chemical solvent. Do not remain any liquids, dirt, dust, blood, or control solution inside of the test port.
-
Page 52: Performance Characteristics
Performance Characteristics Clinical accuracy The 2in1. SMART is calibrated to yield results equivalent to plasma glucose concentrations and is traceable to a NIST standard. The accuracy of the 2in1. SMART System was assessed by com- paring blood glucose results obtained by patients with those obtained using a YSI 2300 Glucose Analyzer. - Page 53 Performance Characteristics Regression statistics Slope 0.9995 Intercept 1.0856 mg/dL 0.9874 No. of samples Range tested 33.6~433 mg/dL (1.8~24.0 mmol/L) Within run precision (100 venous blood tests per glucose level) Coefficient Standard Mean glucose of variation deviation 1.3 mg/dL 41 mg/dL (2.3 mmol/L) (0.07 mmol/L) 2.8 mg/dL 99 mg/dL (5.5 mmol/L)
-
Page 54: Specifications
Specifications Specifications Model PG-101 (2in1. SMART Blood Glucose Monitoring System) Test Method Electrochemical sensor Calibration Plasma Method Sample Whole blood, capillary 0.5 μL Sample Size Test Time 5 seconds Memory No limit Result Range 10~600mg/dL (0.6~33.3mmol/L) Hematocrit 20-60% Operating 10~40°C (50~104°F) Temperature Operating 10-90%... - Page 55 Specifications Electrical and safety standards The meter has been tested for immunity to electro static discharge as specified in IEC 61000-4-2. The meter has been tested for immunity to radio frequency interference at the frequency range and test levels specified in IEC 61000- 4-3.
-
Page 56: Warranty
Specifications Warranty VPD, Bled, d.o.o. warrants that your 2in1. SMART meter will be free of defects in materials and workmanship for 5 years, valid from the date of purchase. The warranty extends only to the original purchaser and is not transferable. -
Page 57: Technical Support
Tehnical support For setting the Apple devices NOTE: 2IN1. SMART APP IS NOT SEEN IN: TAIWAN, CHINA, USA. Please do check this: 1. HI VOLUME Please set your mobile phone to the maximumvolume possible 2. EU LIMIT OFF Check if there is an EU volume limitation on. - Page 58 Tehnical support 4. EQUALISER (Settings > General > Accessibility,) The Equaliser has to be set to centre or shut down. NO EQ must be selected (picture shows, that EQ is selected). 5. If you are using protective cover case, takeit off when inserting the 2in1. SMART device.
- Page 59 VPD, Bled, d.o.o. Pot na Lisice 4, 4260 Bled Slovenia, EU tel.: +386 4 574 50 70 fax: +386 4 574 50 71 email: info@vpd.si web: www.2in1.si Lancing device and Lancet Manufacturer: GMMC Rm 1112, Ace tower 9Th Bldg., 345-30,...
- Page 60 Ďakujeme, že ste si zakúpili systém 2in1. SMART. V záujme správneho používa- nia systému si najprv dôkladne preštudujte tento Návod na použi- tie. Odložte si tento Návod na použi- tie na bezpečné miesto, aby ste v prípade potreby mohli kedyko- ľvek do neho nahliadnuť.
- Page 61 Systém 2in1. SMART môžete v kom- binácii s vaším smartfónom používať na meranie hladiny glukózy v krvi ke- dykoľvek to budete potrebovať. 2in1. SMART používa operačný systém vášho smartfónu a veľmi ľahko a jed- noducho sa aplikuje. Automatické kó- dovanie systémom 2in1. SMART zabez- pečuje presné...
- Page 62 Charakteristika Systém 2in1. SMART sa ľahko a jed- noducho používa v kombinácii so smartfónom. Vďaka malému rozmeru, štýlovému dizajnu a nenáročnej aplikácii ho môžete mať vždy pri sebe, nech idete kamkoľvek. 2in1. SMART čerpá energiu smartfónu a pre jeho prevádzku nie sú...
- Page 63 Obsah Pred použitím O systéme 2in1.SMART Názov a funkcia jednotlivých súčastí Upozornenia Inštalácia aplikácie Odber vzorky krvi O testovaní z alternatívneho miesta odberu Testovanie hladiny glukózy v krvi Testovanie kontrolným roztokom Prehliadanie výsledkov Poruchy a ich odstránenie Starostlivosť o systém Charakteristika fungovania Špecifikácie Záruka Technická podpora...
-
Page 64: Pred Použitím
Pred použitím Symboly Pozor, pozri inštrukcie v Návode na použitie Len pre individuálne jednorazové použitie Dátum expirácie Sériové číslo Číslo šarže Zdravotnícka pomôcka pre diagnostiku in vitro Výrobca Autorizovaný zástupca Symbol pre teplotné obmedzenia Preštudujte si inštrukcie v Návode na použitie Biologické riziká Jednosmerný... - Page 65 Pred použitím Indikácie pre použitie Systém monitorovania glukózy v krvi 2in1. SMART je určený na kvantitatívne meranie glukózy (cukru) vo vzorkách čerstvej plnej kapilárnej krvi odobratej z bruška prstov, predlaktia, ramena, dlane, stehna alebo lýtka a slúži ako pomôcka monitorovania efektívnosti zvládania diabetu pacientmi s diabetom v domácom prostredí.
- Page 66 Pred použitím Testovanie odberom z alternatívnych miest sa môže vykonávať vtedy, keď je hladina glukózy stabilná (teda keď nedochádza k jej rýchlym zmenám). Systém monitorovania glukózy v krvi 2in1. SMART je určený na použitie v kombinácii s Apple iPhone 3GS, iPhone 4, iPhone 4S, iPod touch 4-tej generácie, iPad a iPad 2.
-
Page 67: O Systéme 2In1.Smart
O systéme 2in1. SMART Systém 2in1. SMART zahrňuje: 1. Glukomer 2in1. SMART 2. Puzdro 3. Odberové pero 4. Prúžky 2in1. na testovanie hladiny glukózy v krvi 5. Lancety Dokumentácia k vášmu systému zahrňuje aj tento NÁVOD NA POUŽITIE. Ak by niektorá súčasť z uvedeného príslušenstva chýbala, kontaktujte... -
Page 68: Názov A Funkcia
Názov a funkcie jednotlivých súčastí Glukomer 2in1. SMART Port pre testovacie prúžky Do portu glukomera vsuňte koniec testovacieho prúžku 2in1. Indikátor energie Zapnite, keď je glukomer pripravený na testovanie. Telefónny konektor Glukomer pripojte na váš smartfón vsunutím konektora do otvoru pre slúchadlá. - Page 69 Názov a funkcie jednotlivých súčastí Testovacie prúžky 2 in1. Časť prúžku pre vzorku krvi Na tento koniec prúžku naneste vzorku čerstvej krvi. Elektródy Týmto koncom s elektródami, ktoré sú na lícnej strane prúžka, vsuňte testovací prúžok až na doraz do portu glukomera. Pri vsúvaní...
-
Page 70: Upozornenia
Upozornenia Upozornenia k systému • Systém 2in1. SMART je určený na vonkajšie použitie (diagnostické použitie in vitro). • Pri aplikácii systému 2in1. SMART sa smú používať len vzorky čerstvej plnej kapilárnej krvi. • Nepoužívajte systém 2in1. SMART na diagnostikovanie a screening diabetu bez kontroly odborného lekára a ani na testovanie novorodencov. - Page 71 Upozornenia • Glukomer 2in1. SMART sa smie používať len s testovacími prúžkami 2in1. a kontrolným roztokom 2in1. • Systém 2in1. SMART obsahuje drobné súčasti, ktoré môžu byť nebezpečné, ak sa prehltnú. • Skontrolujte si balenia pri kúpe a pred použitím systému 2in1. SMART.
- Page 72 Upozornenia Upozornenia k testovacím prúžkom • Testovacie prúžky skladujte chladnom, suchom mieste pri teplote 2°C – 32°C (36°F – 90°F). • Nevystavujte prúžky priamemu slnečnému žiareniu ani horúčave. • Keď vyberiete testovací prúžok z tuby, túto ihneď a pevne uzavrite. • Ak tuba s prúžkami zostane otvorená dlhšiu dobu, namerané...
- Page 73 Upozornenia • Testovacie prúžky musíte použiť v priebehu 3 mesiacov (90 dní) od prvého otvorenia tuby. • Ruky musíte mať čisté a suché vždy, keď vyberáte prúžok z tuby a/alebo keď ho zasúvate do portu glukomeru. • Testovací prúžok neohýbajte, nestrihajte a ani inak ho neupravujte. Upozornenia ku glukomeru •...
- Page 74 Upozornenia • Glukomer 2in1. SMART nečistite chemickými rozpúšťadlami alebo abrazívnymi (drsnými) čistiacimi prostriedkami. • Chráňte glukomer 2in1. SMART pri používaní a skladovaní pred vysokými teplotami, vysokou vlh- kosťou, dažďom a /alebo prachom. • Ak bol váš glukomer 2in1. SMART vystavený vysokej teplote, nepoužite ho na testovanie dovtedy, kým znova nedosiahne izbovú...
-
Page 75: Inštalácia Aplikácie
Inštalácia aplikácie Systém 2in1. SMART je použiteľný s aplikáciou 2in1. SMART. Aplikácia 2in1. SMART je k dispozícii na stiahnutie zadarmo z App Store. Ak si chcete túto aplikáciu stiahnuť priamo na váš smartfón, kliknite na ikonu App Store a zvoľte Vyhľadávanie v spodnej časti displeja. Potom do vyhľadávacieho poľa v ... -
Page 76: Odber Vzorky Krvi
Odber krvnej vzorky KROK 1 Teplou vodou si dobre umyte ruky, aby ste zvýšili cirkuláciu krvi až do prstov. Ruky si dôkladne utrite, pretože prst, z ktorého budete robiť odber, musí byť úplne suchý. KROK 2 Odstráňte vrchnák z odberového pera jeho otáčaním proti smeru hodinových ručičiek, pero... - Page 77 Odber krvnej vzorky KROK 3 Vložte novú sterilnú lancetu do držiaka lancety na odberovom pere. KROK 4 Z lancety odstráňte krytku.
- Page 78 Odber krvnej vzorky KROK 5 Nasaďte späť vrchnák odberového pera jeho otáčaním v smere hodinových ručičiek. KROK 6 Držte pevne odberové pero a vysuňte pohyblivý piestik. Teraz je odberové pero napnuté a pripravené na odber.
- Page 79 Odber krvnej vzorky KROK 7 Požadovanú hĺb- vpichu nas- tavte otáčaním vrchnáka berového pera. Poloha 1 – 2 pre jemnú alebo tenkú pokožku, poloha 3 pre normálnu pokožku, poloha 4 – 5 pre hrubú alebo mozoľnatú pokožku. KROK 8 Odberové pero priložte k miestu vpichu. Pero pevne držte proti strane prsta vrchnákom položeným na prste (Čím silnejšie tlačíte, tým hlbší...
- Page 80 Odber krvnej vzorky UPOZORNENIE V záujme minimalizácie možnosti infekcie dodržujte nasledovné: • Pred odberom vzorky si vždy umyte miesto vpichu mydlom a vodou. • Lancetu odberové pero nepoužívajte spoločne so žiadnou inou osobou. • Použite vždy novú lancetu – lan- cety sú určené len na jednorazové požitie.
- Page 81 O testovaní z alternatívnych miest Glukomer 2in1. SMART vám umožňuje odobrať vzorku krvi z ramena, predlaktia, dlane, stehna a lýtka. Odber krvnej vzorky z týchto “alternatívnych miest“ môže byť menej bolestivý ako odber vzorky z bruška prsta. Nasledujúci obrázok vyznačuje miesta, na ktorých môžete vykonávať testovanie použitím aplikácie 2in1.
- Page 82 O testovaní z alternatívnych miest UPOZORNENIE Odber z alternatívnych miest nevykonávajte v týchto prípadoch: • Ak zistíte, že vaša hladina glukózy v krvi sa veľmi rýchlo mení, napr. v priebehu dvoch hodín pri pohy- bovej aktivite, rýchlo účinkujúcej inzulínovej injekcii alebo boluso- vej dávke z inzulínovej pumpy alebo v priebehu dvoch hodín po jedle.
-
Page 83: Testovanie Hladiny Glukózy V Krvi
Testovanie hladiny glukózy v krvi KROK 1 Spustite vašom smartfóne aplikáciu 2in1. SMART kliknutím na príslušnú ikonu. Ak nemáte aplikáciu 2in1. SMART inštalovanú, aplikáciu si najprv nainštalujte (Pozri str. 75). - Page 84 Testovanie hladiny glukózy v krvi KROK 2 Pripojte glukomer 2in1. SMART na váš smartfón tak, že konektor glukomera vsuniete do otvoru pre slúchadlá. Na displeji sa objaví dialógové okno pre kontrolu hlasitosti. Skontrolujte, či je hlasitosť slúchadiel na maxime, aby mal glukomer 2in1.
- Page 85 Testovanie hladiny glukózy v krvi KROK 3 Testovací prúžok držte otočený tak, aby elektródy na jeho jednom konci boli na lícnej strane prúžka a týmto koncom s elektródami ho zasúvajte jemne na doraz do portu glukomeru. Nevsúvajte ho do portu príliš veľkou silou.
- Page 86 Testovanie hladiny glukózy v krvi KROK 4 Pokyn “Apply Sample“ (Aplikujte vzorku) v hornej časti displeja znamená, že 2in1. SMART je pripravený na testo- vanie. Na prepnutie do režimu testova- nia kontrolným roztokom posuňte pole v dolnej časti displeja v smere šípky.
- Page 87 Testovanie hladiny glukózy v krvi KROK 5 Prst s kvapkou krvi priložte ku koncu testovacieho prúžka. Vzorka krvi sa nasaje do prúžka.
- Page 88 Testovanie hladiny glukózy v krvi DÔLEŽITÉ Objem krvnej vzorky musí byť minimálne 0.5 mikrolitra (skutočná veľkosť ” “).
- Page 89 Testovanie hladiny glukózy v krvi KROK 6 Aplikácia zobrazuje proces odpočítava- nia po dobu 5 sekúnd. KROK 7 V tomto kroku sa výsledok testovania vašej hladiny glukózy v krvi zobrazí na displeji a uloží do pamäti vášho smartfónu.
- Page 90 Testovanie hladiny glukózy v krvi UPOZORNENIE • Ak je výsledok testovania vyšší ako 600 mg/dl (33.3 mmol/l), na displeji sa zobrazí “HIGH“ (vysoká hladina). • Ak je výsledok testovania nižší ako 10 mg/dl (0.5 mmol/l), na displeji sa zobrazí “LOW“ (nízka hladina).
- Page 91 Testovanie hladiny glukózy v krvi UPOZORNENIE Použité testovacie prúžky a lancety sa považujú za biorizikový odpad. Pre ich správnu likvidáciu dodržiavajte príslušné lokálne nariadenia. Neočakávané výsledky Ak je výsledok testovania nižší ako 50 mg/dl (2.8 mmol/l) alebo vyšší ako 250 mg/dl (13.8 mmol/l ) alebo ak displej zobrazí...
- Page 92 Testovanie hladiny glukózy v krvi Rozsah očakávaných výsledkov Hladina glukózy v krvi sa môže meniť v závislosti od príjmu potravy, dávok užívaných liekov, zdravotnej kondície, stresu alebo pohybovej aktivity. Poraďte sa s vaším odborným lekárom o cieľovej hodnote, ktorá je pre vás najvhodnejšia. Očakávané...
-
Page 93: Testovanie Kontrolným Roztokom
Testovanie kontrolným roztokom Kontrolný roztok 2in1. obsahuje určitý známy index glukózy a používa sa vtedy, keď je potrebné overiť, či systém 2in1. SMART a testovacie prúžky fungujú správne alebo nie. Kontrolný roztok je voliteľnou súčasťou systému. Testovanie kontrolným roztokom vyko- návajte v týchto prípadoch: •... - Page 94 Testovanie kontrolným roztokom KROK 1 Kliknite na ikonu 2in1. SMART na vašom smartfóne, aby ste spustili túto aplikáciu. Ak nemáte aplikáciu 2in1. SMART inštalovanú, aplikáciu si najprv nainštalujte (Pozri str. 75).
- Page 95 Testovanie kontrolným roztokom KROK 2 Pripojte glukomer 2in1. SMART na váš smartfón tak, že konektor glukomeru zasuniete do otvoru pre slúchadlá. Na displeji sa zobrazí dialógové pole pre kontrolu hlasitosti. Presvedčte sa, či je hlasitosť slúchadiel na maxime, aby mal glukomer 2in1. SMART dostatok energie.
- Page 96 Testovanie kontrolným roztokom KROK 3 Testovací prúžok držte otočený tak, aby elektródy na jeho jednom konci boli na lícnej strane a týmto koncom ho jemne na doraz zasuňte do portu glukomeru. Testovací prúžok nezasúvajte do portu príliš veľkou silou.
- Page 97 Testovanie kontrolným roztokom KROK 4 Pokyn “Apply Sample“ (Aplikujte vzorku) v hornej časti displeja znamená, že 2in1. SMART pripravený testovanie. Posuňte tlačidlo v spodnej časti displeja a systém sa prepne do režimu testovania kontrolným roztokom s príslušným zobrazením.
- Page 98 Testovanie kontrolným roztokom KROK 5 Potraste fľaštičkou s kontrolným roztokom a odstráňte z nej vrchnák. Jemne priložte ku koncu testovacieho prúžka, aby ste mohli naňho kvapnúť kontrolný roztok. Podržte tak dlho, kým sa nezačne proces odpočítavania.
- Page 99 Testovanie kontrolným roztokom KROK 6 Aplikácia zobrazuje proces odpočítava- nia po dobu 5 sekúnd. KROK 7 Na displeji sa zobrazí výsledok testova- nia kontrolným roztokom a automaticky sa uloží do pamäti vášho smartfónu.
- Page 100 Testovanie kontrolným roztokom KROK 8 Porovnajte výsledok testovania kontrolným roztokom s kontrolným rozsahom uvedeným tube s testovacími prúžkami. Jednoduchý test kontrolným roztokom, ktorého výsledok sa pohybuje v rámci tohto kontrolného rozsahu ukazuje, že váš glukomer a testovacie prúžky fungujú správne. Ak je výsledok testu mimo tohto rozsahu, glukomer 2in1.
- Page 101 Testovanie kontrolným roztokom KROK 9 Odstráňte použitý testovací prúžok a kliknutím na “save“ (uložiť) uložte výsledok testovania do pamäti. Príčinou výsledkov mimo rozsahu môže byť: • nedodržanie inštrukcií v tomto NÁVODE NA POUŽITIE, • expirovaný, kontaminovaný alebo inak znehodnotený kontrolný roztok, •...
-
Page 102: Prehliadanie Výsledkov
Prehliadanie výsledkov Výsledky testovania, namerané sys- témom 2in1. SMART, sa ukladajú do pamäti vášho smartfónu. Svoje výsledky si môžete na smartfóne prehliadať bez ohľadu na to, či máte alebo nemáte na ňom pripojený glukomer 2in1. SMART. KROK 1 Keď kliknutím na ikonu spustíte aplikáciu 2in1. - Page 103 Prehliadanie výsledkov KROK 2 Kliknutím na ktorýkoľvek z týchto výsledkov na zozname sa zobrazia podrobné informácie k zvolenému výsledku. DÔLEŽITÉ Ikony Správy a E-mail slúžia na odosielanie výsledkov testovania buď formou SMS správy alebo E-mailu. Na ochranu súkromných informácií odporúča použiť...
- Page 104 Prehliadanie výsledkov KROK 3 Ak otočíte smartfón do horizontálnej polohy, graf zobrazený na displeji ukazuje výsledky testovania glukózy, pričom horizontálna os reprezentuje čas a vertikálna os reprezentuje hladinu glukózy. Graf v jednoduchom prehľade ukazuje výsledky testovania ako aj ich vývoj. KROK 4 Kliknutím na niektorý...
-
Page 105: Poruchy A Ich Odstránenie
Poruchy a ich odstránenie Po pripojení glukomeru 2in1. SMART na smartfón aplikácia neumožní spustiť režim testovania. Možná príčina Náprava Glukomer 2in1. SMART Zvýšte hlasitosť na musí pracovať pri max- maximum. imálnej hlasitosti. Kontaktujte svojho Chybný glukomer. lokálneho distribútora. Pripojte glukomer Glukomer 2in1. SMART 2in1. - Page 106 Poruchy a ich odstránenie Po vsunutí testovacieho prúžka 2in1. do glukomeru aplikácia neumožní spustiť režim testovania. Možná príčina Náprava Testovací prúžok je do Vložte testovací prúžok glukomeru zasun- potlačenou, teda utý naopak, teda lícnou stranou hore nesprávnym koncom a tým koncom, kde sú alebo nie je zasunutý...
-
Page 107: Starostlivosť O Systém
Starostlivosť o systém Skladovanie systému Po každom testovaní uložte glukomer, prúžky a kontrolný roztok do puzdra. Všetky súčasti skladujte na suchom a chladnom mieste pri teplote do 32°C (90°F), nie však v chladničke. Všetky súčasti systému chráňte pred priamym slnečným žiarením a horúčavou. Ihneď... - Page 108 Starostlivosť o systém control solution within 3 months after the first opening. Testovacie prúžky a kontrolný roztok majú dátum expirácie vytlačený na svojom obale. Keď prvýkrát otvoríte tubu s testovacími prúžkami alebo kontrolný roztok, musíte tento dátum zapísať na etiketu ich obalu. Použite všetky testovacie prúžky a ...
- Page 109 Starostlivosť o systém Čistenie glukomeru Povrch glukomeru utrite mäkkou handričkou navlhčenou vodou a jemným čistiacim prostriedkom. Nepoužívajte alkohol žiadne chemické rozpúšťadlá. Vo vnútri portu glukomeru pre vkladanie testovacích prúžkov nesmú zostať žiadne zvyšky tekutín, špiny, prachu, krvi alebo kontrolného roztoku. Čistenie odberového pera Povrch odberového pera utrite mäkkou handričkou navlhčenou...
-
Page 110: Charakteristika Fungovania
Charakteristika fungovania Klinická presnosť Systém 2in1. SMART je kalibrovaný tak, aby poskytoval výsledky ekvivalentné ku koncentráciám glukózy v plazme a zodpovedal štandardu NIST. Pres- nosť systému 2in1. SMART bola stano- vená na základe porovnania výsledkov nameranej glukózy v krvi získaných od pacientov s ... - Page 111 Charakteristika fungovania Štatistika regresie Odklon 0.9995 Intercept 1.0856 mg/dL 0.9874 Počet vzoriek Testovaný rozsah 33.6~433 mg/dL (1.8~24.0 mmol/L) V rámci priemernej presnosti Štandardná Koeficient Stredná hodnota glukózy odchýlka variácie (mmol/L) 1.3 mg/dL 41 mg/dL (2.3 mmol/L) (0.07 mmol/L) 2.8 mg/dL 99 mg/dL (5.5 mmol/L) (0.16 mmol/L) 2.9 mg/dL 131 mg/dL (7.3 mmol/L)
-
Page 112: Špecifikácie
Specifications Špecifikácie Model PG-101(Systém monitoro- vania glukózy v krvi 2in1. SMART) Metóda Elektrochemický senzor testovania Metóda kalibrácie Plazma Vzorka Plná krv, kapilárna 0.5 μL Veľkosť vzorky Doba testovania 5 sekúnd Pamäť Neobmedzená Rozsah výsledku 10 ~ 600 mg/dL (0.6 ~ 33.3 mmol/L) Hematokrit 20 - 60 % Pracovná... - Page 113 Špecifikácie Elektrické a bezpečnostné štan- dardy Glukomer bol testovaný na odolnosť proti elektrostatickému výboju podľa špecifikácie v IEC 61000-4-2 . Glukomer bol testovaný na odolnosť proti rušeniu rádiovej frekvencie pre frekvenčný rozsah a úrovne testovania ako sú špecifikované v IEC 61000-4-3. Glukomer bol testovaný na elektromag- netické...
-
Page 114: Záruka
Špecifikácie Záruka Firma VPD, Bled, d.o.o. poskytuje 5-ročnú záruku na to, že glukomer 2in1. MICRO bude fungovať bez chýb v materiáloch a vyhotovení. Záruka je platná od dátumu kúpy, vzťahuje sa len na pôvodného kupujúceho a je neprenosná. Krstné meno a priezvisko: Adresa: Telefónne číslo:... -
Page 115: Technická Podpora
Technická podpora Nastavenie na zariadeniach Apple POZNÁMKA: 2IN1. SMART APP NIE JE K DISPOZÍCII PRE: TAJWAN, ČÍNU, USA. Skontrolujte si, prosím, nasledovné: 1. ÚROVEŇ HLASITOSTI Nastavte si svoj mobil na najvyššiu možnú úroveň hlasitosti. 2. VYPNUTIE OBMEDZENIA HLASITOSTI (EU) Skontrolujte, či máte zapnuté... - Page 116 Tehnical support povolenie prístupu zvoľte ON (zapnúť). 4. EKVALIZÉR (EQ) (Nastavenia > Všeobecné > Prístup- nosť) Ekvalizér musí byť vypnutý. NO EQ must be selected (picture shows, that EQ is selected). 5. Ak používate ochranné puzdro na telefón, odstráňte ho predtým než pripojíte zariadenie 2in1.
- Page 117 Hotline 2: +421 905 600 200 VÝHRADNÝ DISTRIBÚTOR PRE SR: N – Point s.r.o. Záhradnícka 153, 821 08 Bratislava Slovenská republika VPD, Bled, d.o.o. Pot na Lisice 4, 4260 Bled Slovenia, EU tel.: +386 4 574 50 70 fax: +386 4 574 50 71 email: info@vpd.si...
- Page 118 VPD, Bled, d.o.o. Pot na Lisice 4, 4260 Bled Slovenia, EU tel.: +386 4 574 50 70 fax: +386 4 574 50 71 email: info@vpd.si web: www.2in1.si Lancing device and Lancet Manufacturer: GMMC Rm 1112, Ace tower 9Th Bldg., 345-30,...
Need help?
Do you have a question about the 2 in 1 Smart and is the answer not in the manual?
Questions and answers