
Summary of Contents for Clymen Q7
- Page 1 Q7 User Manual Please watch our video manualon the website: www.clymen.com Please send us an email with subject Extra Warranty to service@clymen.com to get an extra 3 months warranty.
-
Page 2: Table Of Contents
Table of Contents SAFETY INSTRUCTIONS..........3 FUNCTION OVERVIEW..........4 REPLACEABLE COMPONENTS.........5 COMPONENTS............6 OPERATING..............8 MAINTENANCE............13 SPECIFICATION............15 COMMON FAILURE.............16 HAZARDOUS SUBSTANCE.........17... -
Page 3: Safety Instructions
Safety Instructions Before using this product, read the following safety instructions and follow routine safety precautions. Please carefully read this manual. Please keep this manual well. Not following the instructions may damage your robot cleaner Caution Besides our certified service technicians, no one may disassemble, repair or modify the product. Do not use any charger other than the one included. -
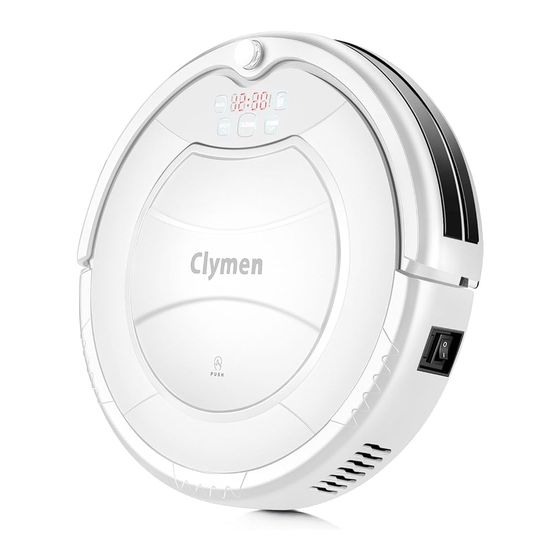
Page 4: Function Overview
Function Overview Robot overview Infrared signal receiver Panel Bumper Middle cover Universal wheel Auto-recharging poles Left side brush Right side brush Battery cover Suction inlet Right wheel Left wheel Bottom cover Middle cover Dustbin Power jack Power Switch Dustbin Cover Primary filter HEPA filter HEPA bracket... -
Page 5: Replaceable Components
Replaceable components Replaceable components of the product are as follows: Battery cover Battery Right side brush Universal wheel component Suction tunnel flap Left side brush component Bottom cover Left side brush component Right side brush component Left wheel component Right wheel component Fan component Surface cover... -
Page 6: Components
Components Panel Plan Spot Clean Home display “ ” Display time setting, progress, recharging status, and error codes, etc. Display “ ” Error display.。 display “ ”” Turn constantly on for a full dustbin or a choked suction tunnel. 。 Cleaning button “... - Page 7 Components Robot and Accessories Item Number Robot Recharging dock Remote control(without battery) Adapter Cleaning components Manual Manual...
-
Page 8: Operating
Operating Multiple Cleaning Mode 1. Auto-cleaning The robot will clean the room automatically under self-cleaning mode, and switch among different cleaning modes according to floor status. 2. Spot cleaning Place the robot beside the position needing spot cleaning and start the robot. 3. - Page 9 Operating Power on/Pause/Sleep Power on A. Make sure to turn on the power switch at the bottom. B. Press the CLEAN button on the remote or the robot to start cleaning. Pause Pause means to switch from working to selection mode, and the following operation can pause the robot:...
- Page 10 Operating Remote Control Automatic cleaning Cleaning plan Spot cleaning Direction Forward Backward Left Right Clean/Power button Wall-following cleaning Mechanism of this remoter is similar to a TV remoter. First turn on the switch on its bottom, then control the robot using buttons on it, such as turning on/off the robot, spot cleaning, wall-following cleaning, cleaning plan, and self-recharging.
- Page 11 Operating Cleaning Plan You can order the robot to start cleaning at a specific time. Cleaning plan of this product indicates delayed start (maximum delayed time is 23 hours and 45 minutes). For example, if you plan delayed time of 6:30 at the 9 o’clock, the robot will start working after 6 hours and 30 minutes, i.e.
- Page 12 Operating Charging Dock Infrared signal window Set the charging dock Signal indicator Top cover Recharging terminals Power jack 1. As shown above, the dock should be pushed against the with no obstacle two meters in front of and one meter to the left and right of the dock. 2.
-
Page 13: Maintenance
Maintenance Cleaning side brushes A. Status check: Check if the side brushes are damaged or dirty. B. Clean side brushes with the small brush or a soft cloth. C. Replace the side brush that is too damaged to work. Cleaning the dustbin and filters A. - Page 14 Maintenance Cleaning sensors and recharging poles A. Polish sensors and recharging poles of the robot with a soft cloth or small brush at the following locations 。 B. Polish the recharging terminals of the charging dock with a soft cloth or small brush at the following locations.
-
Page 15: Specification
Specifications Category Item Parameter Diameter 340mm Structure 95mm Height Weight 2.8±0.5kg Voltage 14.4V Electronics Battery LI-I0N 2000mAh Power Dustbin capacity 0.5L Type of recharging Self-recharging/Manual recharging Self-cleaning, spot cleaning, Cleaning Cleaning mode wall-following cleaning, planned cleaning Recharging time About200-300min Single cleaning time ≥90min Type of Button on Robot LED touch buttons... -
Page 16: Common Failure
Common Failures Warning Codes In case of common failures, following warning codes shall be displayed on the screen. Warning Code Cause Troubleshooting Left wheel stops working Check the left wheel Right wheel stops working Check the right wheel Robot suspended in midair Place the robot back to the floor First, clean the cliff sensor. -
Page 17: Hazardous Substance
Hazardous Substance Name and content of hazardous substances in the product Hazardous Substance Polybro- Polybrom Name of minated Friendly inated Lead Mercury Cadmi- Hexavalent Component biphenyl diphenyl (Pb) (Hg) chromium (PBB) Period ethers (Cd) (Cr6+ ) Plastic parts Mother board Screen component Drive wheels Side sweeping wheel...
Need help?
Do you have a question about the Q7 and is the answer not in the manual?
Questions and answers