
Related Manuals for Skim-A-Round The Floating Skimmer

Summary of Contents for Skim-A-Round The Floating Skimmer
- Page 1 Important FOR BEST RESULTS Please watch the setup videos at: Skim-A-Round.com/setup Installation Manual SKIM-A-ROUND 2430 Vanderbilt Beach Road, Suite 108 Naples, Florida 34109 US Patent US9879439...
- Page 2 Extra or Replacement Skimmer Traditional wall skimmers rarely provide enough suction to pull debris in from across the pool. The Skim-A-Round can be added to the pool or spa as an extra skimmer, or even as a replacement skimmer. Just plug Skim-A-Round into the vacuum line, or even into the bottom hole of an existing wall skimmer.
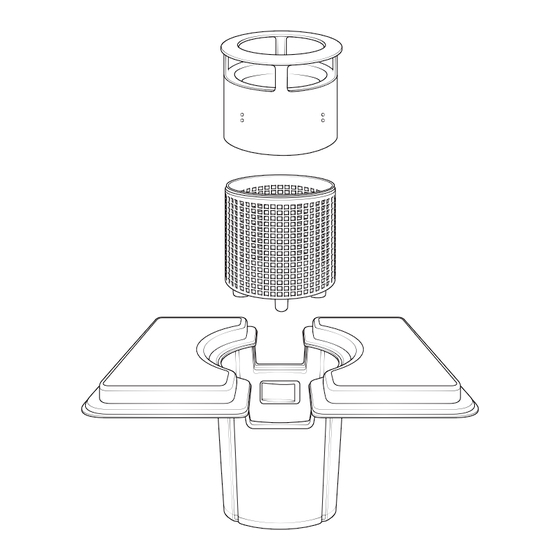
- Page 3 Parts Air-Tight Adapter Debris Trap Basket Hose Connector: (For Vacuum Attachment Only) Hose Connector: (Stand Alone Skim-A-Round only) Body Velocity Increaser (2) (For Vacuum Attachment Only) Adapter for Zodiac Vacuums Regulator (Stand Alone Skim-A-Round only) (Stand Alone Skim-A-Round only)
-
Page 4: Installation
Installation The Skim-A-Round may be installed as a stand alone, floating skimmer or as a vacuum attachment. Please follow the installation for the desired setup. Installation as a Stand Alone Skimmer Important! Check if the pool, or spa, has at least two open suction lines. If the pool, or spa, doesn’t have at least two open... - Page 5 Ensure the connection is tight. 9. Attach the hoses to the cone shaped portion of the Hose Connector. 10. Place the Skim-A-Round into the pool until the wings are floating on the water surface. 11. Connect the hoses to a wall skimmer or side wall vacuum port.
- Page 6 NOTE: Attaching to an existing pool vacuum does not require the use of any additional hose sections. If you received additional hose sections with your Skim-A-Round, these will only be needed when using as a stand-alone skimmer 1. Turn off the pool pump/filtration system.
- Page 7 11. Attach the remaining hose(s) to the cone shaped portion to the right side of the Hose Connector. 12. Place the vacuum head and the Skim-A-Round into the pool. 13. Connect the Debris Trap onto the top of the basket.
- Page 8 Increase Suction *If your pool pump is not providing enough suction to run the floor vacuum and the Skim-A-Round simultaneously, first ensure that the bottom drain valve, by your pool pump is closed (Seen In Diagram - page 9), and that any existing regulator valves from your existing vacuum have been removed.
- Page 9 Skim-A-Round. To decrease suction to your Skim-A-Round, ensure that the bottom drain valve is open. If your bottom drain valve is already open, you can decrease suction further by installing the regulator. See 'Installing...
-
Page 10: Troubleshooting
4. Repeat steps 1- 3 on the opposite side of the Skim-A-Round body. 5. Completely close the Skim-A-Round valve 6. Turn pool pump on; Slowly open the Skim-A-Round valve until it begins to skim the surface. (NOTE: Skim-A-Round will now require significantly less flow.) - Page 11 Emptying the Basket 1. Turn the Pool Pump off. 2. Slowly pull the Skim-A-Round to the edge of the pool. 3. Pull the basket out by the handle. 4. Disconnect the Debris Trap from the Basket. 5. Empty the debris from the Basket.
Need help?
Do you have a question about the The Floating Skimmer and is the answer not in the manual?
Questions and answers