Table of Contents
Advertisement
Quick Links
This quick start guide provides the user very basic information required to make the E10
controller pulse solenoid valves and to make changes to the time and pressure settings. The
user is referred to the E10 manual for detailed connection and setup information and all
safety and warning instructions. The E10 should only be installed by a suitably qualified
person and all local electrical standards must be observed.
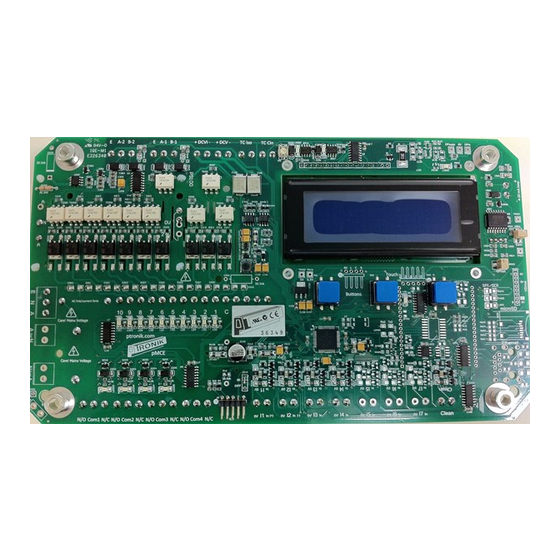
Top Board Layout
Bottom Board Layout
Output Relays
Fuse (AC
version)
110/240
VAC
Input
Solenoid
Valve
Outputs
Modbus RTU and/or
extension cards
Quick Start Guide
E10 Master Controller
Input Sensors
24VDC connections
24VDC Input
for tube cleaning valves
Or Output
LCD Screen
Three Button
Interface
Cleanup
Advertisement
Table of Contents

Related Manuals for PTronik E10

Summary of Contents for PTronik E10
- Page 1 Quick Start Guide E10 Master Controller This quick start guide provides the user very basic information required to make the E10 controller pulse solenoid valves and to make changes to the time and pressure settings. The user is referred to the E10 manual for detailed connection and setup information and all safety and warning instructions.
- Page 2 Connecting Power and Solenoid Valves If the E10 has been purchased as a complete unit then undo the 4 dome nuts and remove the face plate. Remove the PCB from the brass spacers to access the bottom of the board.
- Page 3 The main run page gives the user a snap shot of the current status of the dust collector. There is a lot of information on this screen so please take a minute to read this section. Indicates the model of the PTronik controller. Visually the E10, E10 MODEL OF PTronik CONTROLLER and E10 look very similar.
- Page 4 To modify the controller timer settings, enter the middle Select button. This page specifies the number of valves connected to the E10. To alter the number of valves connected to the system use the left DOWN or right UP buttons. When the desired number of valves has been entered enter the middle SET button.
- Page 5 Enter DONE to return to the main menu or NEXT to test and pulse another valve Further Assistance Required? If a full manual or further assistance is required then please contact PTronik Tel: +61 2 4578 9611 Website: https://www.ptronik.com/contact-us Email: sales@ptronik.com...
Need help?
Do you have a question about the E10 and is the answer not in the manual?
Questions and answers