Table of Contents
Advertisement
Quick Links
Advertisement
Table of Contents

Summary of Contents for Pneumex PneuBack Chair
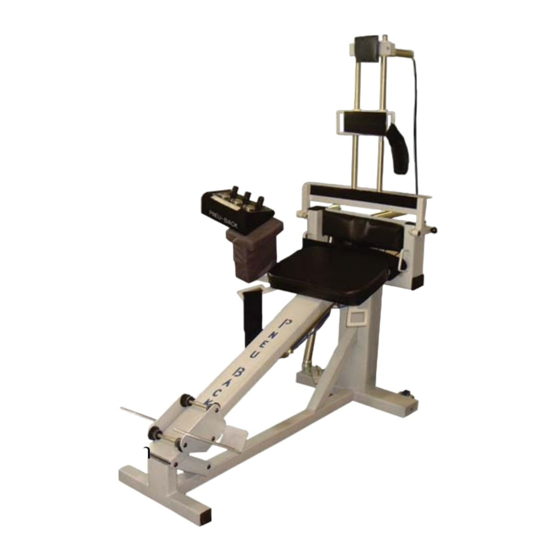
- Page 1 PneuBack Chair™ Assembly Manual Key Benefits Increase range of motion Stabilize the pelvis Patent 6672998 Postural changes Limited ROM Strength/recruitment issues Hyper/hypo mobile Post acute/chronic Genuine Pneumex Equipment Pneumex, Inc. 800.447.5792 pneumex.@pneumex.com...
- Page 2 Distributed by Pneumex, Inc. Protocols by Pneumex Pneumex, PneuGait Foot Strap, PneuMAP, PneuBack Chair, PneuWeight, PneuWalker and PneuVest are trade‐ marks of Pneumex, Inc. Copyright 2003 Pneumex All rights reserved Visit our web site at www.Pneumex.com Pneumex, Inc. 2605 North Boyer Ave.
-
Page 3: Table Of Contents
Exercise Arm Assembly Box 3 ........11 Attach Air Cylinders ..........12 Attach Control Panel Assembly ....... 13 Connect Air Hoses ............ 13 Testing The PneuBack Chair ........14 Specifications ............15 PneuBack Chair Parts ..........16 PneuBack Chair Protocols ........18 Using Chair ............... -
Page 4: Preface & Liability
Preface This manual contains the operating instructions and service re‐ quirements for the PneuBack Chair system. The manual is de‐ signed for use by clinical staff use and it is expected that the clini‐ cians will instruct their patients and clients in the proper use of the system and its accessories. -
Page 5: Indications /Contra-Indications For Use
Post‐surgical patients may need Doctors consent. Safety Requirements Read this manual in full before using the PneuBack Chair. Do not start the PneuBack Chair until you are sure the patient is properly secured. Do not operate this equipment in the presence of flammable anes‐... -
Page 6: Description And Use
Description and Use The Chair will stabilize the pelvis to help eliminate the use of stom‐ ach and leg muscles to hold up the back and encourage the use of the smaller spinal muscles to support, and strengthen the back. Once set up in the chair with pelvic and spinal stabilization provid‐... - Page 7 Schedule Service No scheduled service is required. For service, call Pneumex: USA & Canada: 800‐447‐5792 International: 208‐265‐4105 Preventive Maintenance Routinely check the air hose, air fittings, and compressor for leaks. Check the Velcro belts for fraying. Trouble Shooting Problem Possible Cause...
-
Page 8: Pedestal Assembly-Box 1
PneuBack Chair™ Your PneuBack Chair™ comes to you in three boxes Pedestal Assembly Box # 1 Lay pedestal flat on ground (on carpet or Air Cylinder cardboard to prevent scratching) Locate air fitting inside bottom of pedestal. Seat Hooks See Fig 2 Remove the nut that is on the side with the short hose. -
Page 9: T-Base Assembly Box 2
T-Base Assembly Box # 2 Using the 7/32” T‐Handle Hex Alignment Mark Gusset Key wrench supplied, remove the screw from each end of gusset. Position edge of one end of Riser gusset on the mark next to the hole located on the T‐ T Base Base. -
Page 10: Seat Assembly
Seat Assembly Remove belt tie‐down from seat assembly then lay seat assembly on floor with the cushion side down. Remove lock‐nuts from bolts and position belt tie‐downs. See Fig‐6 . Put lock‐nuts back on bolts and tighten completely. Belt Tie-Down Lock-Nuts Axle Locks Fig 6... -
Page 11: Exercise Arm Assembly Box 3
Exercise Arm Assembly Box # 3 Cervical Slider Stabilization Slider Exercise Arm Control Panel Resistance Pad Stabilization Belts Stabilization Pad Interchange Block Air cylinders Lumbar Roll Fig 8 Cervical Exercise Block... -
Page 12: Attach Air Cylinders
Remove lock‐nuts from pivot bolts, See Positioning Fig. 9 place pivot bolts so that the threaded ends are even with the bronze bushings. Pull positioning pins out and twist 1/4 turn, lock into position. Pivot Bolts Fig. 9 Hold the exercise arm assembly in place on pedestal See Fig. 10 and tighten the pivot bolts completely (Then back off... -
Page 13: Attach Control Panel Assembly
Install and tighten the four screws. *Note Control panel can also be placed on the left side of chair. Call Pneumex for this procedure. Connect Air Hoses Install the blue hose from the control panel into the T fitting attached to the air cylinder. -
Page 14: Testing The Pneuback Chair
Connect air hose from compressor to the air inlet on the pedestal. Make sure compressor is on and filled, then open valve on compressor to allow air to flow to the PneuBack chair. Turn the ‘Stabilization’ regulator slowly to the right until the foot trolley moves all the way up and the stabilization pad moves all the way out. -
Page 15: Specifications
The needle in the gauge should move up and down. Turn the regulator up to approx. 30 PSI. Let the PneuBack Chair sit with air pressure on for several minutes while listening and checking for air leaks. If an air leak develops during this step or any of the previous steps contact Pneumex for assistance. -
Page 16: Pneuback Chair Parts
PneuBack Chair™ Parts Thoracic Stabilizatio PneuBack Chair Accessories: Exercise Pad Lumbar Roll Control Panel Cervical Block Mobilization Wedges Knee bolster Thigh Restraint Belt Seat Foot Stabilization Cylinder Foot Truck... - Page 17 Thoracic/Cervical Exercise Exercise Pad Cylinder Positioning Handles on Belt Stabilization Bar abilization Pin Velcro for Mobilization Wedges Pelvic Stabilization Cylinder Pelvic Stabilization Pad Seat Belt Lumbar Exercise Cylinder Wheels Air Inlet Seat Angle Adjustment Riser 13” (Flattened) Position)
-
Page 18: Pneuback Chair Protocols
The exercise protocols for each patient are generated by the software, Pneumex Analysis that comes with the Pneu‐MAP™ however, the therapist may want to alter protocols slightly because of initial patient evaluation or after reviewing post‐exercise results. -
Page 19: Stabilizing Patients
Stabilizing Patients In The Chair Patients should always be warmed up before using the PneuBack Chair™. CAUTION: Be sure all regulators are turned to zero before putting anybody in or taking anybody out of the Chair. 1. Have the patient sit in the Chair with their feet up on a stool, and push the sacrum firmly against the stabilization pad. -
Page 20: Setting Resistance Levels
The stabilization may be released between sets if the patient finds the constant pressure to be too much. If you let the stabilization down between sets, be sure the patient does not slide down in the chair. Re‐engage stabilization before beginning next level. Hyper‐mobile Facet Joint You will stabilize above this joint in order to strengthen that area. -
Page 21: Set And Repetitions
Sets and Repetitions Our exercise protocols call for one set of 10‐15 repetitions at each level. Care should be taken to assure proper mechanics. Be sure the patient is working through a full but controlled range of motion with a smooth, controlled repetition. During each exercise, have patient perform slow controlled movements holding for a full three seconds in full extension. -
Page 22: Position One- Position Two
Position One- Assure that the patient is stabilized with no more than 1/2” Extension on pelvic stabilization cylinder. Cranial apex Stabilizer bar to mid scapula exer‐ Mid ‐scapula cise cylinder to cervical apex Unpin both stabilization pins and pressurize at 25 psi initially lumbar ... -
Page 23: Position Three- Position Four
Position Three- Pin position constant with 2 adjust stabilization bar and cervical / thoracic cell to indicated level on T1 Top of pad T7 Top of bar ROM flex limited to not lose con‐ tact with stabilization bar ... -
Page 24: Lumbar Exercise
Lumbar Exercise Computer Logic: If lumbar curve is <10, use a Exercise pad lumbar roll. If lumbar curve is between 10 Stabilization bar and 15, precede with regular general exercise. Lumbar roll If lumbar curve is greater than 15, flatten seat angle. - Page 25 NOTE: Initially, many patients will only be able to get to a neutral position as monitored by the exercise arm relative to upright post on the pedestal (see Figure 2) When doing this exercise (goal +30° 72° total), have the patient place hands on opposite shoulder and instruct them to minimize thoracic rounding, excessive head movement, etc.
-
Page 26: Lower Thoracic Exercise
Stabilized Lower Thoracic Exercise Computer Logic Maintain lumbar positioning per Lumbar Exercise Pinning position If lean is <0, use 1 position. If lean is between 0 and 2.5, use 2 position. If lean is between 2.5 and 6.5, use 3 position. - Page 27 The Thor/Cerv regulator is now activated and the patient will be instructed to bend forward (let cylinder push out) while maintaining contact with stabilization pad. If the patient breaks contact with the pad, a lower set of spinae erectors will come into play. The easiest way to teach the patient to perform this exercise correctly is to place your free hand beneath the sternum and have the patient bend over your hand.
-
Page 28: Upper Thoracic Exercise
Stabilized Upper Thoracic Exercise Following the exercise protocol printout for the upper thoracic, we first adjust the top of the upper slider to the vertebral level indicat‐ ed. Once this position is set, we adjust the top of the stabilization bar (middle slider) to the position indicated. - Page 29 NOTE: The most difficult area for many new users of the Chair to adjust to is learning to educate the patient to ensure correct recruit‐ ment, to monitor the patient to prevent substitution, and to ascer‐ tain when muscle groups have fatigued. STABILIZATION &...
- Page 30 Stabilized Cervical Exercises Computer Logic Maintain lumbar positioning per Lumbar Exercise. Maintain lean per Stabilized Thoracic Exercise. Minimal‐If cervical curvature < 8, stabilize at T4 and resistance at C4. Excessive‐If cervical curvature <12, stabilize at T4 and resistance at cranial apex. Normal‐If cervical curvature is between 8 and 12, stabilize at T4 and alternate resistance between C4 and cranial apex.
- Page 31 Once the patient can achieve a neu‐ tral position, this exercise will be done with neutral being the furthest anterior point we want the patient working in. Head movement should be straight back with no tilting Fig 7 motion. As with the earlier exercis‐ es, our primary goals in this exercise are quality of recruitment range of motion.
- Page 32 Your Warranty If a product purchased from Pneumex does not operate properly, Pneumex will repair or replace it at no charge, for up to one year from the date shipped. In the course of repair or replacement, Pneumex may send you written recommendations on how to prevent a problem from occurring again.
Need help?
Do you have a question about the PneuBack Chair and is the answer not in the manual?
Questions and answers