Table of Contents
Advertisement
Quick Links
Tools & Requirements for Install:
Wire Cutter / Stripper
o (12/14/16 gauge stranded)
Insulated Connector Wire Crimper
Heat Gun for heat shrink
Digital Multi-meter (to measure DC – Voltage / Current)
Installation
To connect to your battery - open your battery compartment under the
drivers / passenger seat and locate the main battery terminals that provide
the car with 48 or 36 volts DC. Diagram is on page three (3).
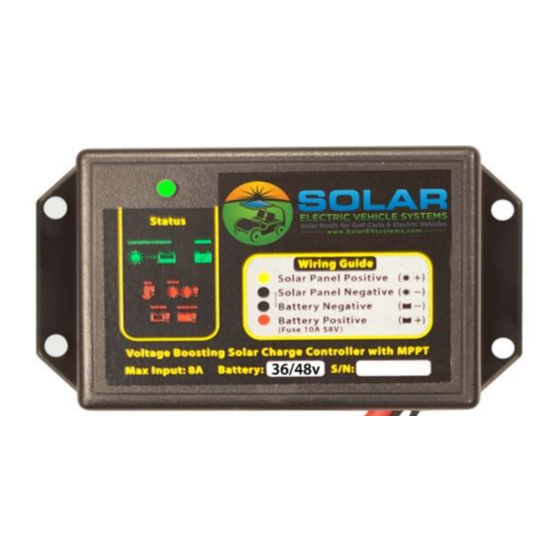
WIRING Connections:
Solar Panel Connection (Solar EV Cable):
Panel Cable Red is + / Positive
Panel Cable Black is - / Negative
Battery Connections:
Positive (Red) w/ Fuse Holder
Negative (Black)
Always Cut and Crimp / Connect EACH WIRE INDIVIDUALLY
Heat-shrink each connector carefully to not melt the individual wires
You may experience a spark when connecting the controller to
the main battery terminals – this is 100% normal – the controller
does hold a charge from the built in capacitors.
to
Yellow Wire - Controller
to
Black Wire - Controller
Advertisement
Table of Contents

Summary of Contents for Solar EV Systems SEV36-8-WP
- Page 1 Tools & Requirements for Install: Wire Cutter / Stripper o (12/14/16 gauge stranded) Insulated Connector Wire Crimper Heat Gun for heat shrink Digital Multi-meter (to measure DC – Voltage / Current) Installation To connect to your battery - open your battery compartment under the drivers / passenger seat and locate the main battery terminals that provide the car with 48 or 36 volts DC.
- Page 2 Charge Controller Status Lights The Solar EV Systems MPPT - Maximum Power Point Tracking Solar Battery Charger a status LED. When you first connect your charger to the battery, The LED will blink red and then green for approximately one second, so that you can confirm that the LED is operational. During operation, the LED blinks green to indicate that your charger is powered and charging, and the LED may blink red to indicate errors.
- Page 4 EXCLUSIONS: Solar EV Systems LLC will not be responsible for labor charges, loss, or consequential damage of any kind or character caused by defective parts or for charges incurred in the replacement or repair of defective parts by Purchaser. This warranty does not apply when damage is caused by sand or abrasive materials, chemical deposits, collision, unreasonable/unintended use, improper installation, non- approved alteration/modification, corrosion, neglect and acts of god.
Need help?
Do you have a question about the SEV36-8-WP and is the answer not in the manual?
Questions and answers